AU
An AU Link plug-in can be inserted into each DAW track, and there is no limit to how many Link plug-ins can be inserted in the DAW. This means one or more tracks can be transferred at the same, which can greatly speed up your workflow.
The AU Link transfer operates like a "real-time" bounce to disk and therefore will take as long as the selected audio plays. This might be efficient, if transferring several tracks to Revoice Pro (RVP) at the same time. An alternative to consider (particularly with longer files) is using a faster-than-real-time export or "bounce" of audio files containing the desired tracks, and then dragging these files into Revoice Pro.
The examples in this section use Logic Pro as the DAW, but the AU plug-in should also work with other DAWs that use AU plug-ins.
We recommend that you name the tracks in the Revoice Pro Session to help identify the source of the transferred audio. In the example below, we've left the Revoice Pro Tracks named Audio 1, Audio 2 and Audio 3.
DAW Setup
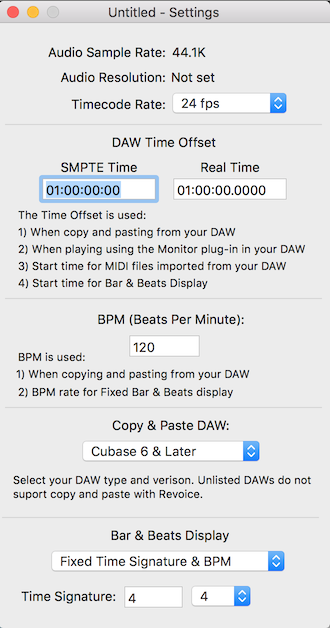
Make sure you check in the Revoice Pro View > Settings window (shown right), that Revoice Pro's DAW Timecode Offset / SMPTE Time is set to the same Offset as the Logic Pro File > Project Settings > Synchronization... options. Logic normally sets this by default to 1 hour, which we also do in Revoice Pro. The Time display will show the actual corresponding running time, based on the Timecode Rate.
The DAW setting does not affect performance with AU plug-ins.
Inserting the Link plug-in
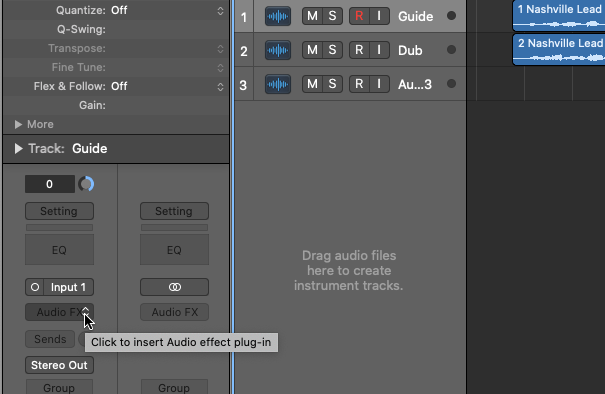
On each Logic track to be processed by RVP, insert the RevoiceProLink AU plug-in (it does not have to be the first in the list, but any plug-ins before it will have an effect on audio transferred to RVP):
- In Logic's Track area inspector for the track concerned, press the Audio FX button.
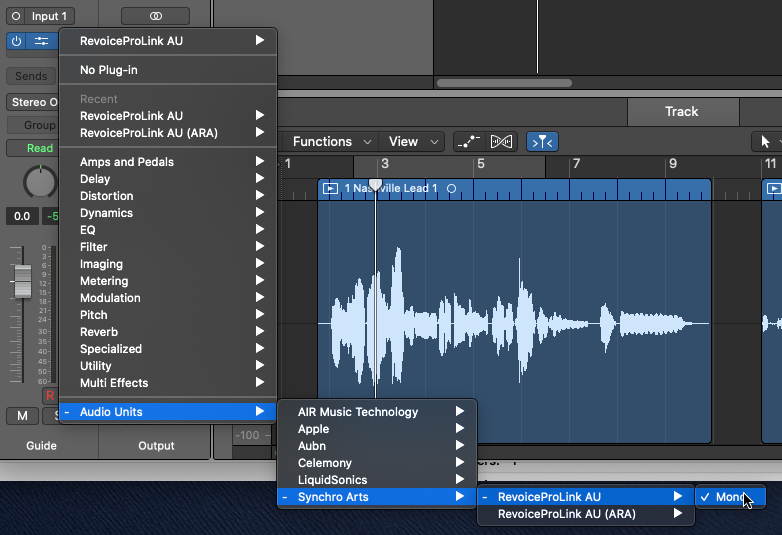
- In the menu that appears, select: Audio Units > Synchro Arts > RevoiceProLink AU > Mono.
(If you have already used the RevoiceProLink AU plug-in, you may also be able to select it immediately from the Recent list at the top of the menu.)
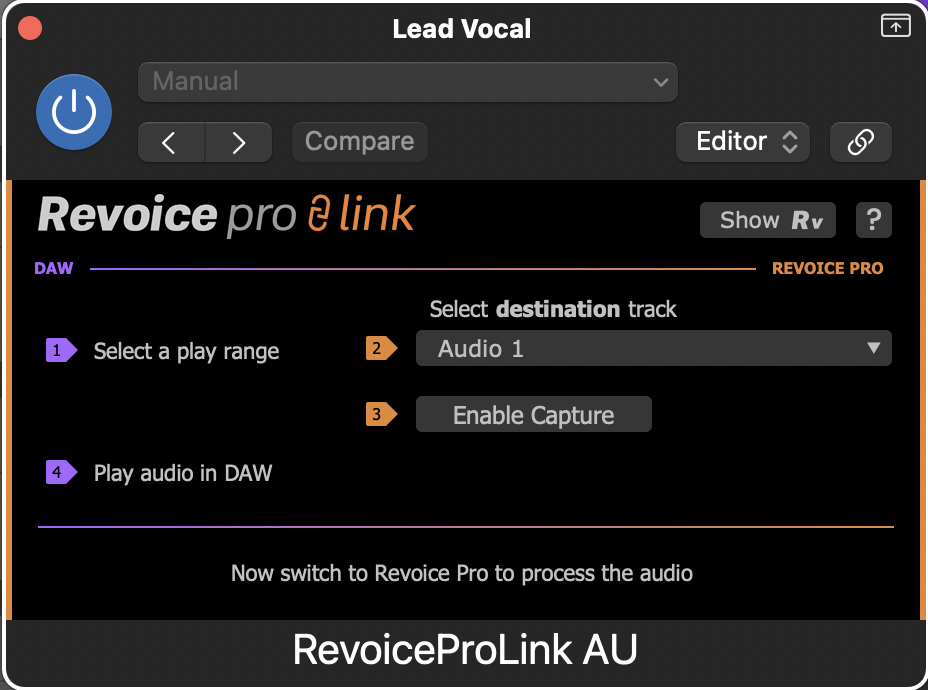
- Once selected, you will see the Revoice Pro Link plug-in control window (below). At the top are the standard plug-in controls. (Detailed information about header controls is available in the Logic Help system.)
- Repeat this insert operation on all the tracks that you want to transfer to RVP (you will need to set appropriate destination track numbers on all tracks, see next section).
Opening and showing Revoice Pro
There is a button in the plug-in window that enables you to Start RVP if it is not already open, or to Show RVP if it is open and you want to reveal its session window:

Plug-in control window
Once an RVP session is open, you will see the audio capture functions in the Link plug-in control window, which are described in detail in the following sections. Essentially, audio from Logic has first to be captured by RVP, processes are applied manually in RVP, then the processed audio is transferred back to Logic.
Revoice Pro Link Switch

To transfer audio using any of the Link Plug-ins to Revoice Pro, the Revoice Pro Link Switch must be ON (green as shown left) in the destination Revoice Pro Session window.
Otherwise, the Link plug-ins will display an error message.
Only one Revoice Pro Session can have this switch ON at a time.
Topics in this section:
Capturing audio from Logic using the link plug-in
Transferring the audio back to Logic when using the link plug-in
![]()