Warp Region: step-by-step introduction
The Warp Region function is one of Revoice Pro's most useful tools for making creative and/or corrective time and pitch adjustments "in place" (i.e. the output is directly created in the same track as the input, so the input is replaced by the desired output).
This corrected audio can then be used both on its own and as an input to other Revoice Pro processes such as APT or Doubler processes.
Adjustments made to a Warp Region will also cause tracks that use this signal as an input to reprocess the output to follow the time and pitch changes in the changed input (if the process is set to do that).
Creating a Warp Region

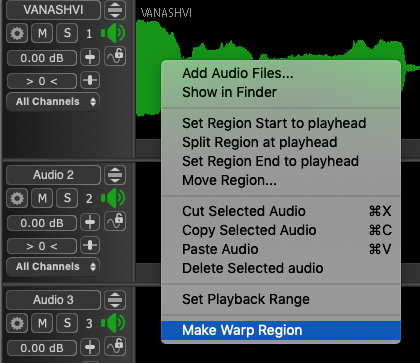
- In one track, select one (or multiple audio waveform regions in the same track) as shown in light green at the right. RIGHT CLICK in the track with the selected regions and select Make Warp Region in the pop-up menu window that will appear (shown right).
- Once the region (or regions) have been processed, there will be Warp Region end markers (white triangles) at the ends of each warped region, blue "non-pitched" regions, grey pitched blocks (notes) with optional average pitch lines (blue), and brown pitch "transition regions". Detailed pitch contours may appear as shown below in wavy lines.

- If the pitch contours do NOT appear in the track window (as shown below) they are probably outside the range of notes visible in the track window. Move the Pitch Range control (shown below) up and down (by selecting it with the mouse or by centring the mouse in the track and rotating the mouse scroll wheel) until the pitch contour lines appear in the track window as shown above. Use the Y Scale control to adjust the scaling. (Also see Seeing pitch information)

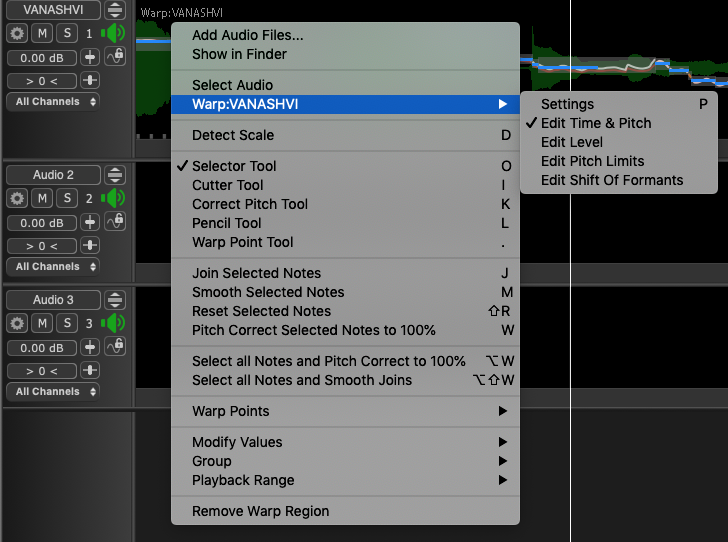
 RIGHT CLICK in the track concerned to see the menu right. You will see the available Warp functions, which in this example is just one, Warp:VANASHVI. Although normally the editing choice is set correctly, if required, select the name of the Warp function then one of Edit Time & Pitch, Edit Level, Edit Pitch Limits or Edit Shift of Formants to display that Warp Region's editable features. If there are multiple warp regions listed, only one can be selected at a time from the left hand part of the menu.
- In order to do detailed editing of timing, pitch and level, see Manually adjust timing, pitch and level
- To Remove the processing in a Warp Region, RIGHT CLICK in the region which has the Warp Region and select Remove Warp Region as shown selected at the bottom of the menu shown right.
- To see and change the Settings for each Warp Region, select the Warp Region of interest and then either press the P key, or RIGHT CLICK the Warp Region and select Settings from the sub-menu related to the Warp process concerned, and the Warp Control Panel should appear.
- If you want to temporarily bypass the Warp processing you have done, to compare the original audio, press the comma (,) key and the audio will turn bright green to indicate. A red bypass warning is shown. Press comma again to revert to the processed audio.
Related topics:
Manually adjust timing, pitch and level