Track operations
Track menu
The Tracks menu contains a number of functions for adding, clearing and viewing tracks.
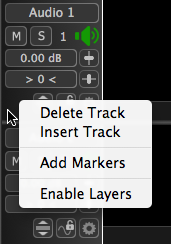
A contextual menu of some Track-based functions can be accessed by RIGHT CLICKing in an "empty" area of the Track Control panel as shown at right. The selectable items includes Insert Track and Delete Track, which are self explanatory.
The last menu items, Add Markers and Enable Layers, provide further useful functionality. See Marker Tracks, Audio Layers.
Rearrange tracks
Tracks can be re-arranged in the Session window by holding down the LEFT Mouse button in an empty area in the Track Control Panel and, with the Hand icon, dragging the Track's "ghost" up or down and dropping it in another "destination" Track Control Panel.
If the "ghost" is dropped in the top half of the destination track's window - the dragged track will be placed above the destination track.
If the "ghost" is dropped in the bottom half of the destination track's window - the dragged track will be placed below the destination track.
Insert tracks
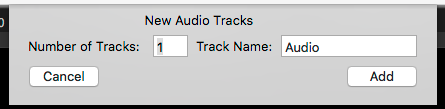
Tracks can be inserted with the Tracks menu Add Tracks... command: CMD SHIFT N (Mac) /CTRL SHIFT N (Windows). The number of new tracks and their base name can be entered in the window subsequently displayed. Each consecutive track so created will have an incremented number in brackets after the name, e.g. Audio, Audio(2), Audio(3), ... Audio(n).
Duplicate tracks
Tracks can be duplicated by pressing ALT key (Mac) / CTRL key (Windows) and left click and hold down mouse button and dragging a Track Control panel to another track. The dragged track control panel will be duplicated and an auto-incremented number will be added to the end of the current name, if the source track is labelled "Audio n" or "Output n" (where n is a number). (This only duplicates the basic track settings, such as level, pan, but not the content or processes.)
Track height
Track heights can be resized by selecting anywhere on the thick horizontal separator line between tracks and when the up/down arrow icon appears, hold down a left click and drag the line up or down to increase or decrease the Track height.
If the SHIFT key is held down, ALL the track heights will be adjusted at the same time.
A Full height view of a single Track in the multi-track display can be displayed by pressing this button in the Track Control Panel ![]()
Pressing it again will restore the multi-track display.
Track processes
Tracks can be "Cleared" of all Audio and Processes by selecting Clear Tracks command in Tracks menu. The Tracks layout and Track Control Panels will be preserved. This command can be used to create Session Templates.
To show only Tracks used by the selected Process, press the Z key. To show all the tracks, press X key.
To toggle hiding the Displays of processes that are not selected, press the C key.
See tracks menu below for Mac (left) and Windows (right)
![]()
![]()