Pitch range
Sometimes it's necessary to adjust the pitch detector range of the Match Process to recognise the full range of a signal.
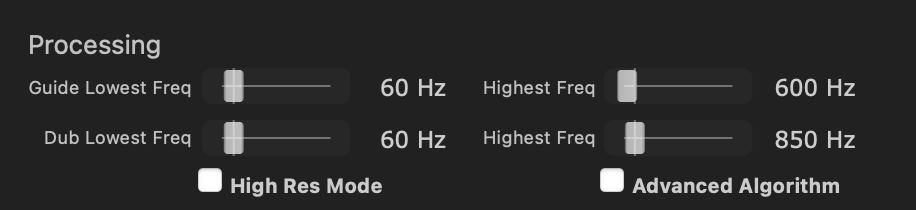
In this example with a flute as a Guide track, we have started with a Guide High Frequency pitch measurement limit set to 600 Hz as shown in the Processing section of the Match Control Panel below. This means the Guide pitch measurements stop at 600 Hz and will not find or display notes above this frequency.
Consequently, this example's pitch display does not yet show any pitches correctly above 600 Hz and, as a result, there are audible errors in the output.
There are two ways to adjust the pitch range:
- Use the Match Control Panel and modify the limit values shown (either with the sliders or typing a value into the frequency display box). This method is quickest when the pitch range limits are known. OR
- Use the Track's graphical display to show an adjustable pitch limit display bar and move that up or down (in pitch) until all the notes or pitch values appear correct. (This method is recommended when the pitch range is not known because it gives immediate feedback.)
We will continue to use the flute example to show how to do both of these.
Method 1: In the Processing section of the Match Control Panel shown above, a new value for the Guide High Frequency pitch limit (shown in the red box) can be entered in by moving the slider or typing in. Try entering a higher frequency if the system is not recognising the fundamental pitch of all the notes.
The effect of the new value can be immediately checked by pressing the Space Bar to reprocess the signal with the new value. The new pitch trace will be displayed and the audio played.
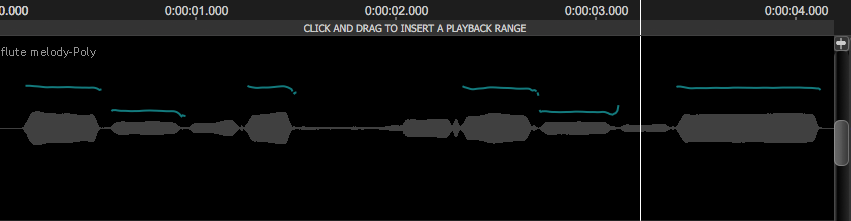
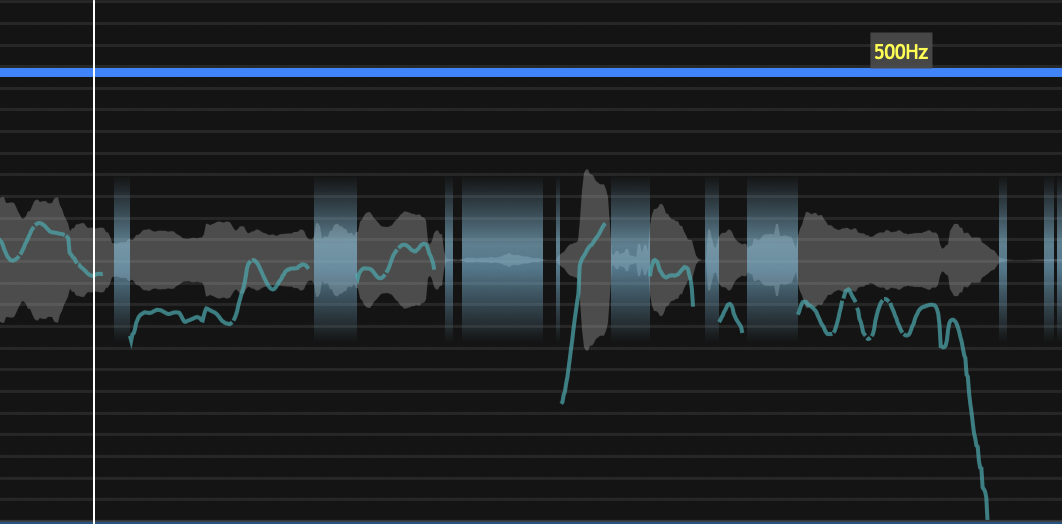
Below we show before and after using the correct upper limit for the flute signal in question.
Upper limit 600 Hz. (Before correction)
Upper limit 900 Hz (After correction)
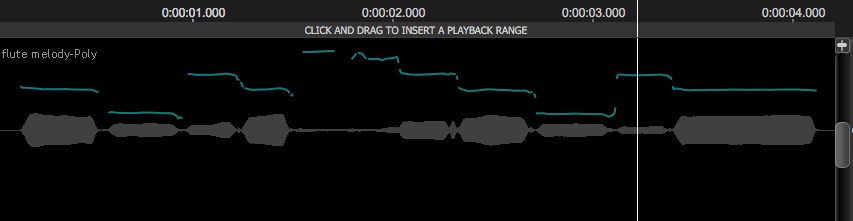
One can see all the correct new notes appearing, which are higher in the display and more detailed structure.
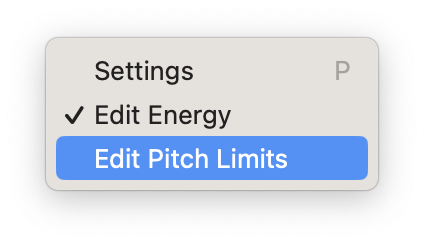
Method 2: In the track display, we can turn on horizontal bars showing the Match's high and low pitch limits in the Guide and Dub Tracks along with the pitch measurements. To enable the display of these pitch limit bars, RIGHT CLICK in the Guide or Dub track, select the name of the Match Process being adjusted (in this example, Match:1) and then select Edit Pitch Limits as shown below.
Once that is done, use the mouse wheel or the gray scale offset slider at the right of the track to bring the upper/lower pitch limit bars into view.
The pitch limit can be adjusted by LEFT CLICKing on the bar, then holding the LEFT mouse button down, and dragging the bar up or down to the desired position and releasing the mouse button.
The new pitch trace will be calculated and displayed. By raising (or lowering) the bar until no further new pitches are displayed, the entire pitch range can be shown as measured correctly.
For low-pitched instruments (such as bass guitar, a similar adjustment can be used to move the lower pitch limit to as low as 25 Hz. This would allow manual editing for such extreme signal pitches.