To adjust the Match settings after creating a Match Process, you you need to make sure you have selected the correct Match Process before you open its Match Control Panel. That means you must have selected either the Match Output audio, the Dub Process Control Block, or the correct Guide Process Control Block (where there are more than one Match Process Control Blocks in a stack). Refer to Process Control Panel for more information.
Press P key to open the Control Panel as shown right.
You can repeatedly try other Presets or modify the parameters in the Control Panel and listen to the result.
The Match Control Panel can remain open and, while signals are playing, you can adjust controls and the process will be applied.
Time-varying automation can be applied to some Process parameters.
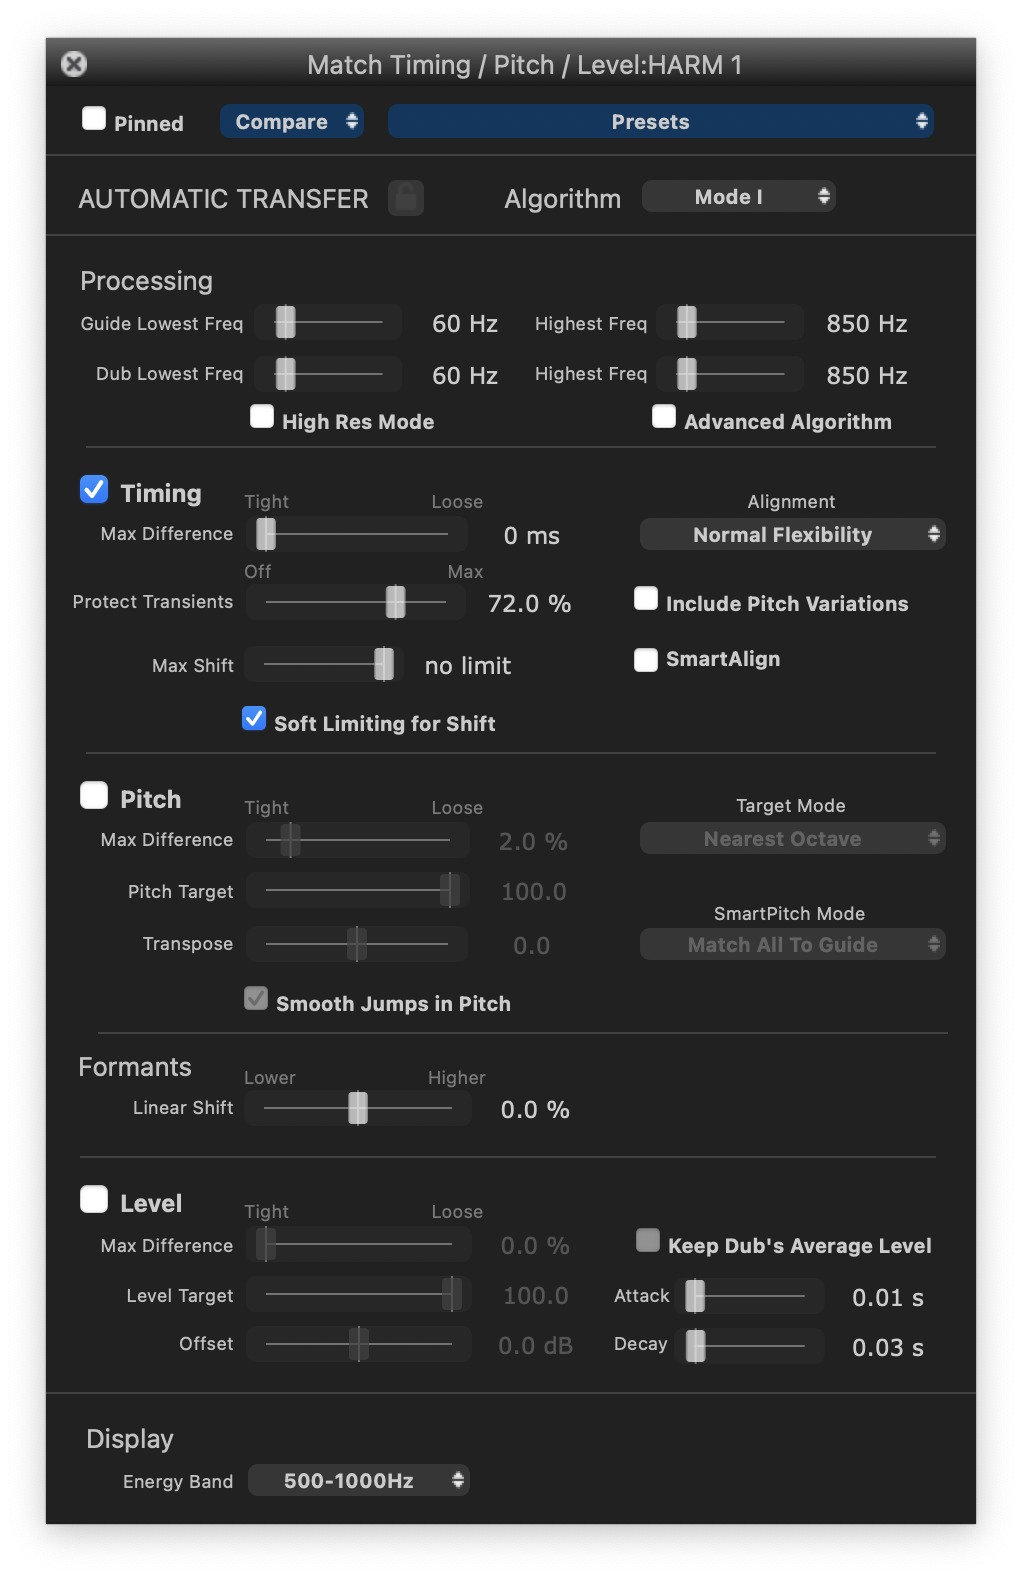
Match Panel Controls
Presets (shown top right with "Factory Defaults") allows you to select Factory or your own previously saved "User" settings, and to save your own User Preset settings.
There is also a Compare function to compare saved versions of a Process, and a Pinning control to keep this Process Control Panel open (while opening other Control Panels).
For Match Processes there is a Process Lock button (shown locked red in the picture below) below the Compare and Presets section. This fulfils the same function as the lock button on the Process Control Track, and will stop further automatic processing from taking place. This is to stop any optional manual edits from being overwritten.
The pitch range of automatic processing is set in the Processing section below Automatic Transfer and Dialog/Music mode switches. This is explained in the next topic.
Advanced Algorithm – this function tries to preserve the envelope of source audio during pitch correction. Try ON if you hear unwanted artefacts. (Default OFF.)
Hi Res Mode – this function edits the signal at a higher resolution, and can reduce artefacts in pure signals. For higher pitched signals try ON if you hear unwanted artefacts. (Default OFF.)
Each of the controls shown has a "pop-up" explanation which will appear shortly after hovering the mouse pointer over a slider control or parameter display box. Further details of controls and what you might be able to do with them are given in the table below.
|
Control
|
Description
|
AUTOMATIC TRANSFER
|
- If Lock icon OFF, all processing below is available.
- If Lock icon ON (Red), turns all further automated processing off.
|
|
Timing
|
- ON = Transfer Guide's timing to Dub automatically but obeying the Tolerance and Alignment settings.
- OFF = The Guide features of Pitch or Level, if ON, will be transferred to the Dub at the correct timing but without modifying the Dub's timing.
- Include Pitch Variations = Uses audio pitch as well as energy envelope to effect time alignment of Dub. Useful when energy variations alone are not clear enough to be effective, such as in legato music lines.
- SmartAlign = enables effective alignment of audio that has large gaps (of silent content) in Guide or Dub. (There is a separate set of Match Presets that function in the same way as the basic Presets, except with SmartAlign enabled.)
|
|
Other Timing Controls
|
- Alignment - Choose desired time-alignment flexibility
|
Alignment Setting
|
Main characteristics
|
|
Lowest Flexibility
|
Alignment is least flexible, creates fewest edits. Sound quality may be best.
|
|
Low Flexibility
|
Alignment is not very flexible, creates fewer edits. Sound quality may be better.
|
|
Normal Flexibility
(Default)
|
Try this first as it works
best in most cases, balancing good alignment with moderate editing.
|
|
High Flexibility
|
Alignment is the most flexible and allows more editing, which may
compromise sound quality
|
|
Maximum Compression
|
Tries to match the Guide by time compressing the aligned audio as much as possible.
|
|
Maximum Expansion
|
Tries to match the Guide by time-expanding the aligned audio as much as possible
|
|
Normal Flexibility + Pitch
|
If energy pattern does not change but pitch in Guide and Dub change together, this can work in signals with legato pitch changes.
|
- Tolerance - (Tight/Loose) sets maximum allowed offset in timing difference.
- Protect Transients - Reduces possible distortion effects. (Default: ON)
- Max Shift - Reducing values restricts the maximum time shift from its original position allowed for the Dub audio.
(Default: no Limit)
- Soft Limiting for Shift- Introduces a more flexible boundary for the Max Shift setting. (Default: ON)
|
|
Pitch
|
- OFF = Guide Pitch will NOT be transferred to the Dub
- ON = Transfer Guide signal's pitch to the Dub (time aligned).
|
|
Other Pitch Controls
|
- Tolerance - (Tight/Loose) sets maximum % allowed pitch difference.
- Transfer Strength – Proportion of correction factor transferred. 100% means use only the Guide's pitch, 0% means use only the Dub's pitch.
- Target Mode (Drop Down menu):
- Nearest Octave – transfer exact pitch but allow natural octave jumps
- Absolute – transfer exact pitch
- Relative – pitch change relative to Guide pitch at “phrase” starts
- Monotone – all pitch changed to measured average pitch
- Tuning - Match long term average variation of Dub to Guide's.
- 0% = Keep Dub tuning
- 100% = Apply Guide longer term average tuning to Dub.
- Fit - short term variations of Dub to Guide's (e.g. vibrato) from 0% (not at all) to 100% exact match.
- Offset – modify output signal pitch by % shown
- Smooth Jumps in Pitch – (Default ON)
SmartPitch Mode: affects what matched to the Guide track tuning For details, see SmartPitch
|
|
Formants
|
- Linear shift - adjusts the frequency of formant regions up or down to change the character of e.g. a voice. (Formants are resonant frequencies, typically of the vocal cavity, which affect the character of the sound. For example, female vocal formants have a slightly different structure to male ones.)
|
|
Level
|
- ON = Transfer Guide signal level to Dub (time-aligned).
- OFF = Do not transfer signal level
|
|
Other Level Controls
|
- Tolerance - (Tight/Loose) sets maximum % allowed level difference.
- Transfer Strength – Proportion of correction factor transferred
- Offset – add a constant gain to the Dub level trace.
- Keep Dub's Average Level - modifications are made relative to Dub average
- Attack – Slew time (smoothing) applied to increases in level changes (Default = 0.01sec)
- Decay –Slew time (smoothing) applied to decreases in level changes (Default = 0.03sec)
|
|
Display
|
- Energy Band: Display the selected octave-wide frequency band used for energy measurements that are input to the alignment algorithm.
|
Related topics:
Pitch range
Playback controls
Playback range
Track mute and solo
Next