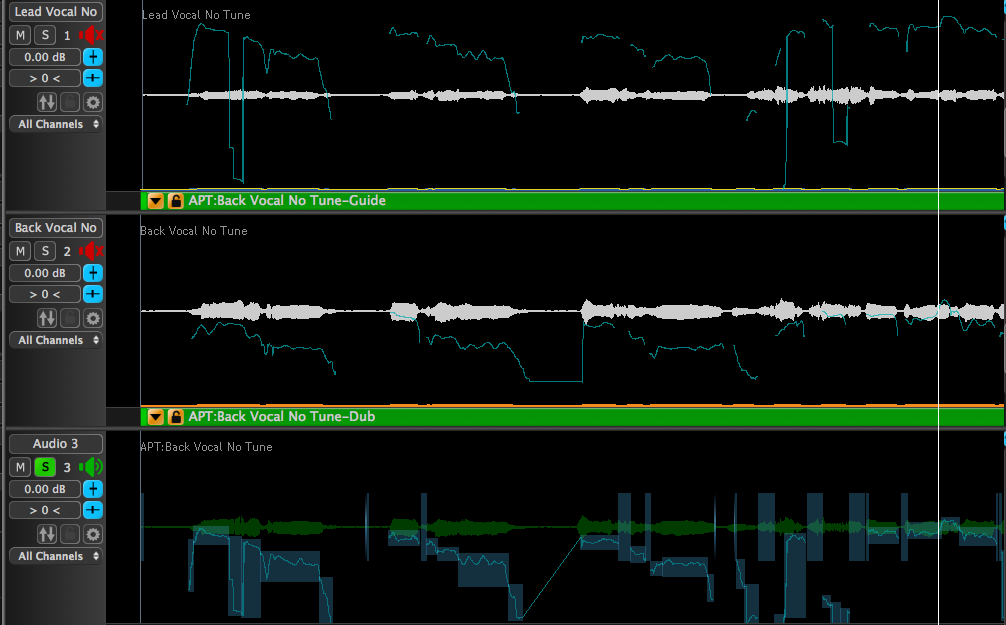
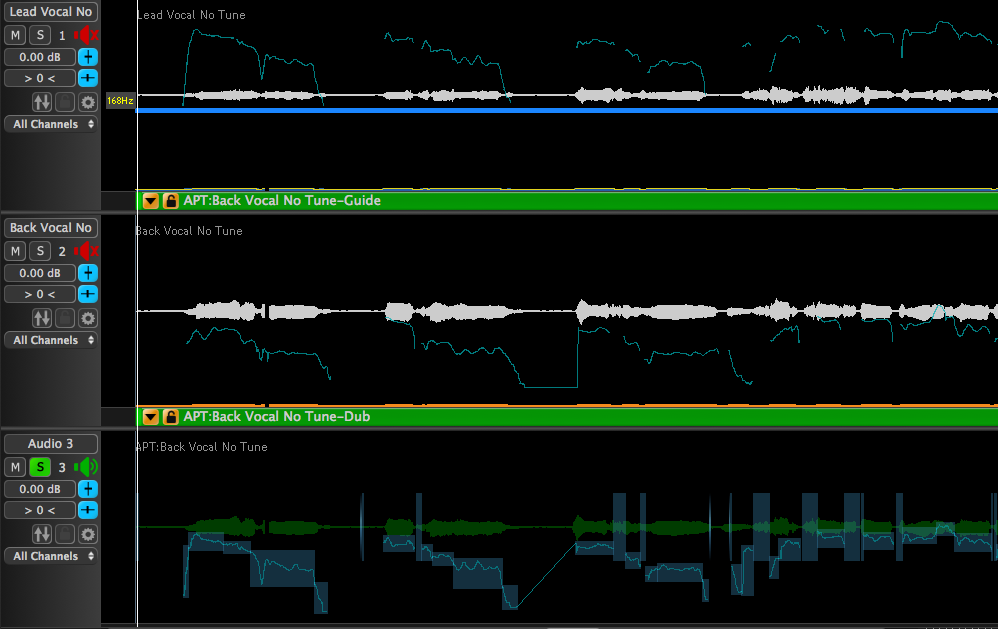
APT - Fixing Processing Problems
Recognizing Processing Problems
When using the APT process, there may be times when the processing creates audible artefacts in a small area of a signal or in a large part of the signal. These artefacts may arise for a number of known signal-related reasons, which are generally understandable and fixable. Examples include:
- Localized Differences between the Guide and Target (Dub) signals as in:
- Vocal "creaks" (where the pitch drops briefly an octave lower or is unmeasurable), phrase or word startup differences (onsets)
- Differences in phrase beginnings or endings being breathy
- Breaths taken between words differently in the two signals
- A word, words or other sound appears in one signal but is absent from the other (this is quite common in Dialog Replacement with noises occurring in the Guide Track)
- Discontinuous signals: Having short sections of a Dub with silence between each short section and trying to aligned this discontinuous signal to a continuous Guide (or vice versa)
- Extra Silence at start of signal file: Setting an APT input to start in possibly long stretches of digital silence before the signal starts can sometimes cause a problem
- Tight cuts at signal starts: Not giving an APT Dub input enough "non-signal" to allow it to be moved, if required.
- Different or extreme signal pitch ranges:
- Voices or instruments with very low or high pitch frequencies
- Vocal "creaks" or "rough" voices (where the pitch drops briefly to a lower octave) in one voice but is normal in the other signal.
Most of these situations are quickly solvable using the tools in Revoice Pro and are discussed below or in the next chapter.
Protecting audio regions from modification
When there is the problem of localized differences between the Guide and Dub (as listed in (1) above), editing the audio signals would be tedious and maybe even not help.
Revoice Pro provides a mechanism for quickly inserting a protective “coating” over a region or section of the Dub audio that prevents that section from getting Time and/or Pitch modifications. Quite often, inserting such a Protected Area in the Dub signal to stop it being processed, frequently removes the processing artefacts quickly and make the output acceptable. This section explains how to do this.
PROBLEM: An example with breath in Dub and not Guide
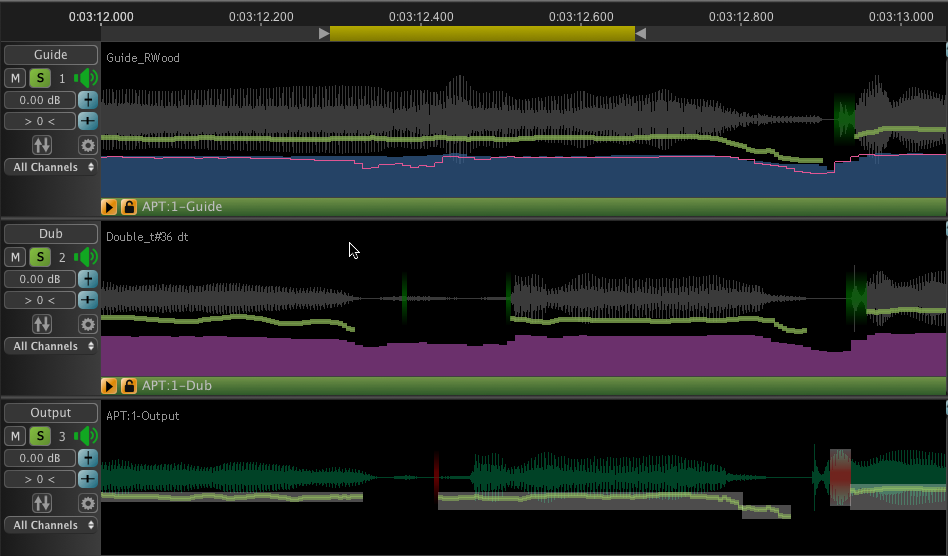
In the image below, the dark yellow Playback Range at the top of the screen is positioned so it extends through a breath (low level audio) seen in the Dub Track 2 ( dark waveform) that does not occur in the Guide Track 1, where a note is held instead. The problem here is that the pitch in the guide signal note cannot be sensibly transferred to the breath region which has no pitch.

The next image below shows the result once an APT process is inserted with APT settings selected to process Time and Pitch. The light trace in the Guide is the pitch, which can be seen as continuous and the Dub pitch trace does not continue across the gap where the breath is located. The short green blocks in the gap in the Dub indicate non-pitched sounds. In the Output track, the Dub audio has been pulled back into the gap. This result may sound OK, or not, depending on the actual audio content.
How to Insert a Protected Area
Operational Note: The following procedure requires that the Display Energy switch is ON in the APT Control Panel. If it is, the display should look similar to the image above (although the colours might differ).
In this example, if the user wishes to preserve the breath sound and the pitch just before and after it, setting up a Protected Area in the Dub signal can be quickly done with the following operations.
- Make sure the APT is selected (in this example it is APT:1).
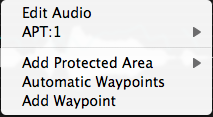 RIGHT CLICK in the Dub track display at the position you want the protection to start (before the start of the gap in this example) and select from the Pop-up menu shown right Add Protected Area. Go to step 4 if you can select this option.
- NOTE:
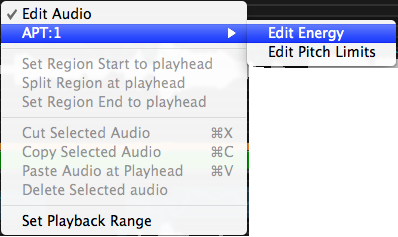
If you do not see the option to Add Protected Area, and you see the menu showing Edit Audio selected (as shown below left), then RIGHT CLICK the APT name ("APT:1" in this example) and select "Edit Energy" and let the pop-up close. Then RIGHT CLICK again in the track and the pop-up menu should appear as shown right below with Edit Energy selected.

- In the follow-on pop-out menu, select whether to protect the Dub Pitch, Time or both from being changed. We have chosen Protect Pitch and Time for this example. This can later be modified as we will explain below

Once this selection has been made, a short, transparent red Protected Area will be inserted in the Dub track (as shown below) which can be extended or narrowed by putting the mouse at either side of the range block, LEFT CLICKing and dragging either the edges, or if the hand cursor is shown, click in the range and dragging the whole Protected Area to the required position as shown below.
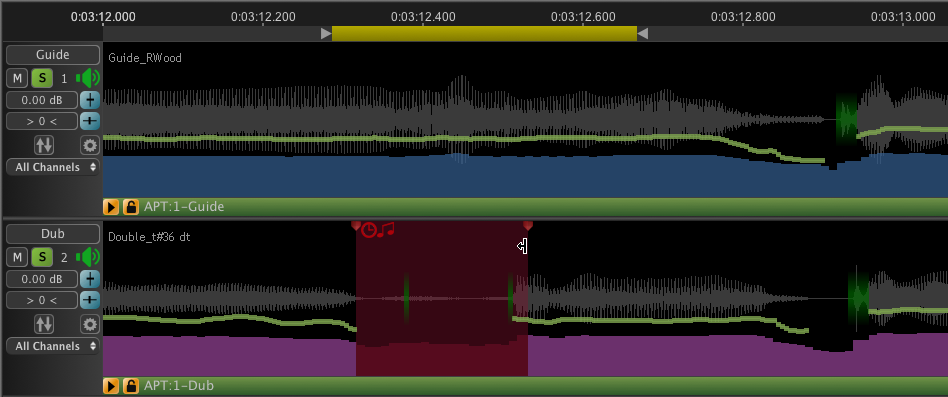
The Protected Area will contain one or two possible icons: clock (time) or musical notes (pitch) depending on the protection selected.
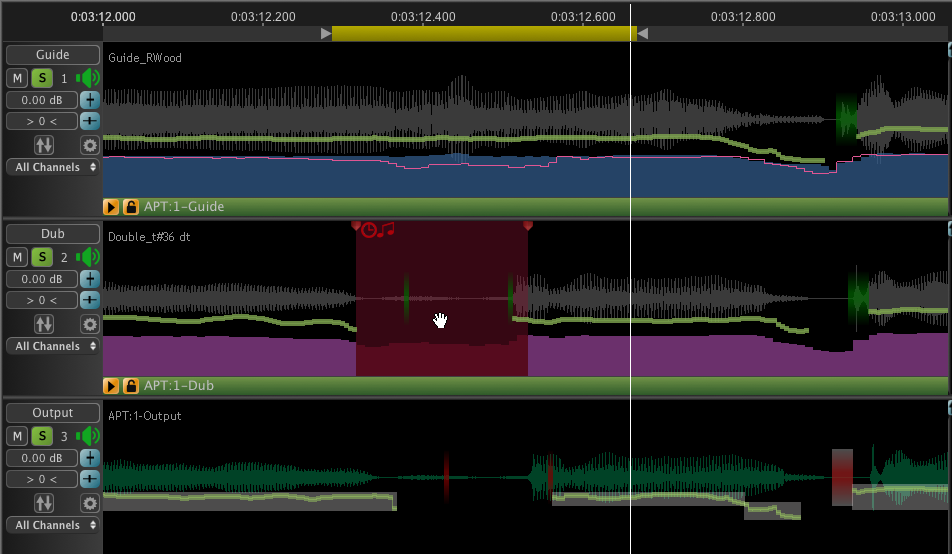
When the audio is processed with the Protected Area, the Time or Pitch features selected for protection will not be processed in that Dub audio Area. As shown in the Output Track (bottom) in the example above, the protected range in the Dub track appears unprocessed in the Output track.
TIP: If the user sets up a loop with the Playback Range and Loop control, the edges and position of the Protected Area can be manipulated while listening for the best-sounding join at each end of the region. This is done by manipulating the Protected Area and then Rendering the Output (processing) each time a change is made to hear when the result sounds most acceptable.
Modifying the Protected Area
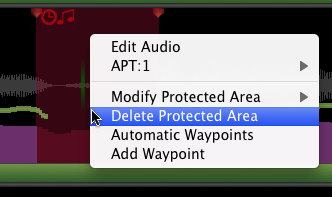 Protected Area's settings can be changed or the entire Area can be deleted anytime. To do this, RIGHT CLICK on the Protected Area and the menu similar to the one right will appear. Simply chose either "Modify Protected Area" and reselect the feature to be protected or select "Delete Protected Area".
PROBLEM: No Pitch in the Guide where there is Pitch in the Dub
If the "non-pitch" section of a Guide (say, at a breath) gets transferred to the Dub where there is pitch - this will sound wrong in the Output. Inserting a Protected Area in the Dub will quite often fix this sort of problem.
Back to Index
Processing Gaps of Silence in Audio Waveforms
If an audio signal starts with a long stretch of silence, or there are long or short gaps of silence between sounds in a long signal, it can sometimes cause problems if it is used as a raw Guide or Dub signal.
Several options are available.
- Obviously, these silences can be edited out of the signal before it is processed in the DAW or in Revoice Pro.
- Alternatively the APT Processing Control Blocks can be placed so they do not include or submit the silence to the APT process.
- Revoice Pro has mechanisms for "ignoring" digital or low level silent areas of waveforms which can be used.
We discuss these below.
Signals with long silence before the audio signal starts
Sometimes, an audio file that is dragged into Revoice Pro has silence for many seconds before the real audio signal starts. If the Guide and Dub have roughly the same amount of silence in both files before the audio starts, then if the APT Process Control Blocks both start at the start of the silence, it is likely to work.
If there are differences in length, the user should make sure the Guide and Dub Process Control Blocks have roughly the same amount of silence before the actually audio starts. Moving the start of the APT Process Control Blocks has been covered previously here.
Signals with Silence between Blocks of Audio
There are three critical settings the user should consider in this situation.
- Set the Guide and Dub Process Control Blocks to start a little (perhaps around 0.25 seconds) before the first similar audio that is to be aligned.
( This means the Guide and Dub Process Control Blocks might NOT start at the beginning of the Guide audio - as the example below will show.)  In the APT Control Panel, use the Max Shift slider control to reduce the maximum movement of the audio to around 0.07 to 0.10 seconds (if the audio is similar). Turn OFF the "Soft Limiting for Shift" switch. See image at right.
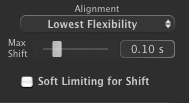 If the audio still does not quite align correctly, try also setting the APT Alignment control to "Lowest Flexibility", as shown right.
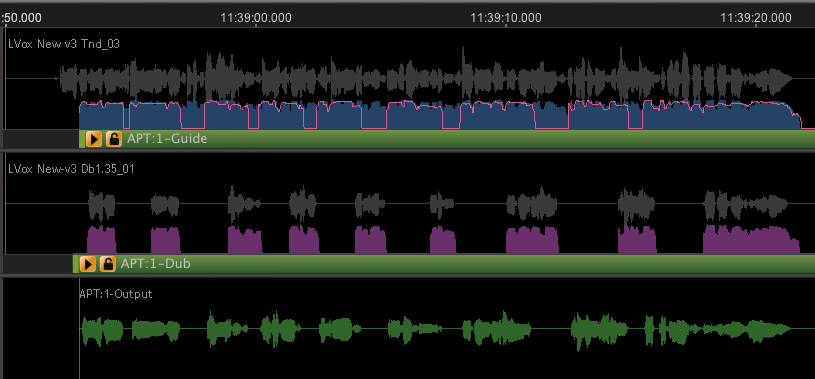
We show an example of using these principles with the audio in the image below. In Track 2 (the Dub) there are individual words cut out of a different take of what the singer sang in Track 1 (the Guide) and digital silence fills the gaps between the cut words in Track 2. When the time and pitch of the Dub track is correctly aligned to the Guide - the "cut out" words will add emphasis to the lead vocal.
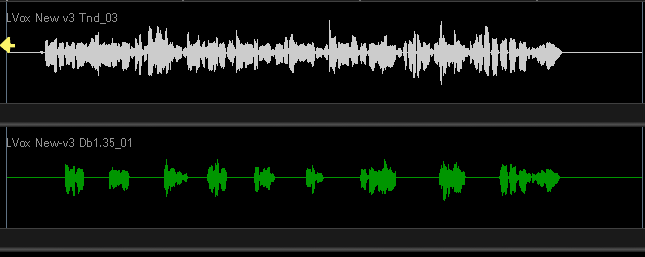
Pay special attention to the fact that the first "cutout" word in the Dub starts a few seconds after the Guide signal starts. Also note the Dub is correctly positioned in time so it already loosely aligns correctly with the Guide as it is. So the audio blocks with words do not need to be moved very much, just tightened a bit more in time and pitch.
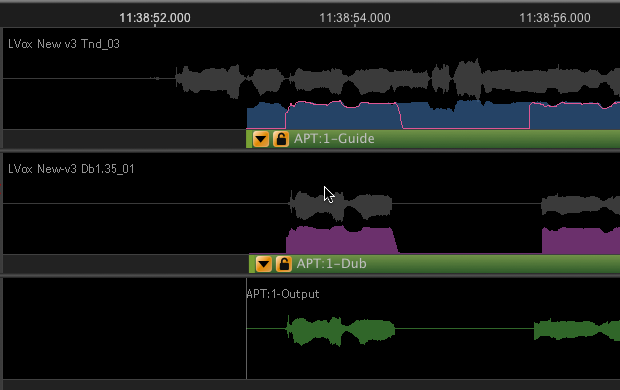
Therefore, as explained in item (1) above, the user should position the start of the Dub APT block to just before the first word in the Dub, and also position the Guide APT block at approximately the same time position in the Guide, as shown in the image right.
When this is done correctly, you can see in the Output track above (in green) - that the first Output word remains roughly in place with the Dub audio - but the detailed shape now looks more like the corresponding Guide waveform.
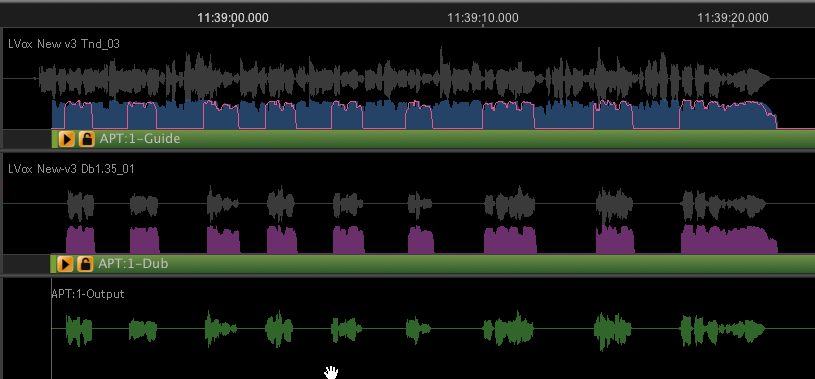
If you have set the Max Shift in the APT Control Panel setting to around 0.07 sec. to 0.10 sec., then after processing the audio, the Output (i.e. the aligned Dub) should be aligned with the Guide, which would then look something like the example below. It is clear that the Dub energy is matching with corresponding energy in the Guide and the Output waveforms are all in the right positions.
Back to Index
Problems to watch out for when aligning audio with silence
- If either the whole Dub or Guide signals are used when first inserting the APT Process Control Blocks, then if the Dub signal starts in a different place than the Guide signal, the alignment will try to pull the first word in the Dub to the first (but different) word in the Guide - and that will be wrong. Follow the example above to put the starts of the APT Process Control Blocks in the right place.
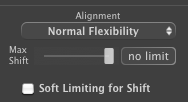 If you do not set the Max Shift control to a lower setting (as described above) or don't set the Alignment to Lowest Flexibility (so the controls look like the image right), then you might end up with the Output alignment completely wrong, and time distorting the audio as shown in the image below.
Back to Index
Starting an APT Process Control Block input in digital silence
If the Guide and Dub both have equal lengths of digital silence at the beginning of the signals, and the user places APT the Guide and Dub Process Control Blocks so they both start with the same amount of digital silence, then the APT process may work correctly.
If the audio is not right, however, it might be best to move the starts of the both APT Guide and Dub Process Control blocks to start closer to the start of the actual audio signals.
Starting an APT Process Control Block in Audio Signals
If a Dub APT Process Control Block has no "room" (i.e. enough "non-signal") to allow the Dub to be pulled forward (or pushed back) if required for alignment, then the Output audio might sound unnaturally speeded up or time compressed (or streatched).
In this case, move the start of the APT Dub Process Control Block further to the left in time, to allow movement of the audio without being wrongly compressed or stretched.
Working with different or extreme signal pitch ranges
Manually adjusting the pitch detector limits
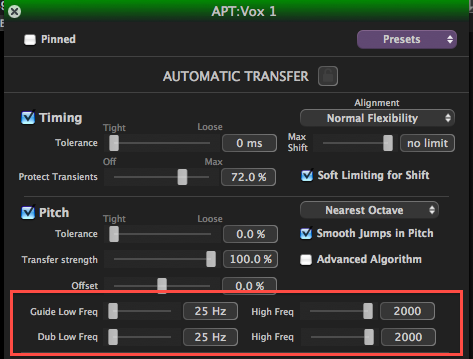 A feature introduced in Revoice Pro 2.5 is the ability to adjust the upper and lower limits of the APT pitch detector. What's more, these limits can be independantly set for the Guide and Dub signals. As shown right, the new lower limit is 25Hz and upper limit is 2000Hz, whereas 60 and 850Hz are the default limits.
This means that:
- Vocal signals with very low or rough pitch, or even bass guitars and flutes can now be used sucessfully as inputs to Revoice Pro and be automatically aligned or manually tuned.
- The operator can prevent transfering octave jumps that occur in one signal to another signal that doesn't have them.
Below we show two ways to do this using examples which correct the two problems just described above. High or low pitches and octave jumps in pitch traces.
However, we will only know that we have a problem if we hear it (e.g. artifacts in the output of an APT or manual pitch adjustment process) or see it in the Revoice Pro displays. Since hearing it is going to be the most common means of detection, we explain below how to display the problems, make corrections and see (and hear) the result.
Back to Index
How to display pitch measurements of APT signals
Sometimes, after an APT process has been run, it is hard to see or even find the pitch measurement traces of the APT's Input and Output signals in the track displays.
Seeing these pitch traces is often very helpful in determining:
- What the pitch contours look like and what the frequency ranges are
- Where Input signal pitch contours are different and might cause problems
- When the pitch of the output audio sounds wrong, what the cause might be.
In the example below - the pitch trace of the Guide signal (a flute) is not seen and the orange Energy trace makes the Dub's pitch hard to see. This is quite common.
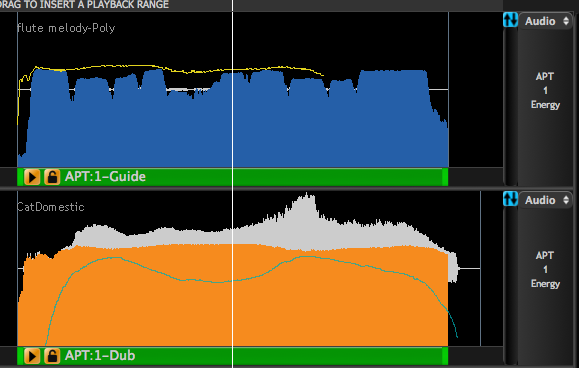
To make pitch traces easier to see and work with, follow the steps below.
1) Lower the energy displays
The APT Energy displays (shown above in blue and orange) can interfere with the pitch trace's visibility. Youo can reduce these displays.
To do this, LEFT CLICK on the Guide or Dub's track Display's Scaling Selector (showing "Audio" in the image below left) to bring up the list shown below right and select "Energy".


This will display "Energy" in the track Display's Scaling Selector.
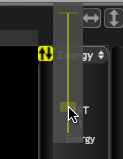 Click the Scale Display button (shown in blue in above left image) to bring up the Slider (shown right) for adjusting the Vertical scale of the selected display.
Lower the slider to lower the Energy display.
TIP: If the SHIFT key is held down while moving the slider, the scaling will be applied to all the tracks with Energy displays as shown below (where the slider is part way down).
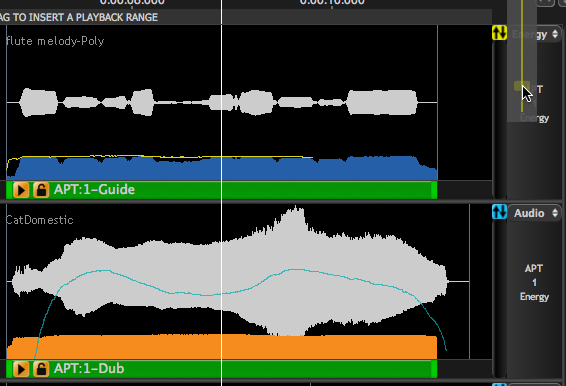
When the slider reaches the bottom, the Energy displays will be reduced and the track Energy will now look similar to the image below.
2) Bring the pitch traces into view.
If the pitch trace of a signal is not visible or partly visible, LEFT CLICK that track's Display's Scaling Selector and select Pitch as shown top right in image below.
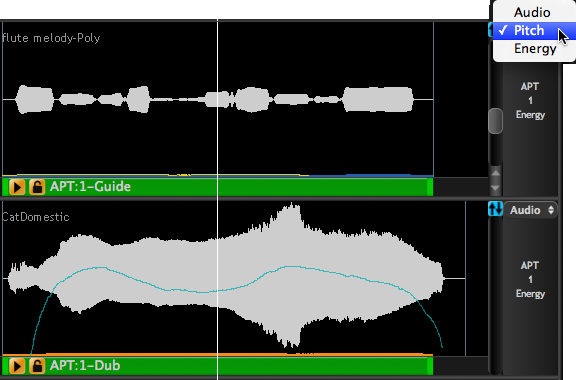
LEFT CLICK the gray Pitch Scale Offset control (shown below selected by the mouse cursor) and move it up or down (or use the mouse wheel when the cursor is hovering in the track display) to bring the pitch trace into view. If the SHIFT key is held down at the same time, the same offset will be applied to all the tracks). This action does not change the pitch of the signal, it only slides the range of pitches displayed in the window.

As shown in example above - the pitch trace can now be seen in the Guide track window. However, in this example, it is not yet correct as will be explained in the next section.
However, if you know the range is correct, you can jump to the instructions on
Back to Index
3) Make sure the pitch measurement range is correct for the signal.
In this example with a flute, we have started with a Guide High Frequency pitch measurement limit set to 600 Hz as shown in red in the section of the APT Control Panel below. This means the Guide pitch measurements stop at 600 Hz and will not find or display notes above this frequency.

Consequently, this example's pitch display does not yet show any pitches correctly above 600Hz and, as a result, there are audible errors in the output.
There are two ways to adjust the pitch measurement range:
- Use the APT Control Panel and modify the limit values shown (either with the sliders or typing a value into the frequency display box). This method is quickest when the pitch range limits are known. OR
- Use the Track's graphical display to show an adjustable pitch limit display bar and move that up or down (in pitch) until all the notes or pitch values appear correct.
This method is recommended when the pitch range is not known because it gives immediate feedback.
We will continue to use the flute example to show how to do both of these.
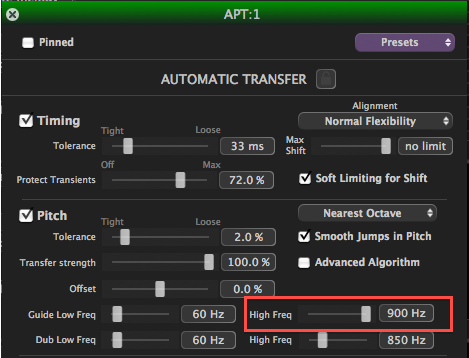 Method 1: In the APT Control Panel shown right, a new value for the Guide High Frequency pitch limit (shown in the red box) can be entered in by moving the slider or typed in. We show entering in a value of 900 Hz - which is more appropriate for a flute.
The effect of the new value can be immediately checked by pressing the Space Bar to reprocess the signal with the new value. The new pitch trace will be displayed and the audio played.
Below we show before and after using the correct upper limit.
Upper limit 600 Hz. (Before correction)

Upper limit 900 Hz (After correction)

One can see all the correct new notes appearing, which are much higher in the display and more detailed structure.
Method 2: In the track display, we can turn on horizontal bars showing the APT's high and low pitch limits in the Guide and Dub Tracks along with the pitch measurements. To enable the display of these pitch limit bars, RIGHT CLICK in the Guide or Dub track, select the name of the APT Process being adjusted (in this example, APT:1) and then select Edit Pitch Limits as shown below.
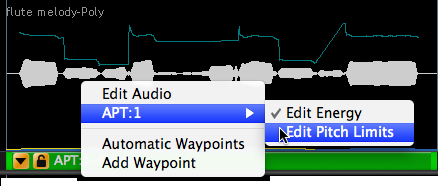
Once that is done, use the mouse wheel or the gray scale offset slider at the right of the track to bring the pitch limit bar (either the upper limit bar or lower bar- or both, depending on scaling) into view. As shown below, the bar is shown as well as it's frequency value at the left of the bar.

The pitch limit can be adjusted by LEFT CLICKing on the bar, then holding the LEFT mouse button down, and dragging the bar up or down to the desired position and releasing the mouse button. The new pitch trace will be calculated and displayed. By raising (or lowering) the bar until no further new pitches are displayed, the entire pitch range can be shown as measured correctly.
In the example below, when the bar is released at 853 Hz, it can be seen that all the notes are shown.
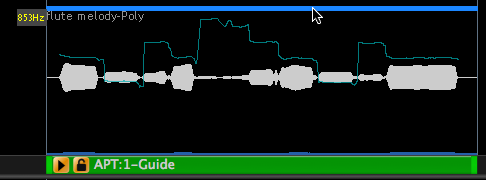
For low-pitched instruments (such as bass guitar, a similar adjustment can be used to move the lower pitch limit to as low as 25 Hz. This would allow manual editing for such extreme signal pitches.
4) Option: Increase the display size and resolution
To get increased resolution and display height, as described in previous chapters, you can expand the Guide (or Dub) to the full height of the Revoice Pro window by clicking on the "Show/Hide" full height button which is being selected at the bottom left of the Track Control Panel in the image below.
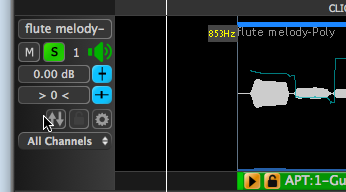
This allows the user to scale the display to see the note names better as well.
The image below shows the full height window with the flute audio and pitch after the upper range limit has been correctly placed to measure all the notes.
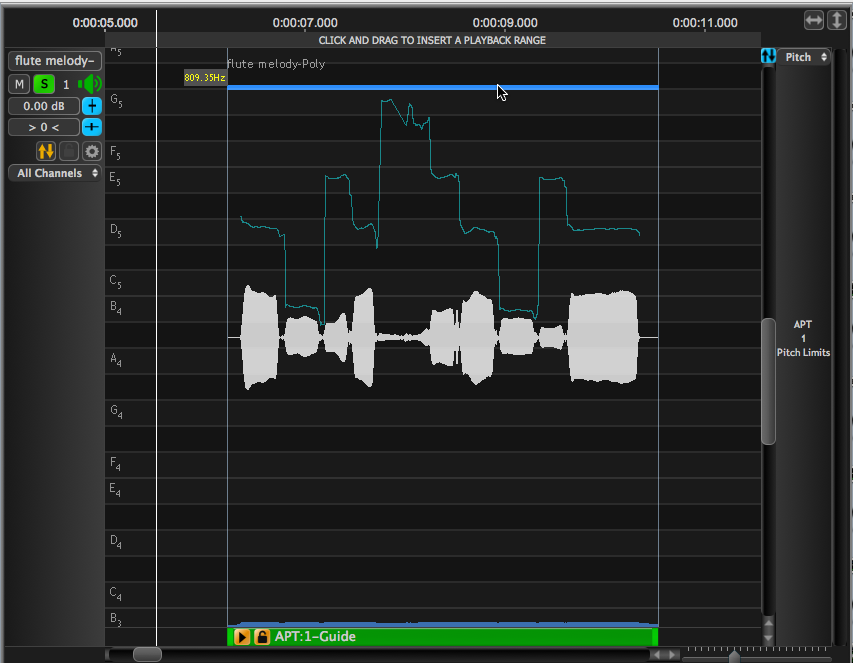
5) Scale the Display
 To scale the pitch trace(s) (i.e. display more or fewer pitch values) for example, to see more detail and have the note grid displayed, LEFT CLICK the Scale Display button (make sure the Selector is showing "Pitch") as image at right shows.
 This will pop-up the Scaling Slider (shown right) for adjusting the vertical scale of the Pitch display as shown being adjusted below. In the Pitch mode, as the slider is increased, when there is enough room, the horizontal note dividers will appear as shown below.

If zoomed in more, the note names will appear. The user might need to adjust the scale offset control (shown selected above) again to get the display fully shown.
If examining a pitch trace in detail, the user might wish to expand the track to the full screen height, as described in the previous section here.
Back to Index
Avoiding transferring "rough" Guide pitch jumps
Sometimes, a Guide signal might contain characteristic jumps in pitch that we do not want to transfer to a Dub voice. One example previously mentioned is a Guide voice with a sometimes "rough" sounding characteristic and a smoother Dub voice. Revoice Pro can now help these types of situations by restricting the pitch detector to deliberately not be able to measure the octave pitch jumps and measure the 1st harmonic (or octave) instead. Forcing this "error" in measurement actually makes the automatic pitch transfer work.
We detail this approach below.
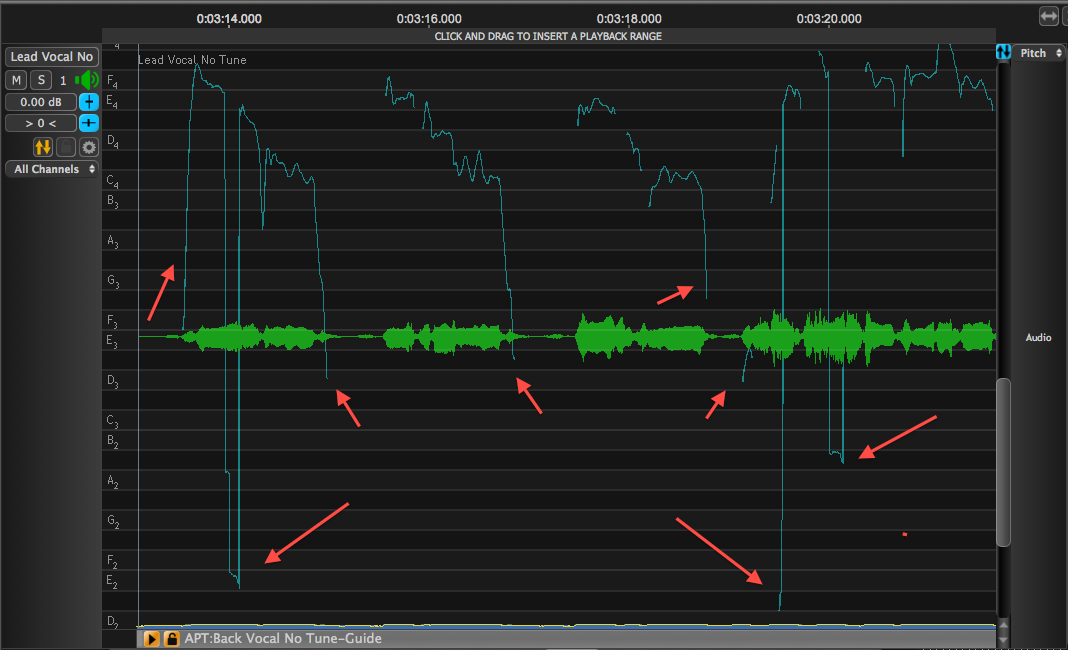
The image below shows around 8 seconds of a Guide voice (lead vocal) that is being displayed in the full height track display with the "pitch" scale expanded to show notes and offset to show the Guide's pitch measurements. The Guide voice is sometimes "rough" sounding, and at the times this is heard, the pitch trace can be seen jumping down an octave in places marked by the downward-pointing arrows. It is important to stress that these are accurate pitch measurements.
The upward-pointing arrows show where there are fast up or down pitch transitions from or to lower notes, but these can be seen to be in low level (quieter) parts of the signals and do not make the voice sound rough.
In contrast, the Dub voice pitch, shown below, does not sound rough (i.e. it does not have such large pitch jumps). It does have pitch similar transitions at the ends of words (in quite parts) like the Guide.
But you can see from the note labels that the Dub is sung one octave below the Guide voice.
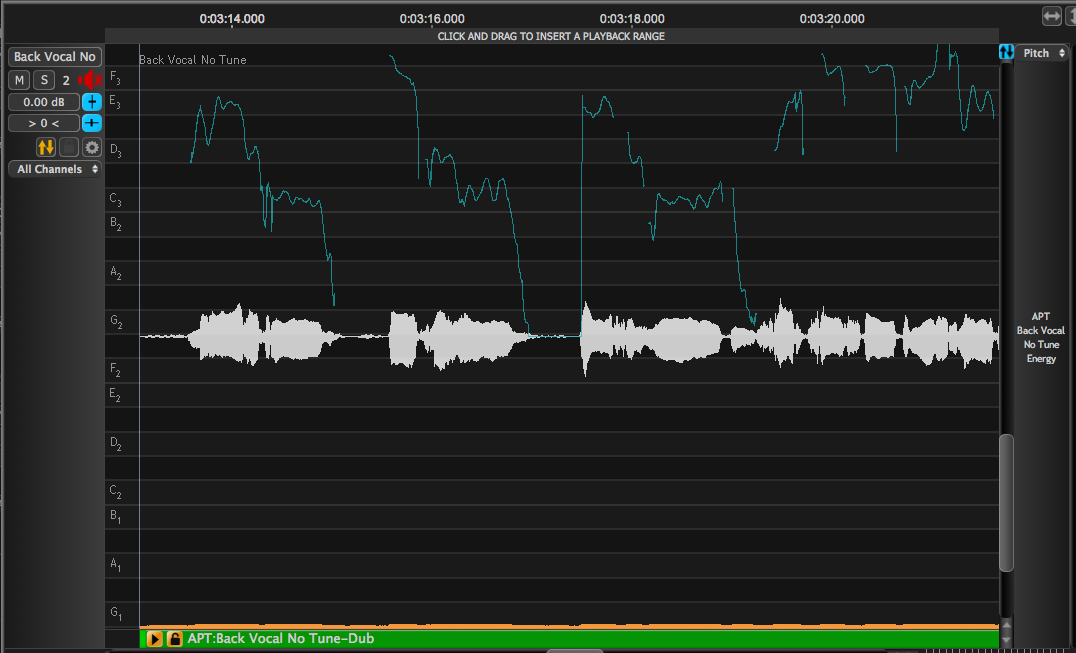
So if we want to adjust the Dub voice pitch to match the Guide, it will not sound right to lower it's pitch one extra octave when the Guide voice drops an octave (unless the Dub pitch was dropping at the same time - which it doesn't do).
One possible solution to this problem is to insert Protected Regions in the Dub (as described in the previous chapter) to stop the pitch being edited when the Guide pitch is wrong. This is not the best solution for two reasons: Firstly, it would take time to insert the many Protected Regions needed and secondly, at each protected region the pitch may or may not need manual adjusting to be in tune with the Guide. There is a faster, easier and better solution.
Principles of new approach
A new approach is now available starting in Revoice Pro 2.5. By adjusting the Guide pitch measurement range, we can "remove" the octave drops in the Guide's pitch trace. This will be done by raising the lower pitch range limit above the octave drops - so the lowest pitches will not be measured. This will force the pitch detector to measure the first harmonics of the actual pitch - which is one octave higher. This pitch will generally provide the tuning contour that we want to apply to the "smooth" Dub voice.
In other words, we "fool" the pitch measuring system into not creating pitch measurements that will result in artefacts in the Dub.
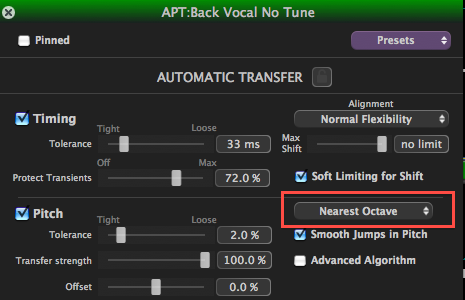
However, there is an further important point to notice in this example. The Dub voice is actually sung an octave lower than the Guide. So the APT process must be set to use the Nearest Octave setting (shown below) to keep the Dub in the range it was sung in.
Back to Index
Removing the measurements of pitch jumps
 It is simple to "correct" the pitch jumps in the Guide graphically.
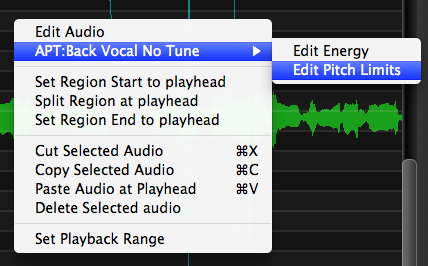
As explained earlier in this chapter, we can graphically display and adjust the Pitch range limits. In the image right, we have brought up this menu by RIGHT CLICKing in the Guide track area, and then selected the APT name and then Edit Pitch Limits.
Once this is selected, as described in the previous examples, we have selected the track "Show Full Height" button, scaled the Pitch Range, and moved the Pitch Offset slider down to find the Guide "Low Pitch Limit" as shown in the image below.
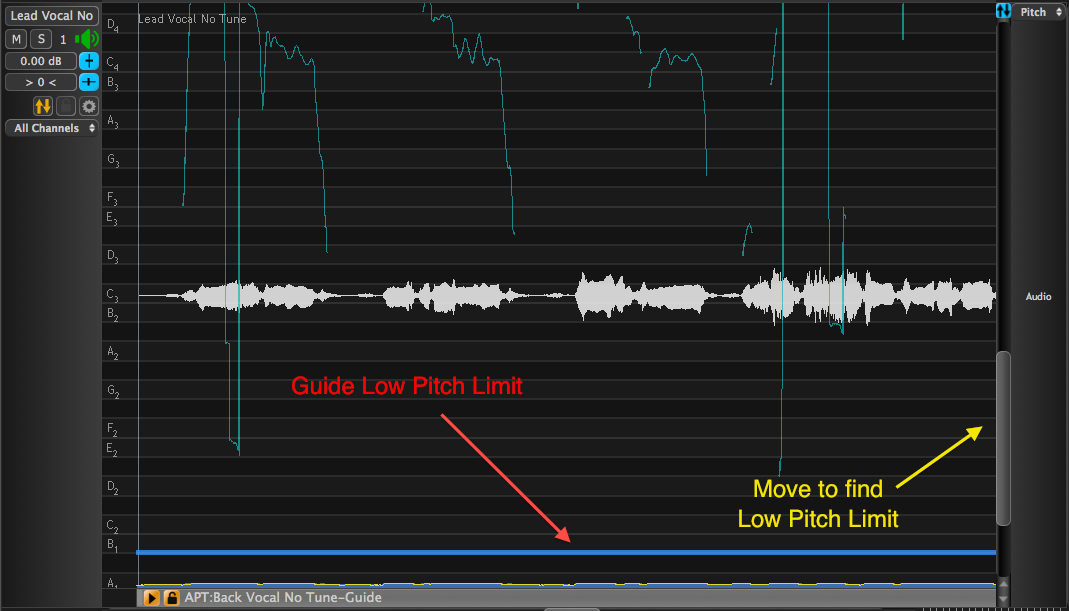
Once the Low Pitch Limit bar is shown, LEFT CLICK on it and, while holding down the LEFT mouse button, drag the line upward until it is higher than the octave jumps and let go of the mouse button. The pitch trace will be recalculated.
The results of doing this are shown below - where the downward octave jumps have now disappeared and been replaced by pitch measurements that fit with neighboring pitch measurements.
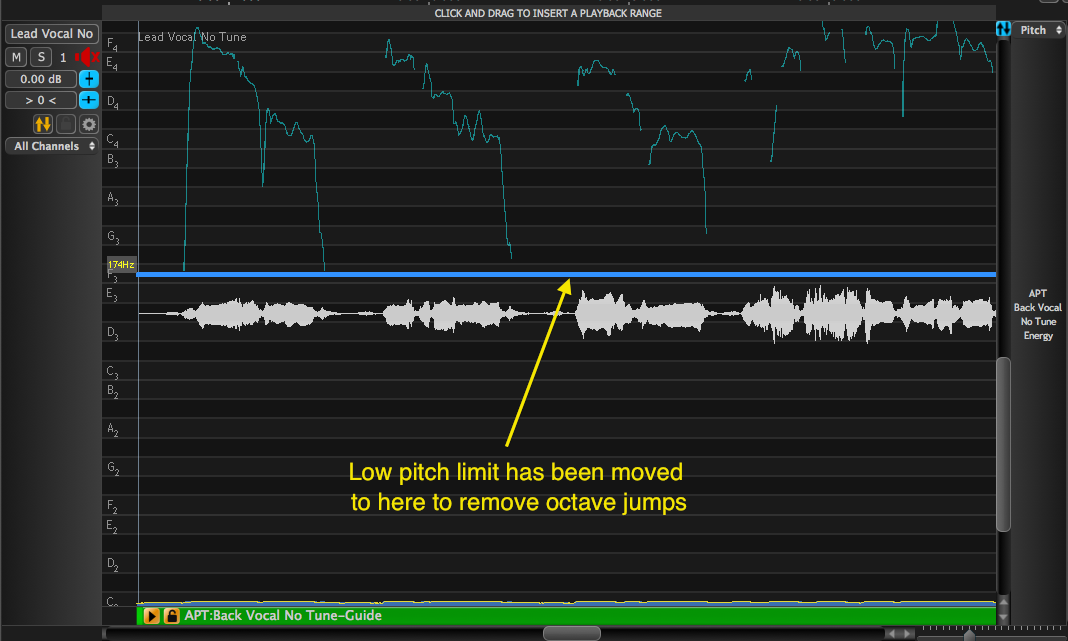
In the two following images, we show the Guide, Dub and Output tracks together, before and then after the Pitch Limit is raised.
