Quick Start Guide for VST3 ARA
- Quick Start for VST3-compatible DAWs
- Overview
- Using the VST3 ARA version of VocAlign 6 Pro
- Installation and Initial Setup
- Adding Vocalign 6 Pro to your tracks
- The plugin window and link settings
- Removing Vocalign
- Processing your Guide and Dub
- Select a preset and Capture your Dub
- Further controls
- Processing a Harmony Track
- Fixing Problems
- Previous Next
Quick Start for VST3-compatible DAWs
Studio One, Cubase, Nuendo, Ableton Live, Reaper, Cakewalk
Overview
In this Quick Start Guide, you will learn how to set up your VST3-compatible DAW and the VocAlign 6 Pro plug-in to be able to load audio into VocAlign 6 Pro, process it, and return the processed output to your DAW.
What about my DAW?
We will show how this VocAlign 6 Pro works using Studio One as an example.
However, very similar procedures apply to Cubase, Nuendo, Live and many other DAWs using VST3.
 | IMPORTANT: Whenever there is a difference in operations from Studio One and the other DAWs listed, we will provide links to EACH DAW's specific instructions for you to follow, after which, you will be returned to this main section to continue to follow the instructions in Studio one, but common to all DAWs mentioned. |
If you are new to our products, the audio transfer procedures might seem more complex at first than other plug-ins.
This is because you have to tell VocAlign 6 Pro which track is the Guide and which track(s) are the ones that need their timing and/or pitch adjusted by VocAlign 6 Pro to match the Guide's.
We won’t go into details in this Quick Start about the control panels or displays, as those will be described in detail in the sections in the folder Using VocAlign 6 Pro .
One last note - because we started long ago in the film industry, we call audio to be modified and output the “Dub”.
Using the VST3 ARA version of VocAlign 6 Pro
This section explains how to use VocAlign 6 Pro as an ARA plug-in with audio editors that support ARA.
Because ARA is relatively new, sometimes only newer versions of DAWs will support this method. Your DAW instructions will probably make it clear that yours has this feature.
For most audio editors such as Studio One or Cubase Pro, VocAlign 6 Pro needs to be added to each clip of audio (Audio Event) as an effect (Event Fx), whereas others such as Reaper, VocAlign 6 Pro can also be added as a track effect (Fx).
Installation and Initial Setup
- You should have already downloaded, installed and authorised the VocAlign 6 Pro plug-in on your Mac computer.
See Installation and Authorization if you haven't done this.
- It’s also necessary to make Logic's track selection automatically follow the selection of audio regions.
- This may already be set up, but if not, in Logic Pro, open Preferences > General, and select the Editing tab at the top.
- In the Editing page, enable ‘Select tracks on Region/Marquee selection’.
Adding Vocalign 6 Pro to your tracks
 | If Studio One Professional 5 does not show the Edit with VocAlign command in the Audio menu after installing VocAlign 6 Pro, please update to Studio One version 5.1.2.62686. The Edit with VocALign command will appear in the Audio menu and VocAlign 6 Pro will respond to it. In Studio One Professional 4, you can still use VocAlign 6 Pro as an ARA plug-in: hold down the Option key on your computer keyboard and drag the VocAlign 6 Pro VST plug-in from the Effects Browser onto all the selected Audio Events you want to process - Guides and Dub(s). |
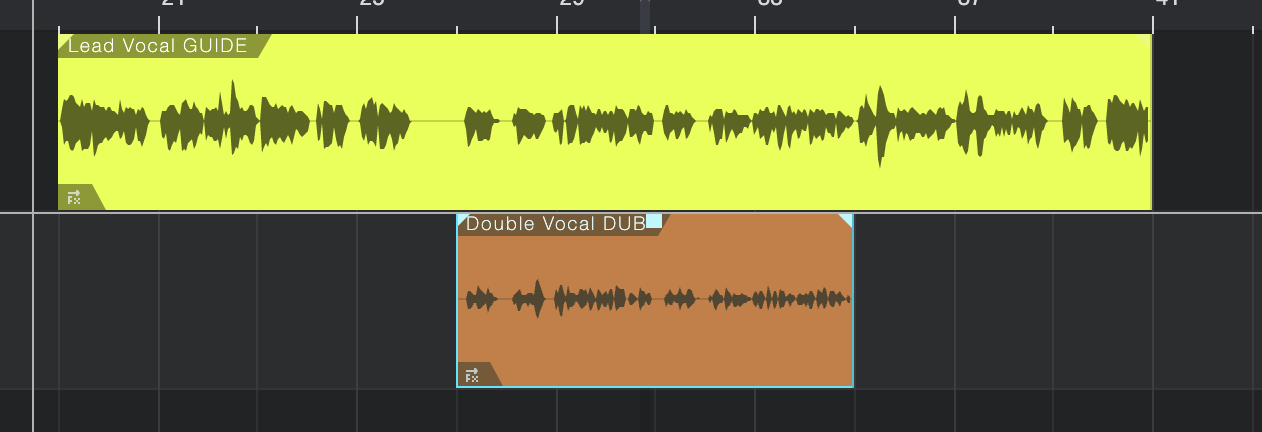
In Studio One, we will add VocAlign 6 Pro as an Event FX on the audio region that we would like to work with. For this guide, we have two tracks to work with:
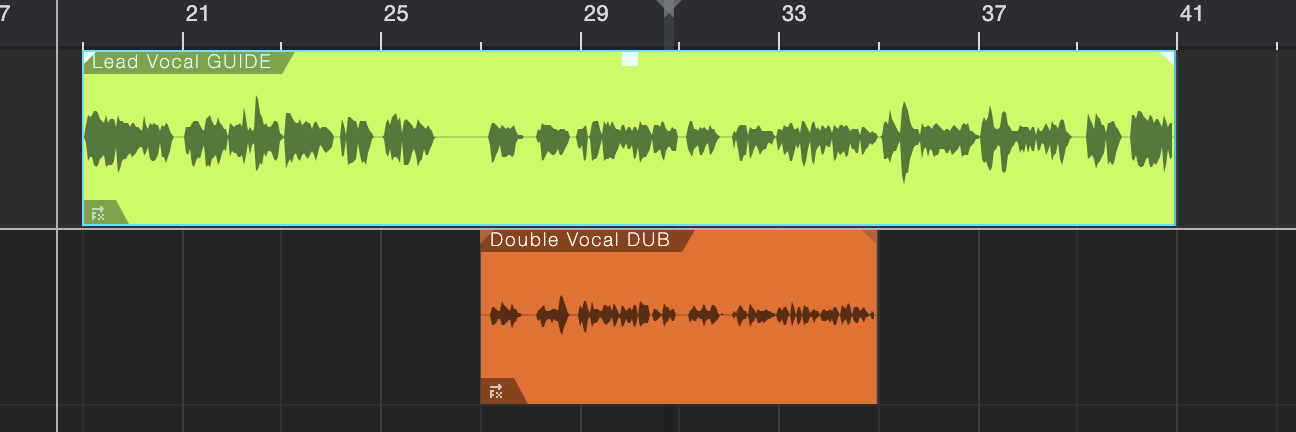
- Lead Vocal GUIDE: our main vocal track, referred to as our Guide
- Double Vocal DUB: our vocal double, or Dub, that we would like to tune and align to our Guide track
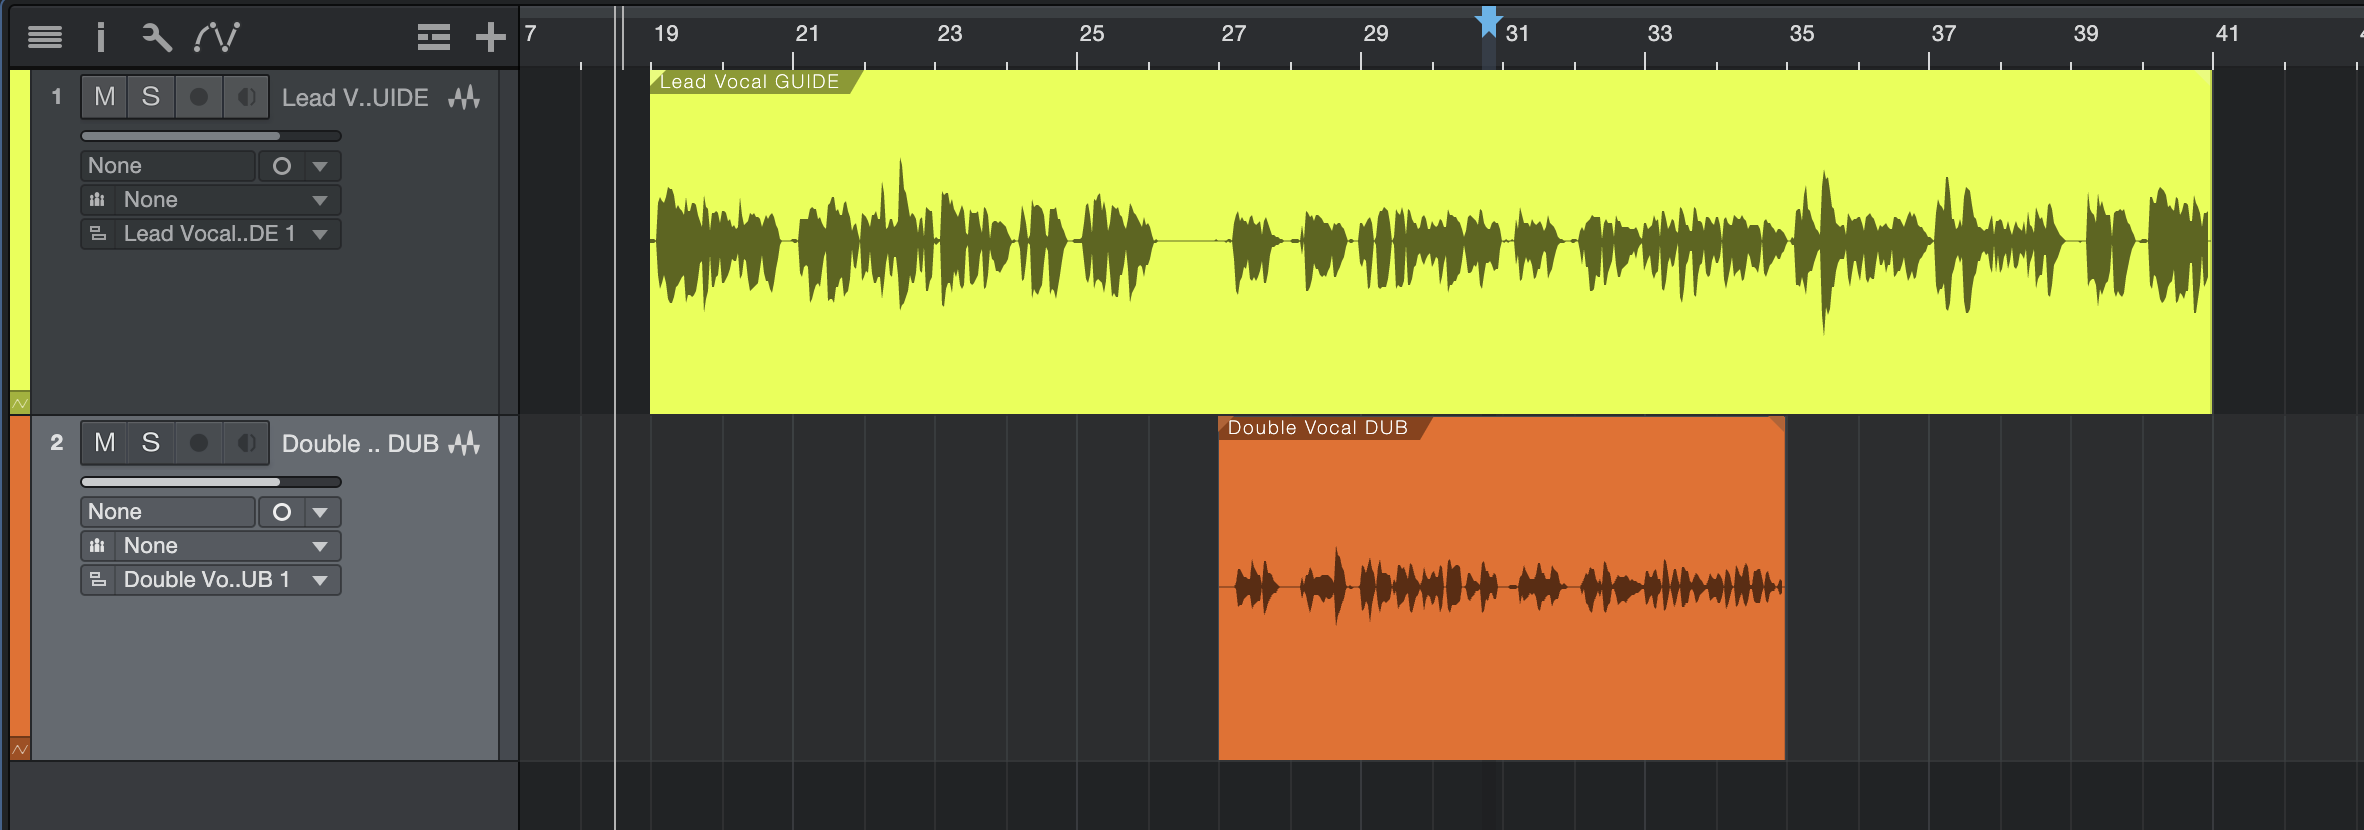
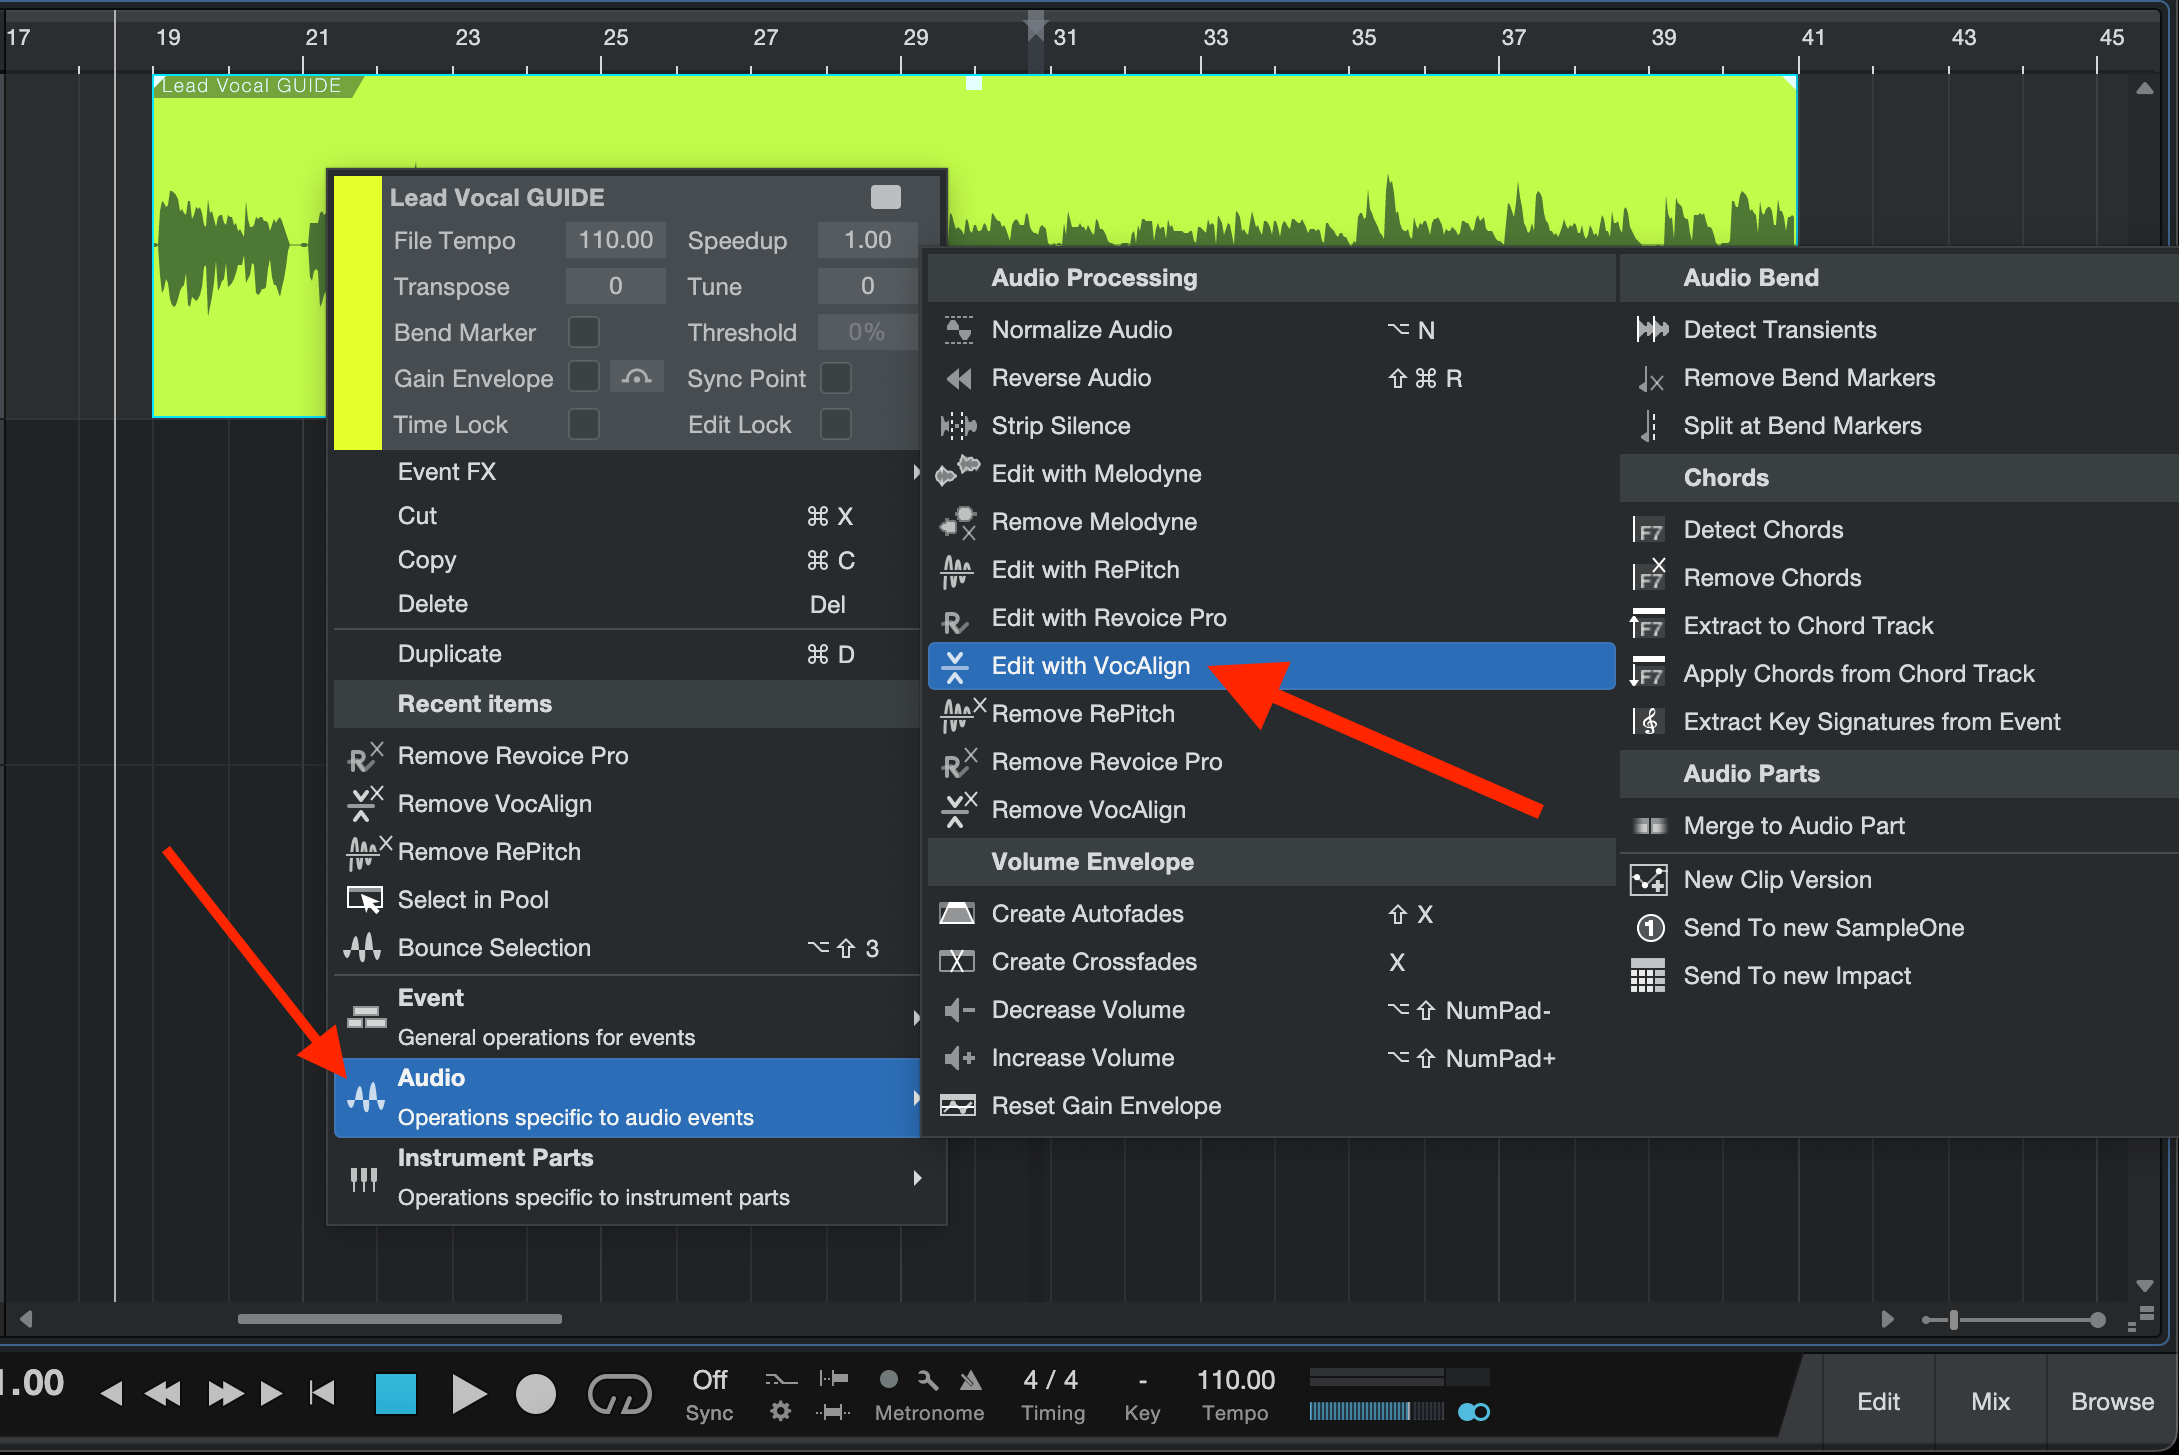
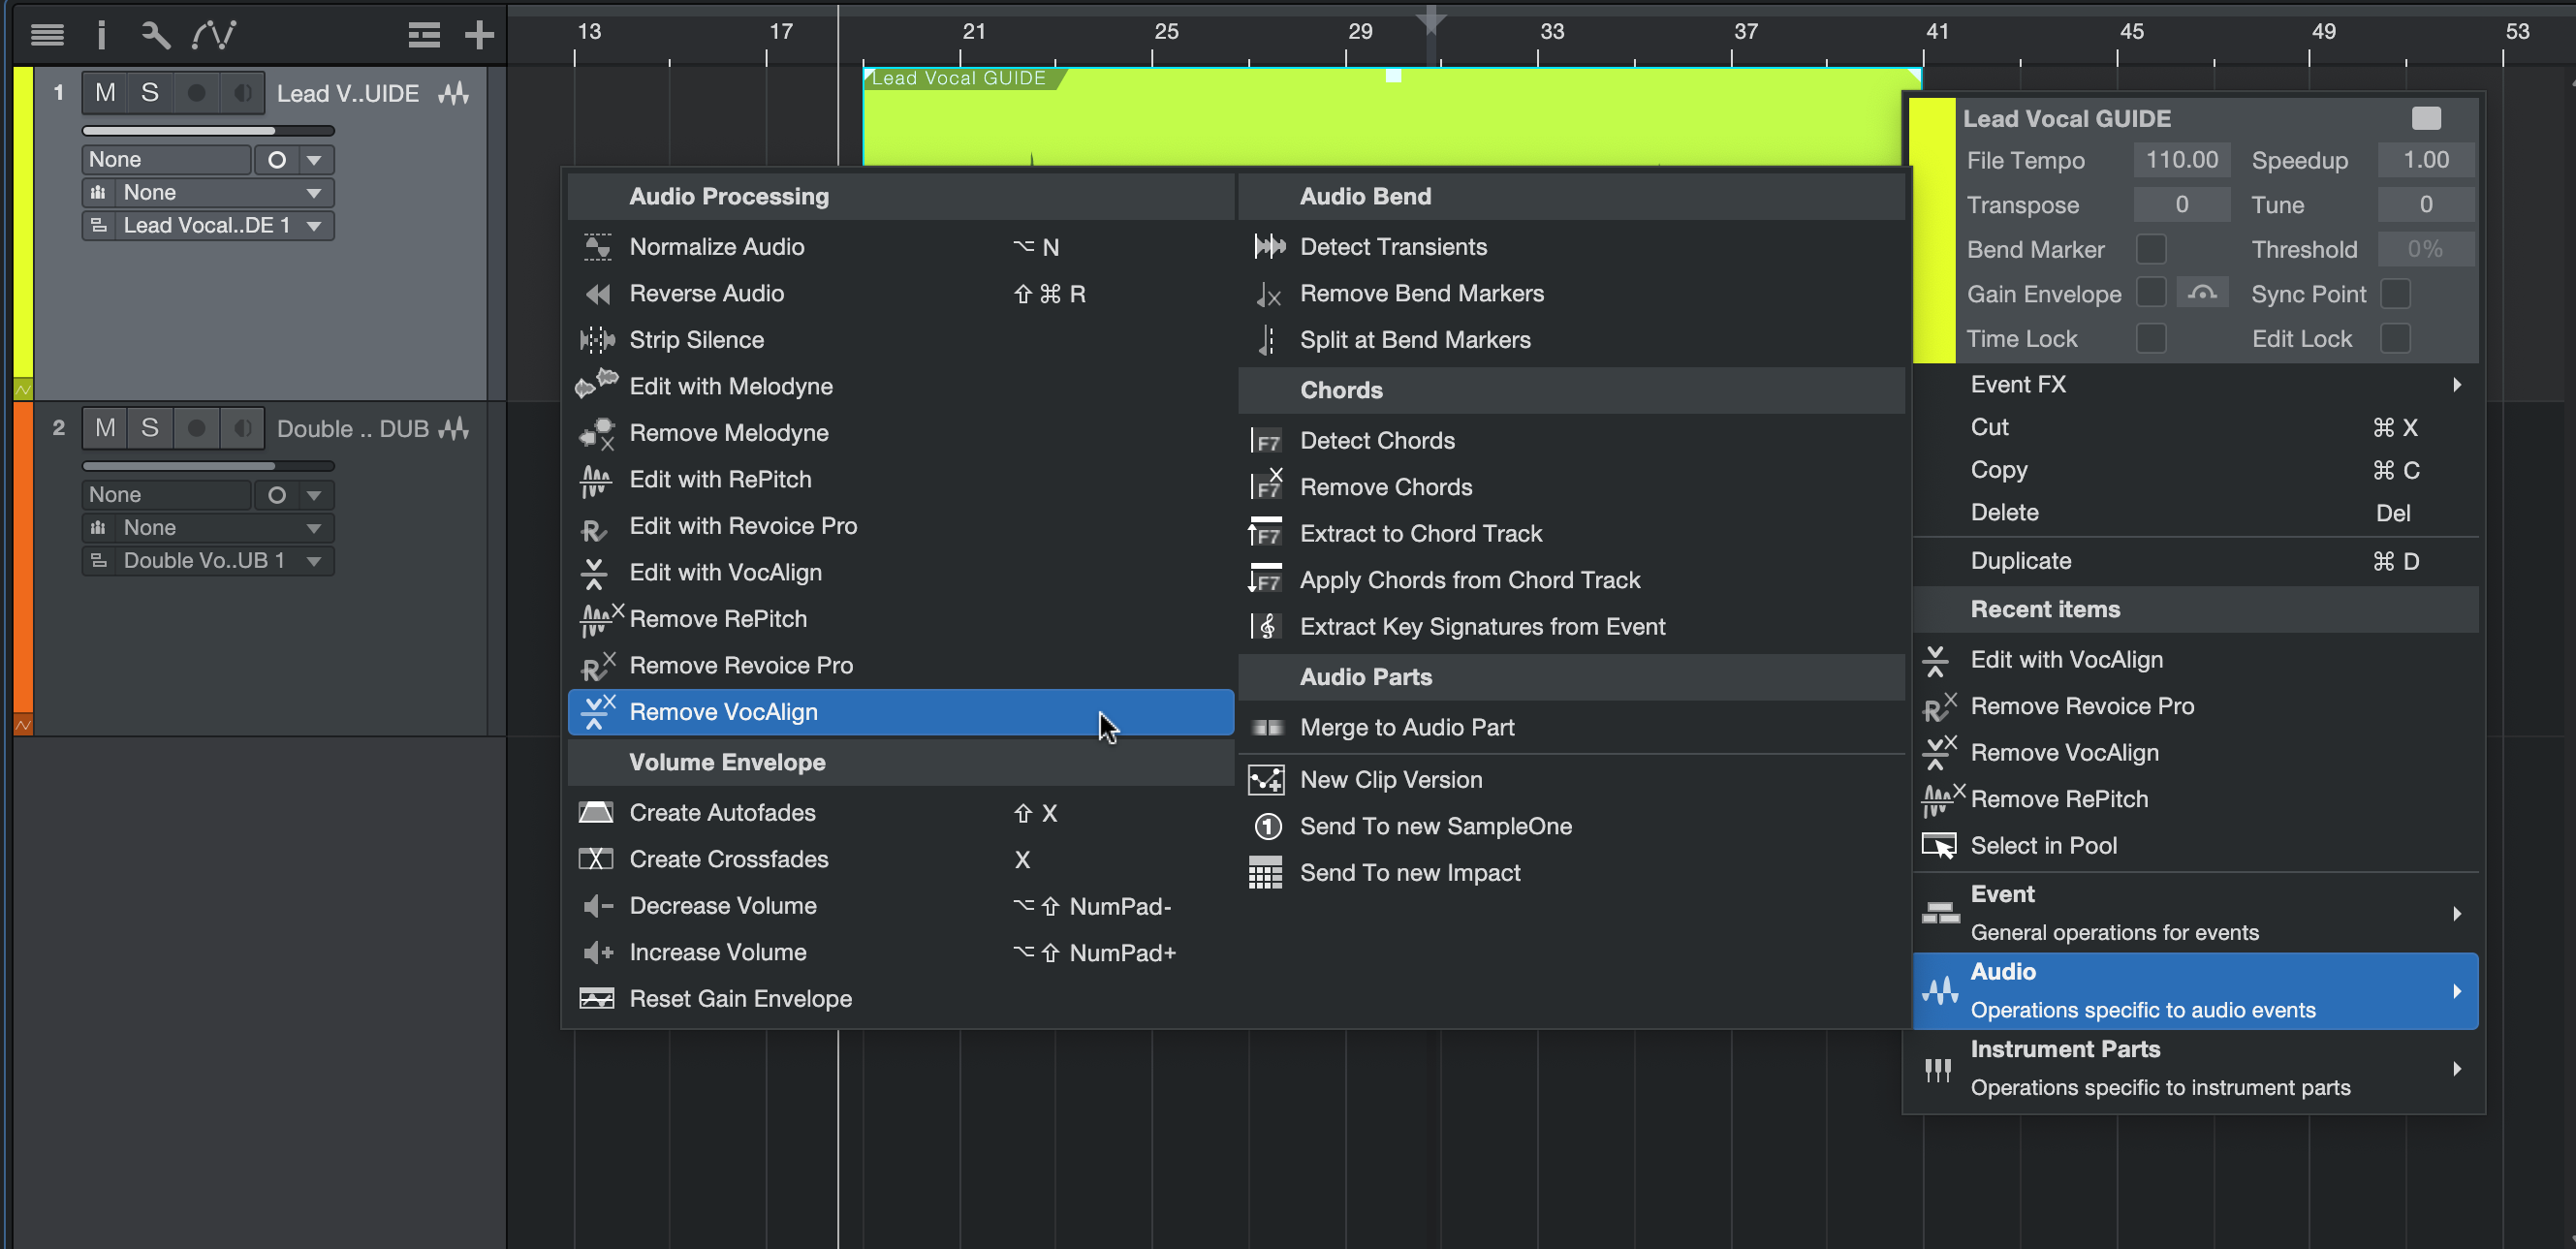
With both your Guide and Dub audio regions selected, right-click one of them to open the menu.
Find 'Edit with VocAlign' under 'Audio -> Edit with VocAlign' and select it to add VocAlign as an Event FX to both clips.
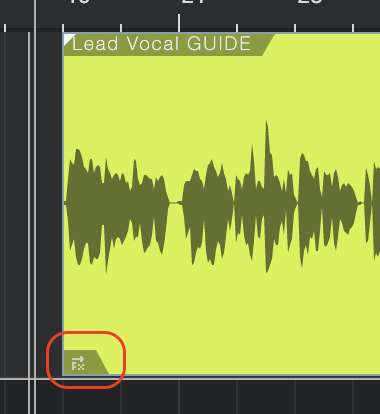
VocAlign will now be added to both audio regions, as indicated by the small Event FX symbol in the bottom left corner of each audio region as shown below.
The plugin window and link settings
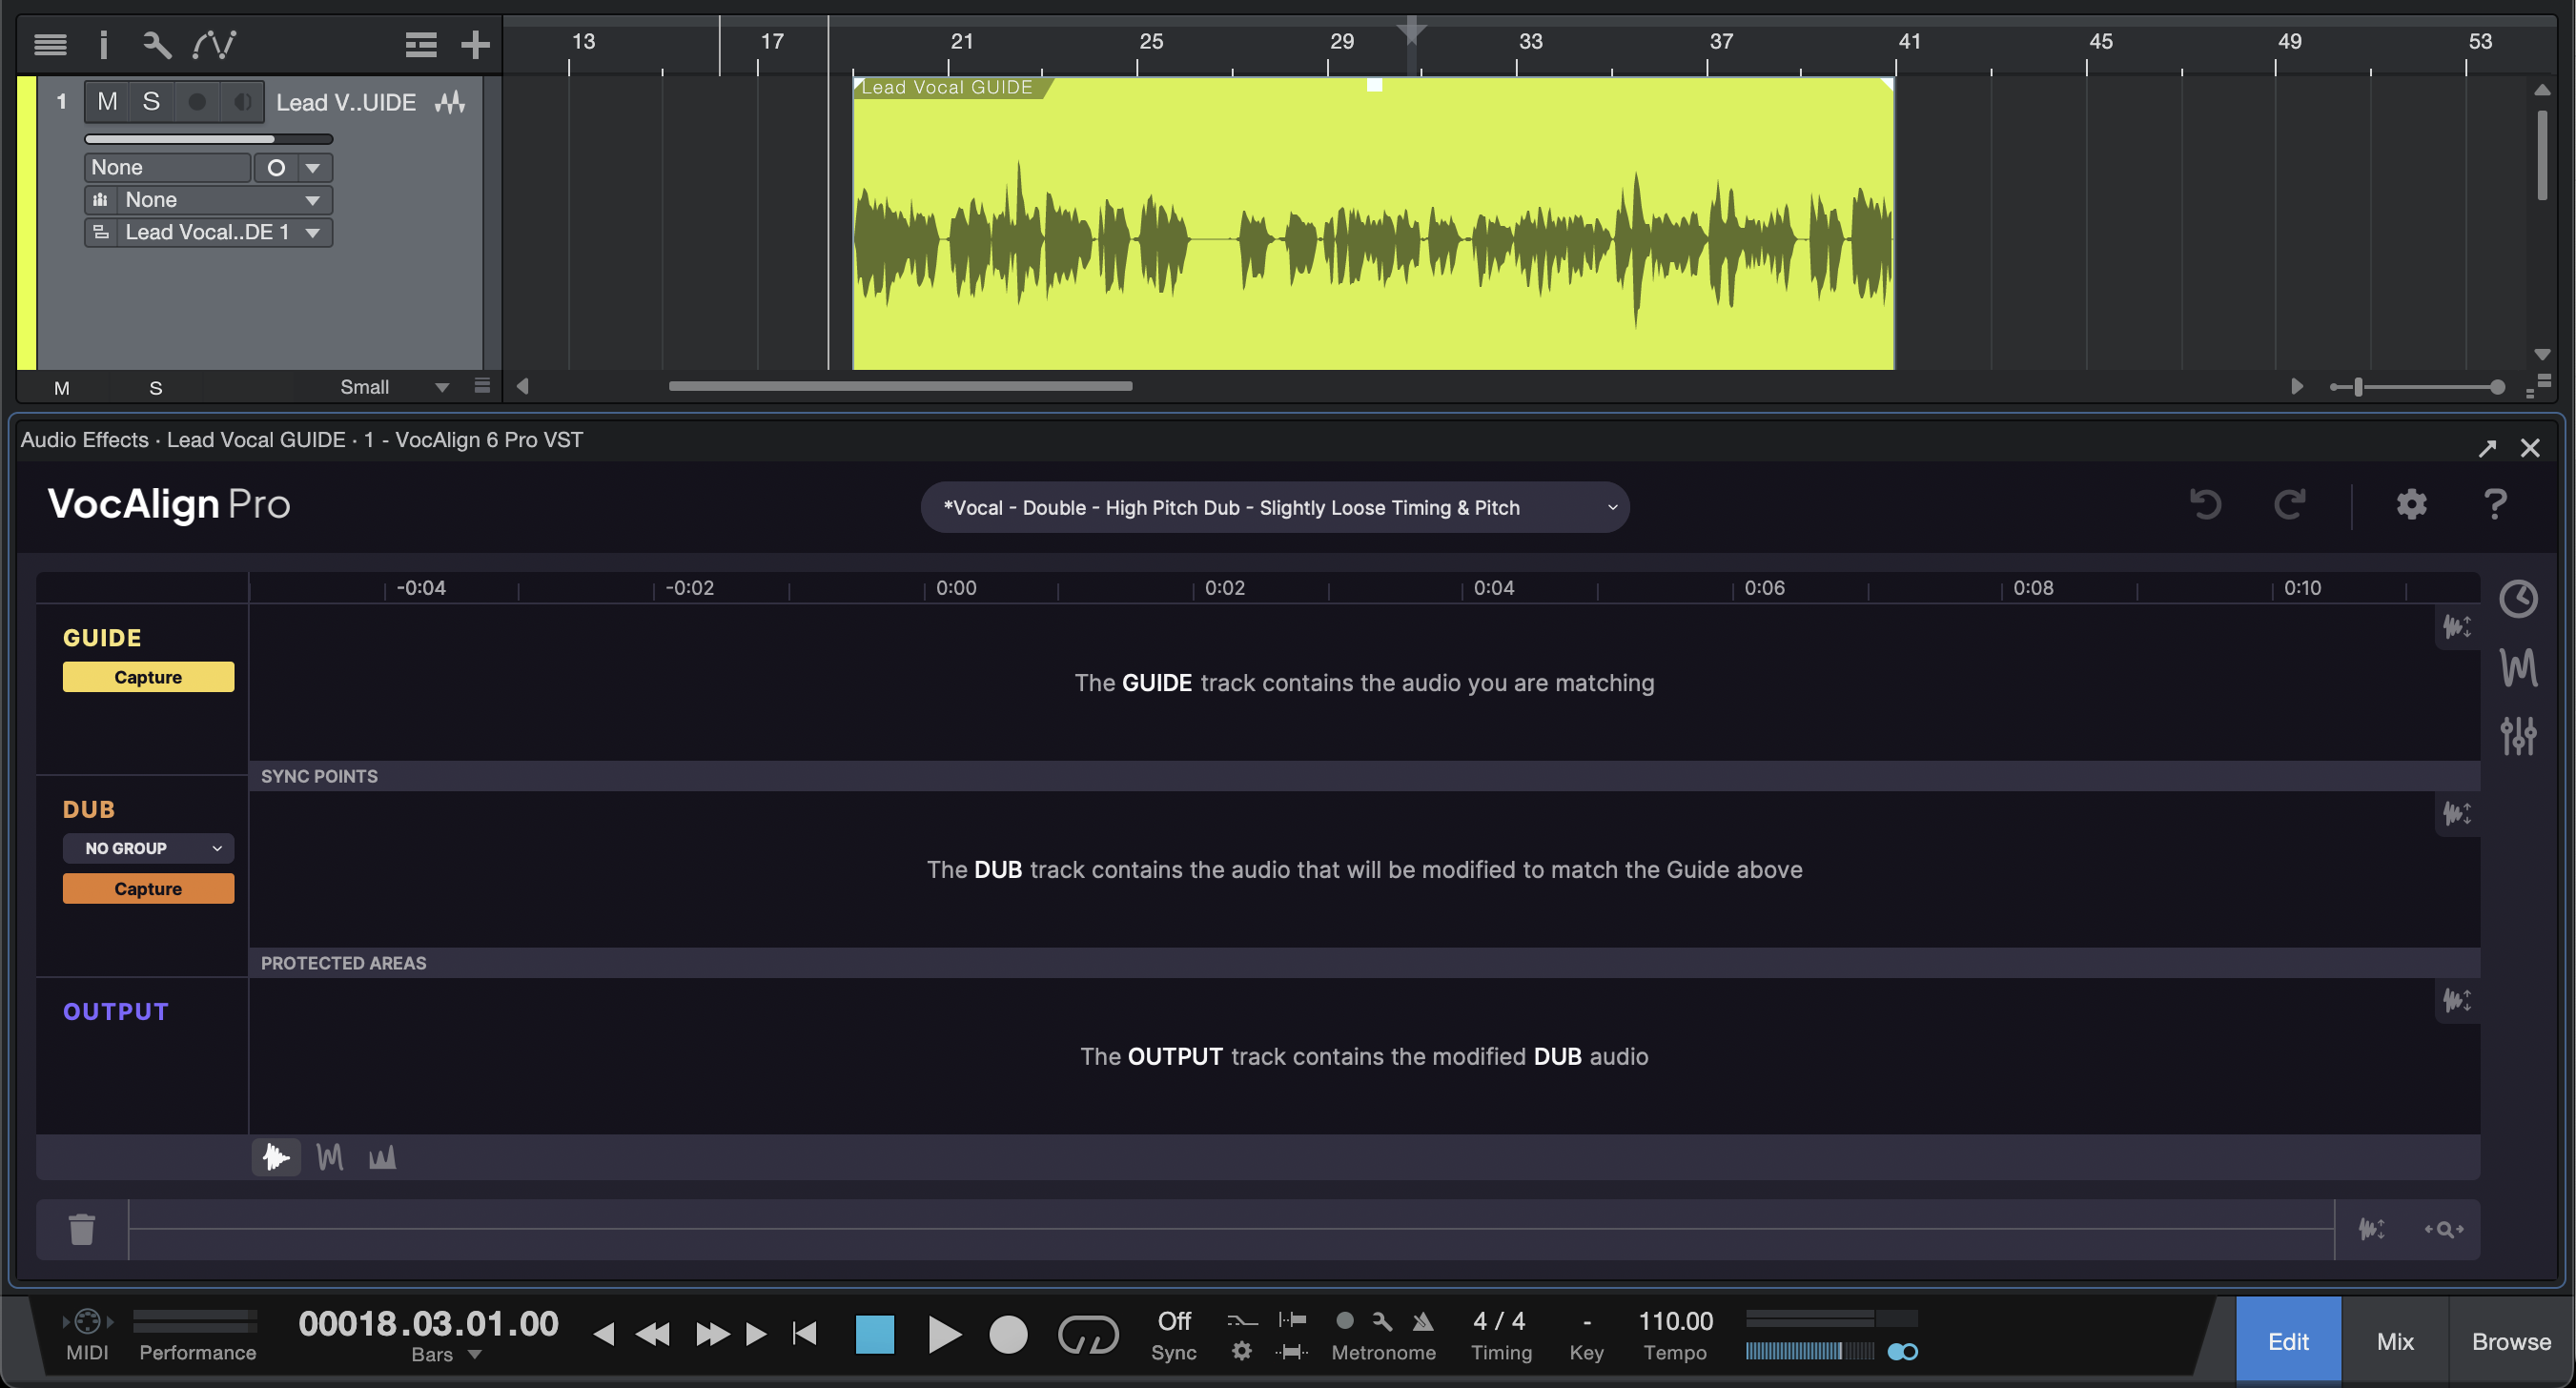
Now that we have added VocAlign to our audio regions, you should see the VocAlign plugin window either docked in your DAWs edit window, or as a separate plugin window. In Studio One, we can see the plugin opens docked in Studio One's edit panel as shown below.
Removing Vocalign
If you need to remove VocAlign, select the audio region or event, right click it, and select 'Remove VocAlign' from the Audio menu.
Processing your Guide and Dub
We will now Capture our Guide into VocAlign.
First, select your Guide audio region as shown in the below image.
Second, in VocAlign, press the yellow Capture button underneath 'Guide' as indicated by the red arrow in the below image. This will Capture your audio into the Guide area of the VocAlign interface, which now displays a yellow waveform. The outline of the Guide waveform is also shown in the Output track as a timing reference.
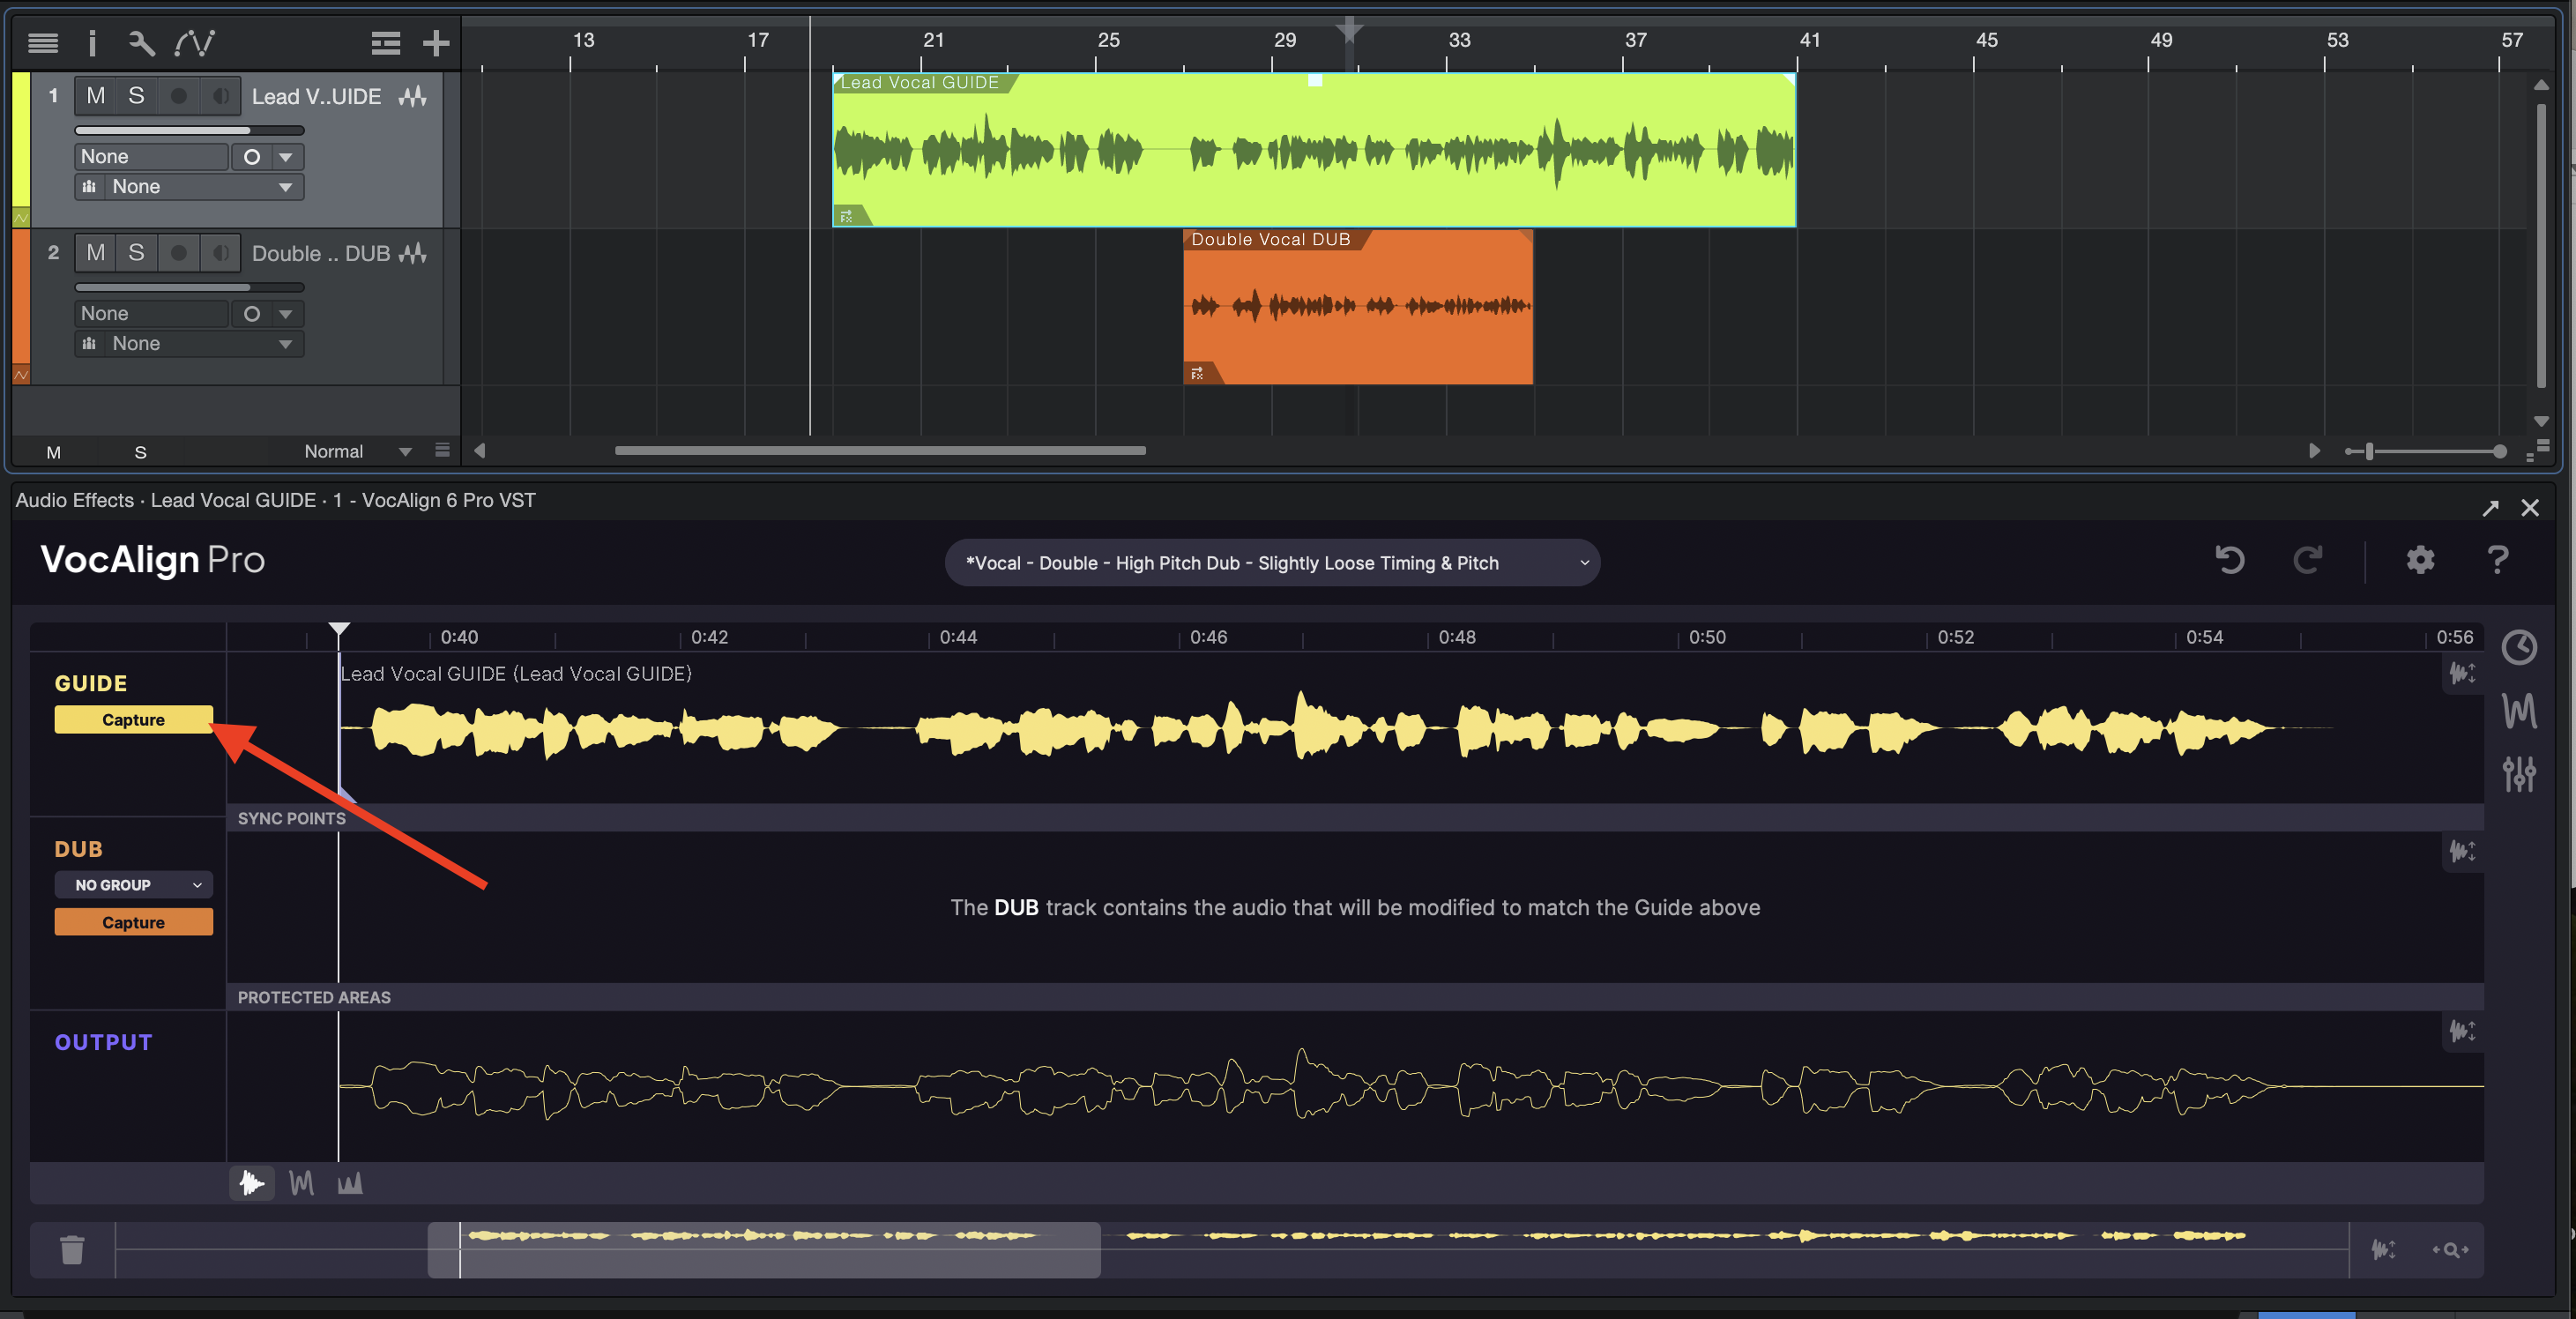
Our Guide audio is now ready to use in VocAlign.
Select a preset and Capture your Dub
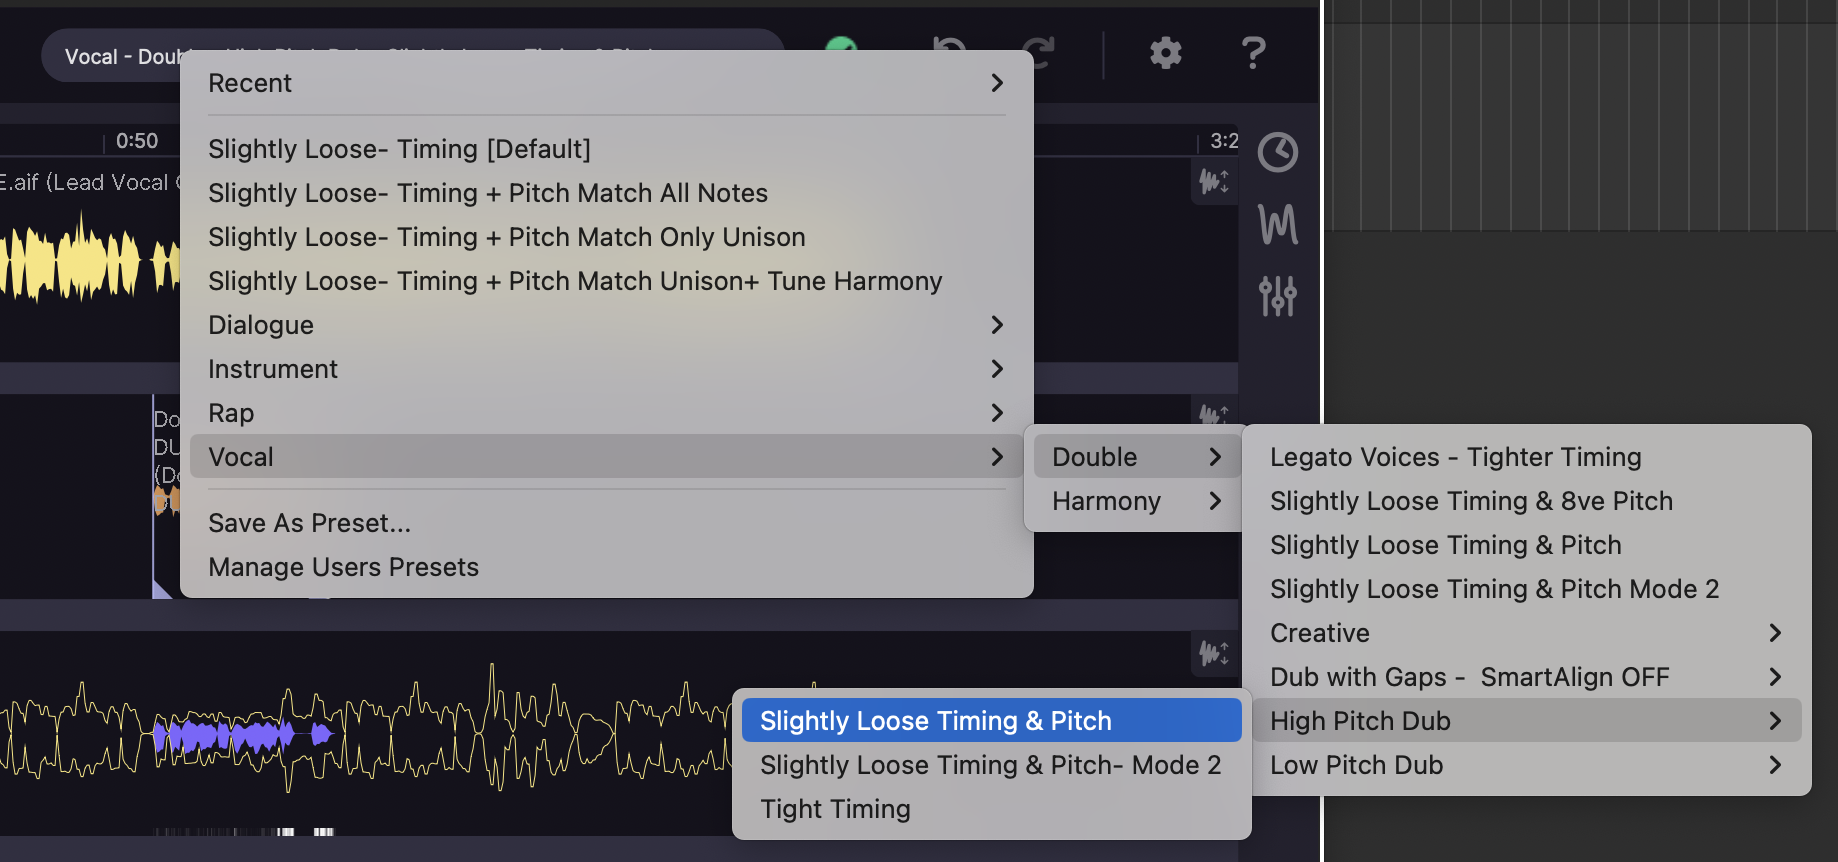
Before capturing our Dub, we will select a preset. Once the Dub is captured, VocAlign will immediately process and output it with whatever preset is currently selected. The preset menu is at the centre-top of the VocAlign interface, shown below.

Click the preset to open a dropdown menu. Our Dub track is a vocal in a high range, so we will select 'Vocal -> Double -> High Pitch Dub -> Slightly Loose Timing & Pitch' as indicated below.
Now select your Dub audio region, as shown below.
Within VocAlign, click the orange Capture button under Dub, as indicated by the red arrow in the below image. You will now see an orange waveform in the Dub section of VocAlign, indicating our Dub audio.

VocAlign immediately applies our chosen preset and processes our Dub track to create the purple Output shown just below the dub. Because we are using ARA, we can also play back our processed audio directly in Studio One to hear the resulting output.
Rendering your output
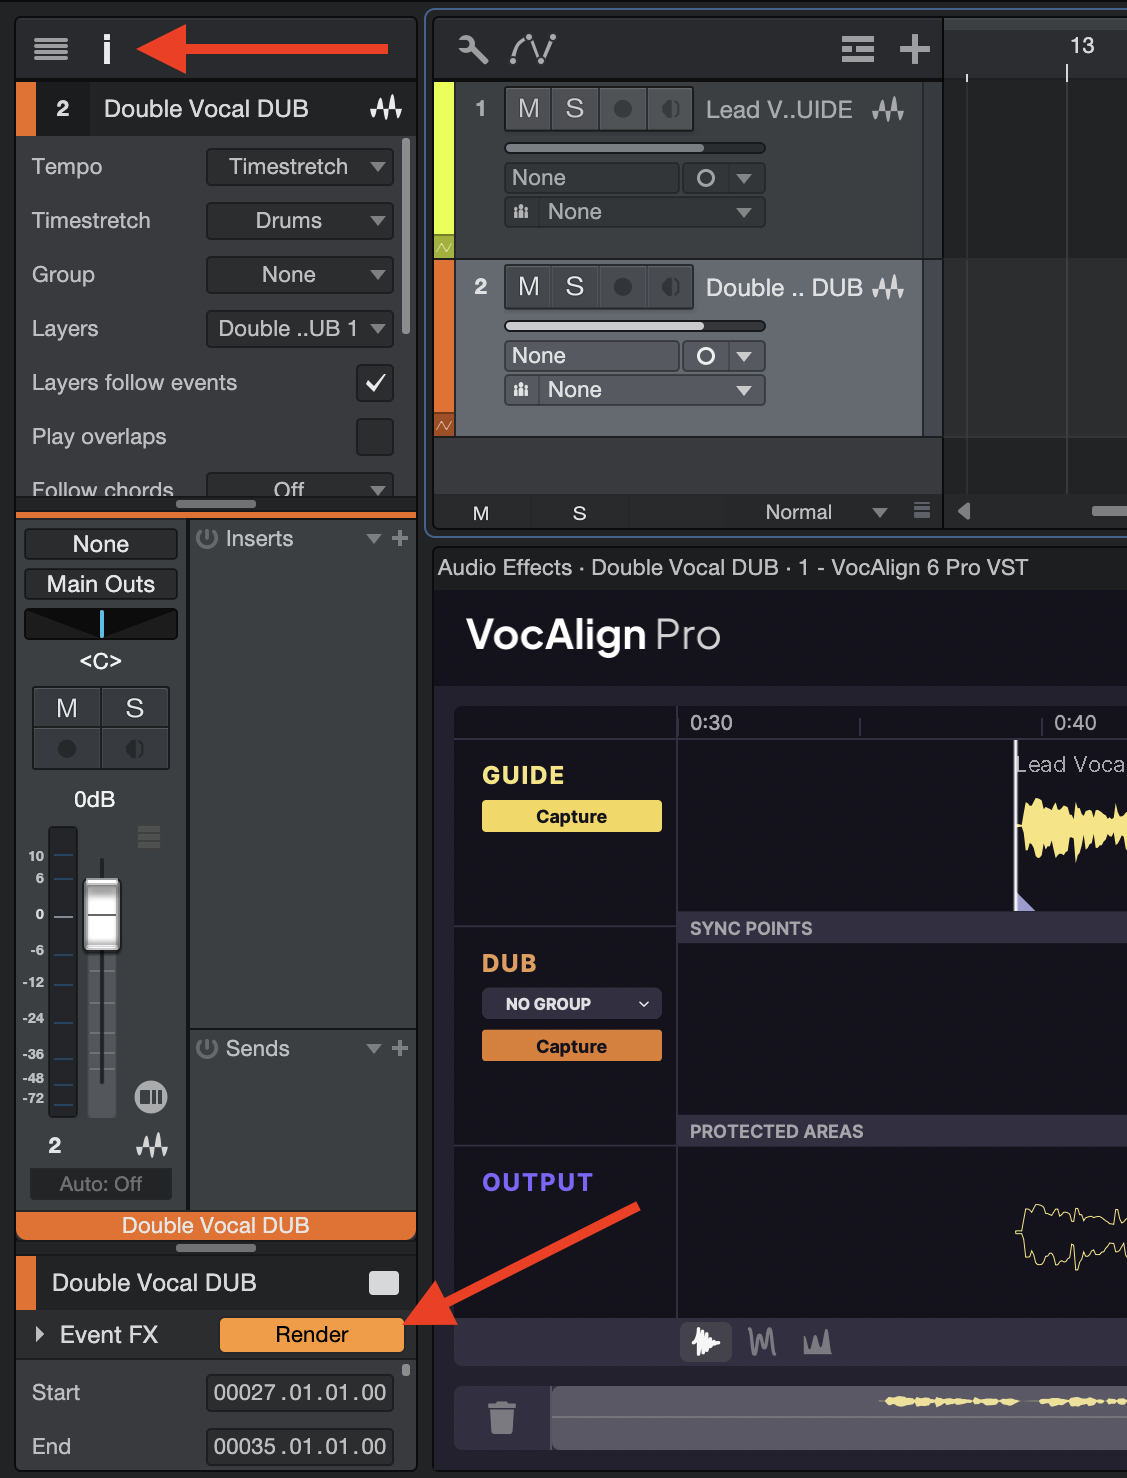
If you would like to render and commit your changes, click the 'Render' button at the bottom of the Inspector panel on the left side of Studio One. If you do not see the Inspector panel, open it by clicking the 'i' button in the upper left of the Studio One interface. Once rendered, it will change to a 'Restore' button in case you wish to revert your changes.
If you are using another DAW, please research how to render ARA plugins in the corresponding manual.
 |
TIP: Unless you render the aligned audio, it will continue to be applied as a real-time effect, until the effect is turned off. This means that you will continue to hear it as it was originally aligned, even if you edit the original audio. To avoid any such confusion, render the effect before changing any audio in Studio One and it will then replay reliably. You can Restore the real-time effect after rendering in Studio One if you change your mind. |
Further controls
Vocalign also provides in-depth control via the Pitch, Timing, and Other control panels available on the right side of the UI. These controls are discussed in detail here.
To open these panels, click the three icons on the right side of the interface, circled in red below.
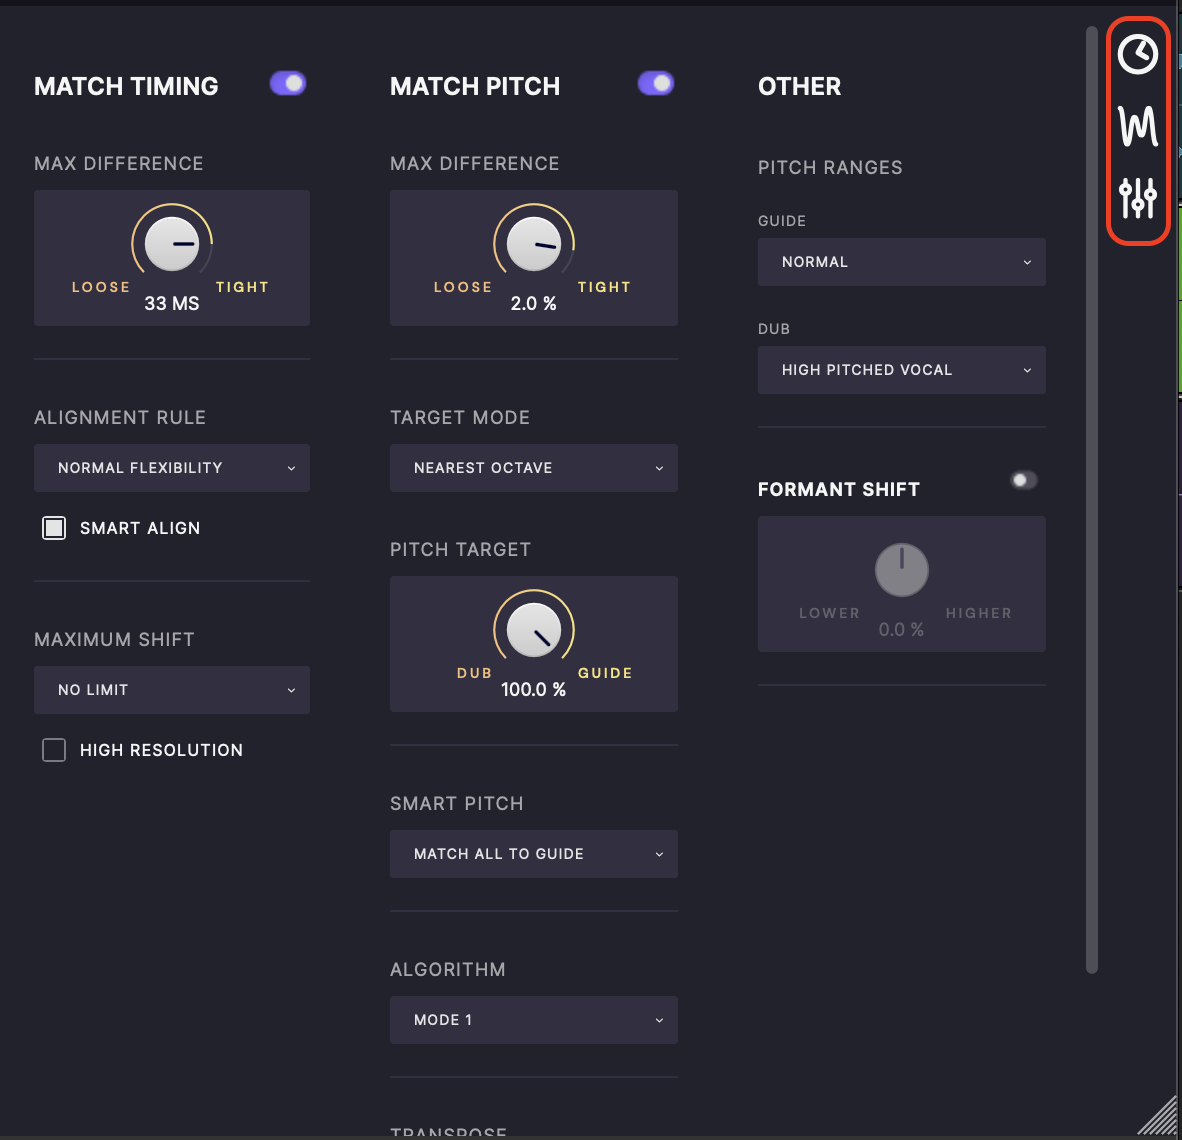
You can adjust the Max Difference controls in the Match Timing and Match Pitch sections to tighten or loosen the timing and pitch alignment applied by the preset. With each change, the Output is reprocessed and the Output waveform redrawn, and the audio is synched to Pro Tools via the ARA connection.
Processing a Harmony Track
When working with harmonies, Vocalign provides Smart Pitch. The Smart Pitch options are accessed in the 'Match Pitch' control panel, discussed in detail here.
Fixing Problems
Protected Areas
There will be times when you want to exclude certain sections in the Dub from processing – when your Guide vocal jumps up an octave, or gets raspy and lower, but your Dub doesn't, for example. Or when there are different words or syllables in the Guide and Dub, which can throw the time alignment off, resulting in unnatural distortion of the Output timing. VocAlign 6 Pro's Protected Areas enable pitch, time or both to be kept unprocessed over any specified range within the Dub.
Protected areas are covered in detail here.
Sync Points
If you're getting small differences in timing caused by different words, sounds or delivery, you can correct them using Sync Points. These let you assign pairs of pointers to events in the Guide and Dub that should be time aligned if they are not. Click here for more details on Sync Points and how to use them.
Previous Next