The Doubler Process
Description
The Doubler process creates natural-sounding double tracks in seconds from vocal or monophonic instrument tracks. It can take as few as three steps to do this.
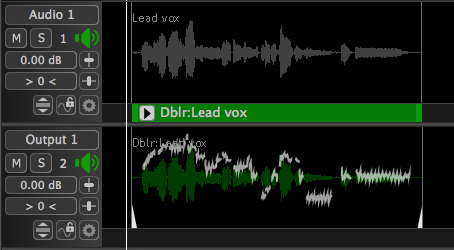
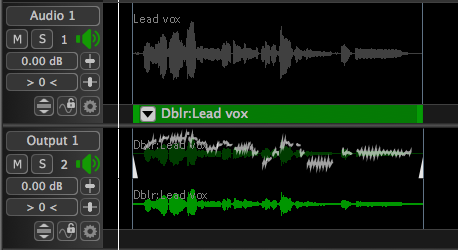
The Input to the Doubler (shown in dark grey in track "Audio 1" in the image below) can be mono or stereo tracks.
The Output from the Doubler (shown in green in track "Output 1") can be either mono (below left) or stereo (below right).
 Doubler Features
- Provides controls for modifying timing variations, formants, and vibrato.
- Stereo input signals can have independent channel controls or the channels can be phase locked.
- Supports extreme parameter variations to create special effects.
- Comprehensive preset system.
What's in this section
This section provides details on how to use the Doubler process in Revoice Pro. For a "Quick Start" (text only) approach without full details, click here or watch one of the Video introductions or tutorials.![]()
Important Updates for existing users:
In Revoice Pro 3.3
- A faster "Quick Doubler" mode has been added for use with Studio One.
In Revoice Pro 3.2
- Time-varying automation of settings is now possible in Doubler, as it is in e.g. APT.
- Doubler formant slider range increased from 10 to 15
- New Factory Presets added: lower delay Mono and Stereo Doublers, with lower average delays
In Revoice Pro 3.1
- Multiple versions of a process can be quickly saved and compared.
In Revoice Pro 3.0
- The Doubler was given negative time adjustment options ±200 ms.
- Doubler sound quality was improved.
- A high-resolution processing mode was added.
- Multiple processes with different settings can be generated.
In Revoice Pro 2.5
1) The Stereo and Mono Doublers were merged into one Doubler process in which the number of output tracks are selected. Details are below.
2) For Pro Tools users, a "Quick" Audio Suite (and AAX) Revoice Pro Doubler plug-in was introduced for quickly sending selected audio from Pro Tools to Revoice Pro with one "Capture" button press, and sending the automatically doubled audio back to Pro Tools with one "Spot" button press.
The process settings used are the Doubler's "Default User Preset". Details of this Quick method are found here but the user should read the sections below on how to set the Doubler Control Panel and create the desired Default User Preset that is used in the Quick Doubler processing.
In Revoice Pro 2.2
3) A fast new approach to set up the Doubler Process was introduced. In general, we recommend using this new approach because it is highly automated, making it faster, simpler and more flexible. (Pro Tools users also have the option of using the "Quick" Doubler).
With the new method, setting up a new Doubler process and creating and hearing the Output signal takes as few as 2 key strokes. It uses the New Process window that can remain on the screen. Once the Doubler Process, the processing range and input and output tracks are set as required, then pressing the keyboard N key (or LEFT CLICKing the New Process button) creates the new doubler process. Lastly, pressing the Space Bar renders the output and starts playback.
Creating a Doubler Process
Before creating and inserting a Doubler process into a Process Control Tracks, the user must set the four main setup options:
- Which Revoice Pro Track contains the Input signal
- The Range (start and end) of the Input audio to be processed
- Whether to use a Preset
- Which Revoice Pro Track to send the output to.
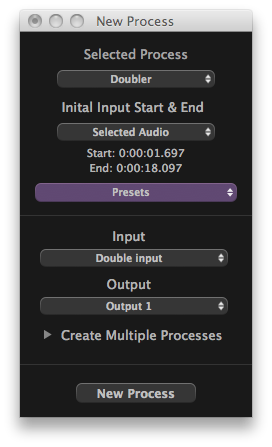 In brief, the four variables above are easily set in the New Process window shown at the right (press the B key to display this). Then when the new process is actually created (by pressing the N key or the New Process button), this inserts a Doubler Process Control Block into the Input's Process Control Track located just below the Input audio track, as seen in pictures below. You can change the settings of the doubler (including Mono or Stereo outputs) if needed, by pressing the P key to bring up the Doubler's controls and modifying them.
To create the doubled output and hear it immediately with the input, you can solo the Process' Input and Output tracks by pressing the E key and then simply press the Space Bar to process and play.
Before reading the rest of this section, the user should make sure they are familiar with two key features of Revoice Pro: Process Control Tracks and Process Control Blocks which were introduced here.
TIP for Pro Tools users:
There is the option to use the "Quick" Doubler Audio Suite (and AAX) plug-in described here to run the Doubler process, without having to leave Pro Tools, in as few as two keystrokes. However, those instructions do not explain how to choose or set the processing settings, which is described below and which must be understood to get the best results.
Input Audio Preparation
To cut down keystrokes when using Revoice Pro, we generally recommend the user loads entire tracks of audio into Revoice Pro and then processes these in sections, working from the start towards the end. This generally works very effectively.
That isn't to say that the user shouldn't load audio in small sections if they prefer, or use the Doubler to process an entire input track. These choices depend on the signals and the user's comfort with their own workflow.
The instructions below will start from having a mono or stereo input signal already loaded in a Revoice Pro track by any of the methods described here.
Back to Index
Overview: Basic Doubler Setup and Processing
Step 1 - Check the New Process settings and change them if necessary.
Let's start with a simple example session with one short mono audio signal ("Lead vox") shown below and create a Stereo Double of that audio. However, the techniques to be described will also work for larger sections or even an entire track.
Note that in the Revoice Pro Session shown, the second track has already been labelled Output 1, (which will be the destination for the Doubler's output); the track containing the Input audio is labelled Audio 1. In the picture, the input audio is shown as "selected" (in green), which is how it would be immediately after loading it. The New Process window is shown open at the right.
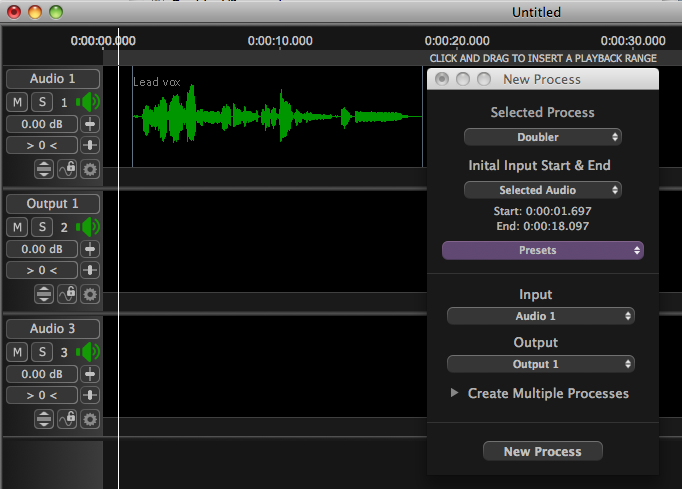
If you do not see the New Process window, then you need to open it. To do this, make sure the Revoice Pro program is selected and press the B key on your keyboard. This will open the New Process window. Pressing the B key again will close it - but it is generally more efficient to leave this window open.
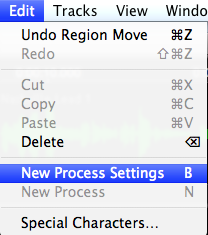 You can also open this window by selecting the "New Process Settings" in the Revoice Pro Edit Menu, as show at right.
The New Process window will automatically preselect all of the drop down menu items and modify some of them as various items are selected in the Revoice Pro session. However, in this first example, we will show that none of these settings will need changing.
We will briefly explain each drop down option in the New Process window as we check they are correctly set in this example.
 Check the Doubler Process
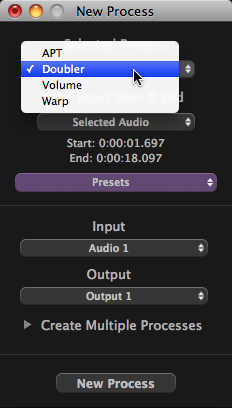
In the New Process window shown previously, under "Selected Process" is the name of the next process that will be created. If the process you want to create is not shown, then LEFT CLICK the drop-down menu under "Selected Process". All of the available processes will be shown, as in the picture right. LEFT CLICK the process you want to create.
The "Doubler" process is shown selected, which is correct for this example.
Check the Input Signal Processing Range
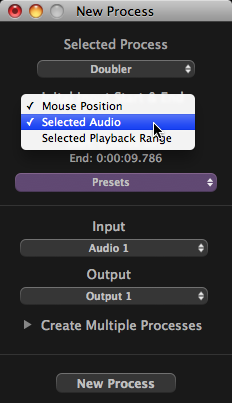
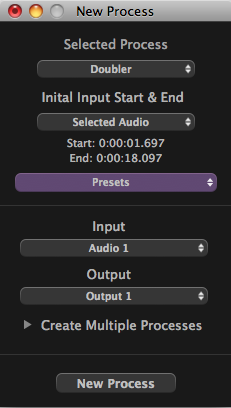 There are three options available to set the initial range of the Doubler's processing on the input audio.
The selected option is displayed in the New Process window under "Initial Input Start & End" (shown first right). The available options are revealed by LEFT CLICKing on the drop down menu.
The three options are shown in the picture above right, but some options may not be displayed, as will be explained shortly. These options will tell the process to:
- Use the range of Selected Audio (which will be green) to set both the start and end of the processing
- Use the range of a Playback Range to set the start and end
- Use the Mouse Cursor position to set the starting point of a short range which can be adjusted later.
We don't recommend using this last option for the Doubler (and it will not normally appear) so it will not be discussed further in this section.
Which options are displayed in the drop down menu under "Initial Input Start & End" changes dynamically depending on whether these selections are available.
In the event that no audio is currently selected (green), then the Selected Audio option will not appear. Similarly in the event that no Playback Range has been created, then the Selected Playback Range option will not appear.
Important: The range-setting option that is automatically selected and displayed is simply based on whether an Audio waveform, or a Playback Range was the last item selected by the user.
We will explain below more details about the differences between these two options.
Select a Preset if desired
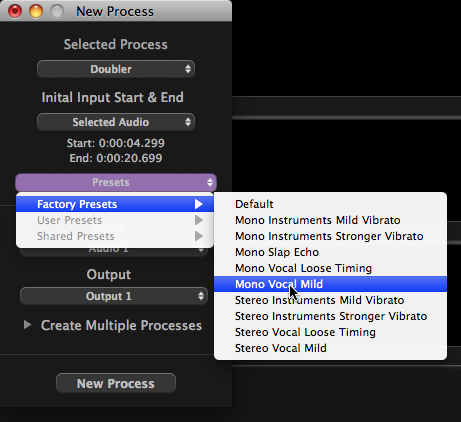
You can choose from one of the provided Factory Presets in the Presets drop-down menu, as a good starting point for processing typical programme material, either in mono or stereo. Alternatively you can select the "Default" setting. If you do nothing, the Default will be used.
 Check the Input Track selection
The track providing the input to the Doubler process can be any track in the Revoice Pro Session window. However, the initial automatic choice will be the first track in the Session.
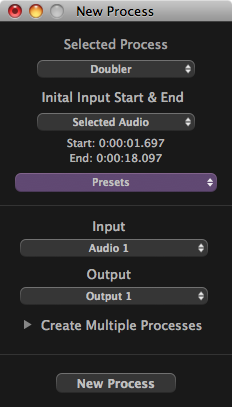
In the New Process window shown right, under "Input" the selected track is "Audio 1". In this example, LEFT CLICKing on that drop down menu would reveal the three tracks shown below.

TIP: Creating a new audio track will set the Output track to the new track.
Check the Output Track selection
The track that will be the destination of the Doubler process' Output will also be automatically selected. But this Output choice should always be checked, because it will be reset to any new track that is created in the Session.
In the example shown below, we have LEFT CLICKed on the "Output" drop down menu and are changing the setting to the second track, labelled "Output 1".
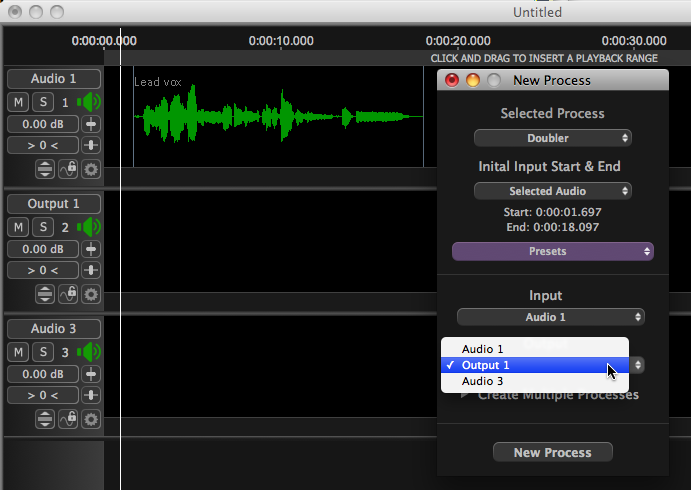
Step 2 - Create the Process with the selected settings - Press "N" key
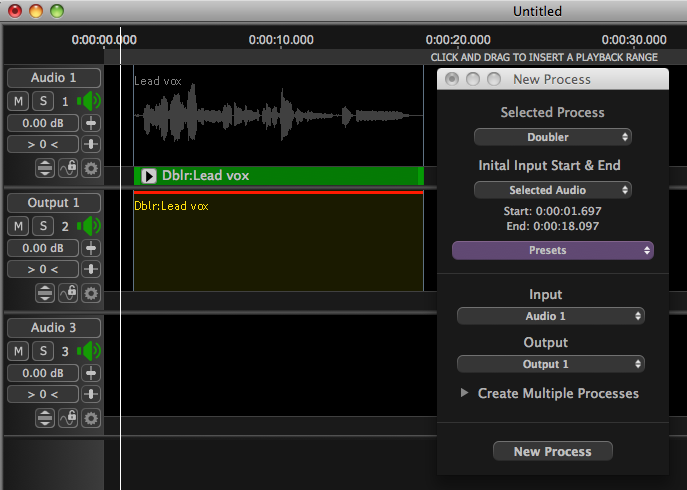 Since the settings are set up correctly, we can now create and insert the Doubler's Process Control Block. If Revoice Pro is the selected program, simply press the N key on the keyboard. Or press the New Process button at the bottom of the New Process window.
The result of doing this is shown right.
In this example, two things are visible: Firstly, a green (selected) Process Control Block labelled "Dblr:Lead vox" has been inserted in the Process Control Track below Audio 1. Note this is the length of the previously selected audio (and the audio is no longer shown selected). This shows where the processing will start and end.
Secondly, in the Output 1 track, the Double output signal has been reserved with the label: "Dblr:Lead vox" and a red line shows that the process is ready to be "run" to render the output audio.
The Render Process button will also turn red. Both these red indicators show the process is ready to run with the current Doubler settings.
Optional Step - Check and adjust the Doubler Processing Settings
 If you know the Doubler Process settings are set as you want, you can go to Step 3 below. However, to inspect and change settings in the Doubler Process Control Panel, make sure the Doubler Input Control Block is selected (green), and the Session window is active, then press the P key on the keyboard (or LEFT CLICK the
 ![]() button) to open the Control Panel shown right.
button) to open the Control Panel shown right.
Make any required adjustments and then go to Step 3. To close the panel press the P key again.
If no changes to the processing are needed, the process will use the Doubler's "User Default Settings". The Doubler's controls will be discussed in detail here.
Step 3 - Process and play the Output audio - Press "Space Bar"
If the Doubler settings are acceptable, Pressing the Space Bar, will run the processes and Play the rendered audio. Or, pressing ALT R on the keyboard or LEFT CLICKing the red Render Process button will generate the Doubler's output signal but not play it. If background processing is turned on, the output audio will already have been rendered and the space bar will simply play audio. The Output is shown as the doubled waveform in green below in "Output 1").
Also, when processing has finished, the process removes the red line(s) and resets the Render Process button.
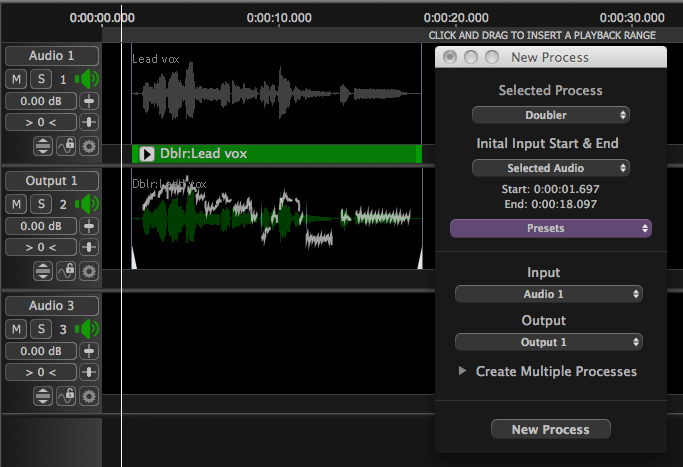
Because using the Space Bar will process and automatically play the audio, you can save time by Soloing the track(s) you will want to hear first.
- To solo the Output (in Track 2 -"Output 1") on its own - press the A Key.
- To solo both the Output signal and the Input (in Track 1) - press the E key.
- To solo the Input signal (In Track 1) on its own, press the G key.
These and other process-dependent track solo keys (fully described here) can also be pressed while playing audio.
Quite often, the above steps will provide a satisfactory result with little or no further effort, apart from transferring the output audio to your DAW or a file.
That completes the basic Doubler operation sequence using the Input signal with "Selected Audio" to set the range.
Doubler Processing - Further Details
Range selection using a waveform
If the objective is to process an entire loaded waveform selection or an edited section, first make sure the desired waveform is selected (shown in green). If it isn't selected, LEFT CLICK the waveform and it should turn green, as shown previously.
 The Initial Input Start and End (range) option will be selected from the drop-down menu under that label and look similar to that shown to the right. The full list of possible options is shown in the picture, but one or two might be missing for the following reasons:
- In the event that no audio is currently selected (green), then the Selected Audio option will not appear.
- Similarly in the event that no Playback Range has been created, then the Selected Playback Range option will not appear.
If the user wants to use the "Selected Audio" option, simply clicking and selecting the input audio (so it becomes green) will change the setting in this menu to "Selected Audio".
Range Selection Using a Playback Region
If the user sets a Playback Region by holding down a LEFT CLICK in the Playback Range Track and dragging right or left (described in detail in Playback Range Functions) this can provide a quick way to not only specify the start and end of the Doubler Process, but to also automatically select the Playback Range option of the Doubler process.
In the image shown below, a Playback Range is shown which does not go all the way to the start or end of the audio region and leaves out some of the silence at the start. Often this is a good way to leave silence out of the processing without having to edit the audio.
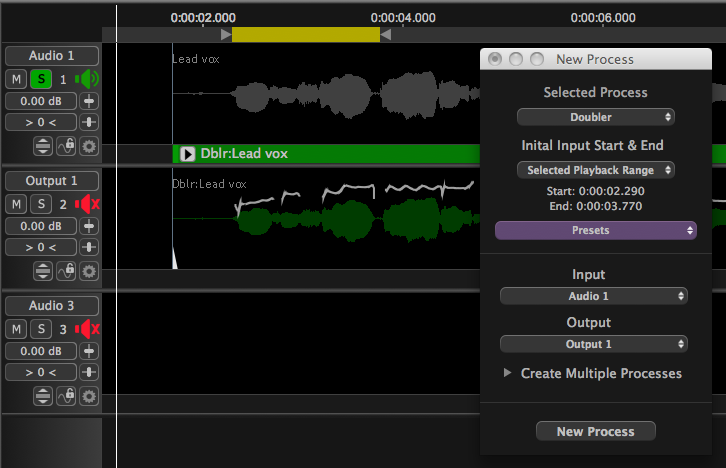
In the New Process window above right, creating (or modifying) the Playback Range automatically sets the "Initial Input Start & End" to "Selected Playback Range".
Pressing the N key (or the "New Process" button) will create the Process Control Block and show the output range with the red line showing that the process needs to be rendered.
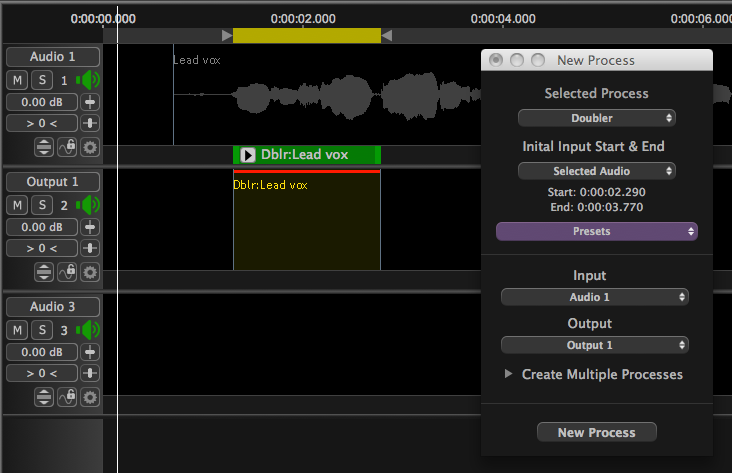
Pressing the Space Bar, will create the Doubler's Output audio (as shown below) and play the audio through the two tracks that have been soloed.
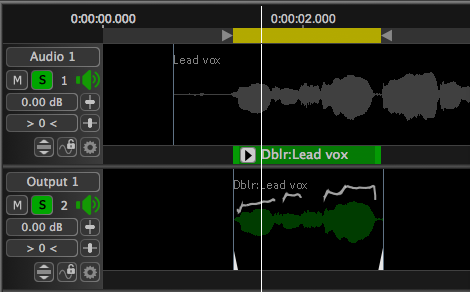
Back to Index
Selecting the Input and Output Tracks
 LEFT CLICK the drop-down menus under the label Input to display all the track names in the Revoice Pro session and LEFT CLICK to select the Track name that contains the audio you want to be the Input to the Doubler. As show right for this example, the track "Audio 1" is shown selected as the Input track based on the next picture below, which shows the track names and input audio.
To chose the Output track, LEFT CLICK the drop-down menu under the label Output. The same session tracks will be displayed and LEFT CLICK one of them to select the Doubler process Output Track.
Output names
Output signals and processes from the Doubler will be automatically labelled with a unique sequential number for easy identification (for example Dblr:Lead vox, Dblr:Lead vox(2), ... Dblr:Lead vox(n)).
Back to Index
The Doubler Control Panel
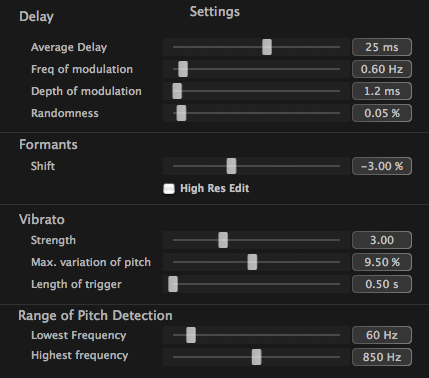
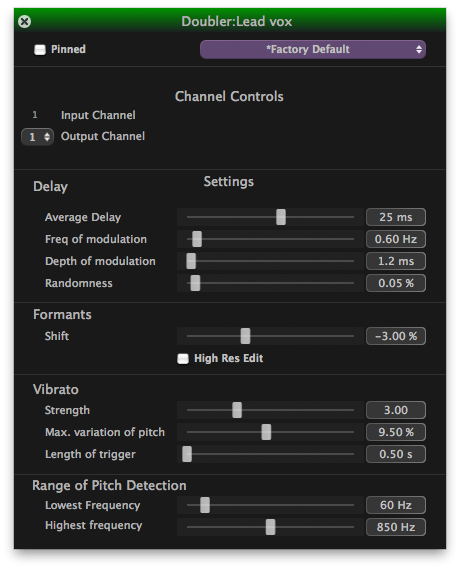
The Doubler's processing Settings can be inspected by clicking the white and black Reveal button ![]() in the Doubler's Process Control Block, or by pressing the P key (if that process and the Session window is selected). Doing this will open the Doubler Control Panel shown below (some of the screenshots shown further below are taken from version 3.0 and do not show the Compare menu present in v3.1).
in the Doubler's Process Control Block, or by pressing the P key (if that process and the Session window is selected). Doing this will open the Doubler Control Panel shown below (some of the screenshots shown further below are taken from version 3.0 and do not show the Compare menu present in v3.1).
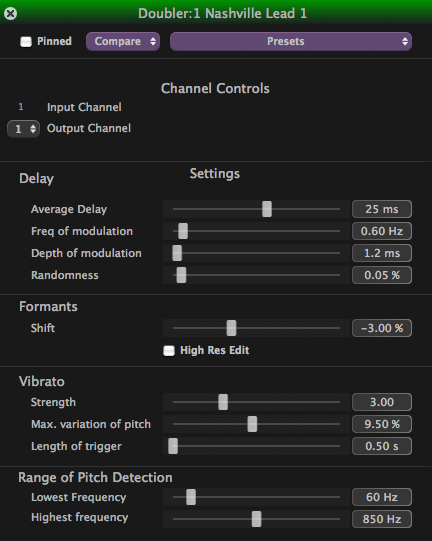
Process Control Panels can be dragged to convenient screen locations.
If you change the number of Output Channels to 2 (using the adjacent drop down menu) the panel will display slightly different controls. You will also see the number of channels in the output track switch to two, but the audio in the new second channel will not be generated until the process is run and renders it.
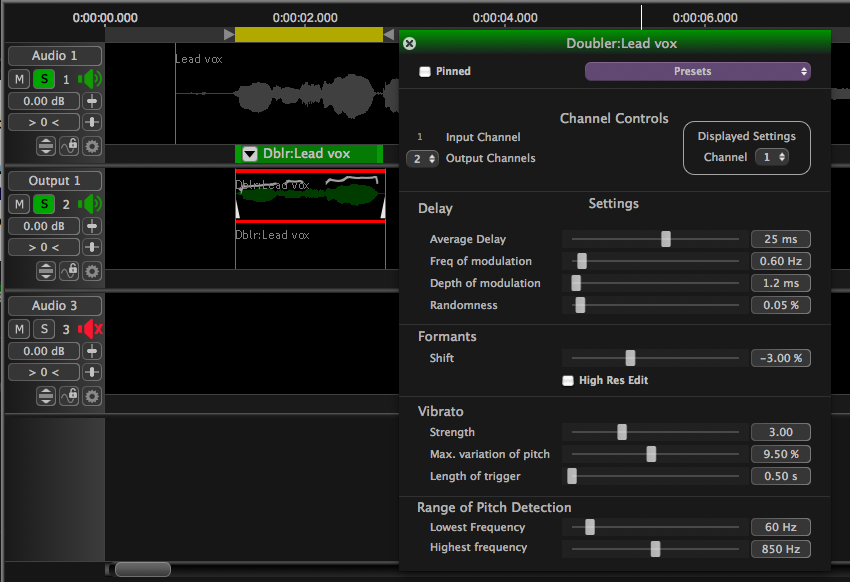
Most of the main sections in the Doubler control panel are the same for 1 and 2 channel-output doublers. The operations and differences in these sections are described next. We start with the Settings section at the bottom of the panel.
Settings Section of Doubler Control Panel
Each of the Doubler controls shown above has a "pop-up" explanation which will appear shortly after hovering the mouse pointer over a slider control or parameter display box, so the controls won't be described in this User Guide.
You can load ready-made Settings (Presets - described in detail below) that should give good results for different situations, or you can experiment with adjusting the controls to hear the specific effects on the output signals and, optionally, create and save your own named Presets.
The Settings panel shows the settings that will be applied to one or both channels, depending on what is selected in the Channel Controls section, described next.
Channel Controls Section of Doubler Control Panel
This section of the Control Panel displays and controls what settings are shown.
Mono Inputs
You can select 1 Output channel
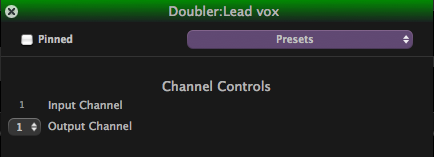
or 2 Output channels.
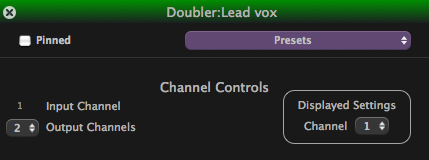
As shown above with two Output channels, a selector control appears which is used to choose which channel's settings are displayed and adjustable.
Stereo Inputs
 You can select one or two Output channels.
With a stereo input and 2 channel (stereo) output you have the further option of phase locking the editing in the two channels. i.e. the editing will be done the same in both channels. This is described in more detail below.
Auditioning and Adjusting the Control Panel with Stereo Outputs
To audition the Left Output channel and adjust its Settings: Pan the Output signal track left (in the Session's Track Control Panel) and select Channel 1 in the drop down under Selected Settings in the Doubler Control Panel shown above. The setting controls will then be for for Channel 1 (which is output to the left).
To audition the Right Output channel and adjust its Settings: Pan the Output signal track right (in the Session's Track Control Panel) and select Channel 2 in the drop down under Selected Settings. The settings controls will then be for Channel 2 (which is output to the right).
To hear the left or right outputs with the input, solo both Input and Output tracks (which can be done with the E key).
To hear the Left and Right Output signals together, move the Pan control back to the centre.
If the settings have been modified and the user wishes to reuse them - they can be saved as a named preset (described further below).
Lock Phase switch

Lock Phase: ON - When the processing is run, only the Settings shown (when either Channel 1 or 2 is selected) will be applied to process both Output channels and the editing will keep the channels phase-locked. i.e. If Channel 1 is selected when processing, then the Channel 1 Settings will be applied to process both input channels. Similarly, if Channel 2 is selected when processing, then the Channel 2 Settings will be applied to process both input channels.
NOTE: Lock Phase ON is the normally expected setting to use when the input stereo signal is nearly the same in both Left and Right channels.
Lock Phase: OFF - The two channels will be independently processed using the Channel 1 settings for the Left input and the Channel 2 settings for the Right input. Using this setting would only make sense if the input Left and Right channels' material was very different.
Top section of Doubler Control Panel
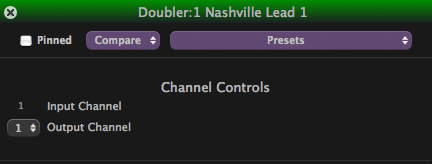
This contains the "Pinned" control, Compare and Presets menus.
Revoice Pro Control Panels can be "Pinned" (or kept open) by clicking the "Pinned" box, so process control settings can be compared easily. Only one Control Panel at a time can be selected and modified. The top bar of a selected menu will be highlighted in green when it is the selected process.
Presets are discussed in the next section.
Versions of a process can be stored and compared using the Compare drop-down in the Doubler control panel. This feature is common to a number of processes and is described in the section Process Versions.
Back to Index
Adjusting the Doubler Parameters
The user can try adjusting parameters by adjusting the Control panel's sliders and re-rendering the output repeatedly, even while playing. After making the desired modification(s), the user needs to press CMD R (Mac) / ALT R (Windows) keys, the Render button, or Space Bar (twice) - to create the output signal, even while the playback is looping.
Alternatively, Preset Settings can be quickly loaded used.
Understanding and Using Presets
The Presets system is used mainly to:
- Save and quickly load named combinations of settings that work well for the user and also
- Allow the same settings to be loaded automatically without having to repeatedly open the control panels.
When you first run the Doubler process, if you do not change the Settings when you run the Doubler process, the Factory "Default" Preset will be used. This may or may not give the results you want.
To change from the default settings you have these options:
- Experiment and make your own settings by changing the sliders in the Settings section of the Doubler Control Panel, OR...
- LEFT CLICK the Presets button in either the New Process window or the Doubler Control Panel.
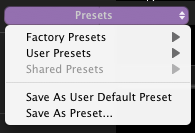
Clicking the Presets button will bring up the menu shown right. If no User Presets have been saved, that entry would be greyed out, similarly to Shared Presets as shown.
Selecting Factory Presets will reveal a further list of named Setting plus a Default. These can't be changed by the user, but are generally good starting points.

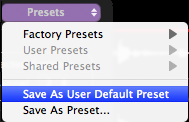 If the user likes the results of a Factory Setting, they can select Save As User Default Preset, (shown right) which saves the settings instantly as the User's Default Preset without opening any other window. That setting will be used in all further Doubler processing until a different Preset or settings is selected.
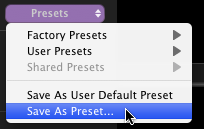 Similarly, if the user makes adjustments to the Setting Controls and finds a setting they wish to reuse on the next and further Doubler processes without opening the Control Panel, they can select Save as User Default Preset or Save As Preset (shown right) if they wish to recall those settings in the future.
LEFT CLICKing Save As Preset opens the window shown below.
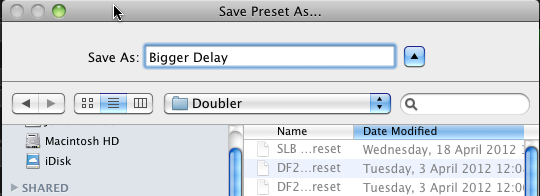
You should then give the settings a distinctive name, for example "Bigger Delay" as shown, and it will appear next time you open the User Preset menu list.
TIP: For user convenience, it is also advisable to include in the preset's name whether the preset is a mono or stereo output preset.
Time-varying automation of Doubler parameters
From version 3.2 it is possible to display and edit the various parameters of the Doubler process so that they change over time. This is done in the same way as for time-varying APT paremeters.
Where Doubler Presets are stored
Mac OS
- An unlimited number of User presets are stored in the presets directories: (user)/Library/Application Support/SynchroArts/RevoicePro/Doubler
- Shared presets (i.e. those to be shared by ALL users of the same computer) should be moved from a User's directory to:
/Library/Application Support/SynchroArts/RevoicePro/Doubler
(Note: Administrator privileges may be necessary.)
Windows
See details here
Presets - Important Operational Features
User Default Preset
- The User Default Preset is always used with the new Pro Tools "Quick" Doubler Audio Suite (and AAX) plug-in. More information.
- The User Default Preset (created with "Save As User Default Preset") are shared between Revoice Pro Sessions and running instances of Revoice Pro.
Removing Presets
Presets can only be removed from the lists by manually deleting the unwanted Preset file, which has the same name as shown as the menu list, from the directory in which they reside.
Back to Index
Comparing Process Versions
Versions of a process can be stored and compared using the Compare drop-down in the process control panel. This feature is common to a number of processes and is described in the section Process Versions.
Checking the output
If the user turns the Rewind and/or Loop controls ON, and presses the Space bar, the audio can be repeatedly listened to - with or without the original Input track.
As described in the chapter on monitoring, the user can solo a selected doubler's Input track, Output track or both together, using the process-based solo switches on the G, A and E keys respectively. Other monitoring approaches are described here.
With a mono input and Mono Doubler output, the input and output tracks can both be centred or differentially panned left and right for clearer checking.
With a mono input and Stereo Doubler output, the user should pan the output hard left to check and adjust the Stereo Doubler's left channel settings and pan the output hard right to check and adjust the Stereo Doubler's right channel settings being sure to select Channel 1 for Left Output channel settings or 2 for Right Output channel settings, as described above.
To audition a smaller range, the user can also insert a Playback Range control in the Playback Range track and optionally set the Loop switch on.
Adjusting the range of the audio being processed
As with the APT program, the start and stop points of the input to the Doubler can be modified by LEFT CLICKing and dragging the start or end of the Doubler's Process Control Block in the Input's Process Control Track.
Alternatively, the Playhead can be used to adjust the start or end of the Process. To set the Process start at the Playhead:
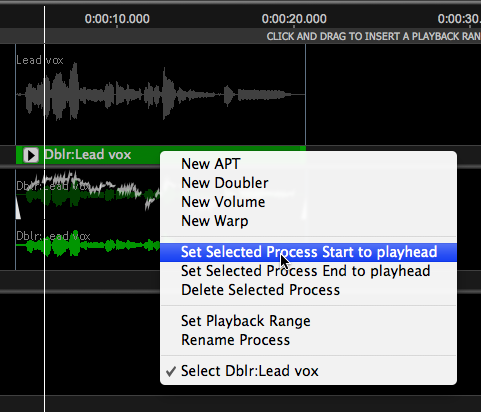 Position the Playback Head by clicking or scrubbing anywhere in the Track where you want to start or end the Process Control Block.
- Left Click on the Process Block you want to modify to select it (it will be green as in the picture right). Right Click on the green Process Control Block and the menu shown right will appear.
- The user can chose to Set Selected Process Start to playhead or Set Selected Process End to playhead as desired and the start (or end) of the process block will "snap" to the playhead.
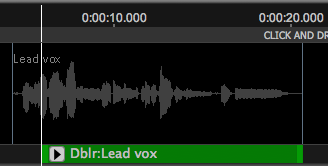 At right we show the result of selecting Set Selected Process Start to playhead. The green block's start has moved to the Playhead.
It is often useful to remove excessive digital silence at the start and the end of waveforms being processed.
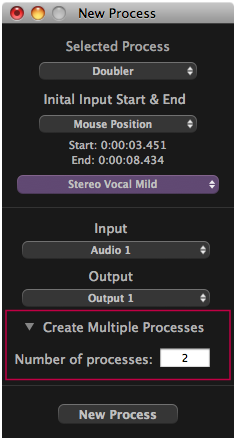 Creating Multiple Processes
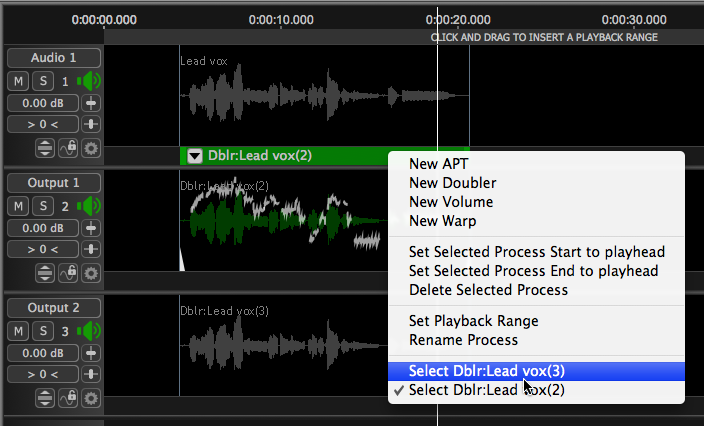
In the New Process window, there is a "Create Multiple Processes" selector as shown right. Using this it's possible to generate more than one process at a time when pressing New Process or the N key. The number of processes to be created is entered in the box. Processes are created on successive output tracks, starting with the one selected, and numbered sequentially. Each one can have different settings.
To edit the settings of each process, right click on the process control block of the input track in question (in the example below, Audio 1), and select the relevant process name. In the example shown below, two processes have been created for Lead vox (Audio 1), with outputs on tracks Output 1 and Output 2. Right clicking on the green process control block brings up the menu shown, where one can select either "Dblr:Lead vox(3)" or "Dblr:Lead vox(2)". Pressing the P key then brings up the relevant Doubler Control Panel where the settings of the process can be changed.
Removing a Doubler Process
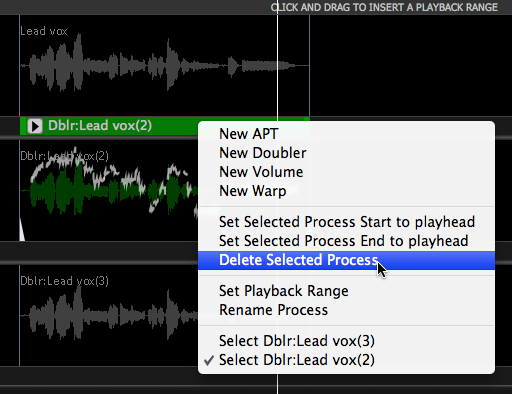 A Doubler Process (and its output) can be removed by LEFT CLICKing the unwanted process control block to select it (the Process Control Block will be green as shown right) and then RIGHT CLICKing to bring up the menu shown. In the case of multiple processes affecting the same block of audio, the currently selected process (in this case "Dblr:Lead vox(2)") will be deleted.
Selecting the option Delete Selected Process will remove the Doubler Process and its output.

