Manual Time and Pitch Warping processes
- Overview
- Manual Time and Pitch Warping Operational Details
- Warp Region
- Warp Process
- How to Adjust Timing and Pitch Features
- Editing Tools
- Manual time and pitch adjustment
- Time Warp Points
- Other Menu-based Operations
- Extending the Pitch Detection Range
- APT Process Considerations
Overview
In Revoice Pro 3, manual editing of Time and Pitch using two new "Warping" functions was introduced and an overview described in the What's New chapter.
In version 3.1 this is enhanced by the addition of new editing tools, enabling more precise editing of pitch, time and level in modes that allow this. The new tools are: Cut, Join, Smooth, Pencil, Correct Pitch.
From version 3.2 the pitch of editable blocks or notes is previewed as they are moved in pitch or time. The sound of this is mixed in with any other audio that may be playing at the time.
From version 3.3, it's possible to switch quickly between pitch and level editing, and a dB grid is displayed for level editing. The boundaries of level editing blocks are made the same as note boundaries for pitch editing blocks. A new Quick Warp mode is introduced for use with Studio One.
This chapter describes the operational details.
"One stop solution" for Time and Pitch processing
- The manual Time and Pitch editing tools give you the option to do these adjustments comfortably and quickly within Revoice Pro faster and with higher quality results than other external time and pitch editing programs.
- A further powerful advantage of keeping linked adjustments within Revoice Pro 3 is that any additional time and/or pitch changes to Guide or Input tracks will be passed automatically into the outputs of all processes using these inputs. So dependant audio tracks will always be in time and in sync instantly.
- The new editing tools allow, for example, pitch blocks to be split into smaller sub-blocks, for more precise control over pitch; for previously split blocks to be rejoined, for the boundaries between blocks to be smoothed, and for contours to be drawn manually.
Typical Applications
Some of the main uses for manually editing signal features (pitch, timing and level) are quite common and include:
- Improving or altering the pitch and/or timing of tracks that will be used as Guide tracks in APT processes.
- Correcting or altering the pitch of a harmony track before using it as a Dub input to an APT process that will have only its timing aligned to the Guide. The output of this APT process can then become a harmony Guide track for automatically aligning the time and pitch of double tracks of this harmony part.
- Manually adjusting the pitch and time of a solo vocal or any voice recording that is not being used with any other vocal track.
- Lastly, if required, making minor adjustments to the features in the output of an APT process.
Back to Index
Manual Time and Pitch Warping Operational Details
There are now three methods for Time and Pitch Warping audio in Revoice Pro.
- The Warp Region process - in which the adjustments are made in same track as the input audio for only one selected Region and the output is heard adjusted "in place" instead of the input.
- The Warp process - which can be any length as set in the Process Control Track - and can include anything from part of one region to spanning multiple regions. The output of the Warp process is sent to a designated output track where the adjustments are made. The input track is left unchanged.
- The output of an APT process can also be manually adjusted with the same techniques, but the APT's automated processing should be locked first to ensure that the manual adjustments do not get removed.
The Time and Pitch Warp selection and modification tools work pretty much the same for these three methods in that user adjustments work on the same type of displays of graphic elements (pitched notes, transitions, non-pitch blocks and added Time Warp points) within the track containing the output.
In addition, you can add Time Warp Points to a Doubler's output as well as the above processes.
We next describe how to set up each method.
Warp Region
Use the Warp Region function to make creative and/or corrective time and pitch adjustments "in place" (i.e. in the same track). The corrected audio can be used both on its own and as an input to other Revoice Pro processes such as APT or Doubler processes.
It is important to note that any adjustments made to a Warp Region will also cause tracks that use this signal as an input to reprocess using the changed input.
 How To Create Warp Regions
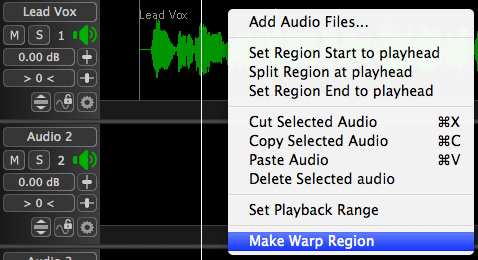
- In one track, select one (or multiple) audio waveform regions as shown in light green at the right. RIGHT CLICK in the track with the selected waveforms and select Make Warp Region in the pop-up menu window that will appear (shown right).
- Once the region (or regions) have been processed, there will be Warp Region end markers (white triangles) at the ends of each warped region, "non-pitched" markers (in centre of waveform), and pitch contours may appear as shown below in light grey lines with note-height blocks (notes) around them.
- If the pitch contours do NOT appear in the track window (as shown below) they are probably outside the range of notes visible in the track window. Move the Pitch Range control (shown below) up and down (by selecting it with the mouse or by centring the mouse in the track and rotating the mouse scroll wheel) until the pitch contour lines appear in the track window as shown above. Use the Y Scale control to adjust the scaling.

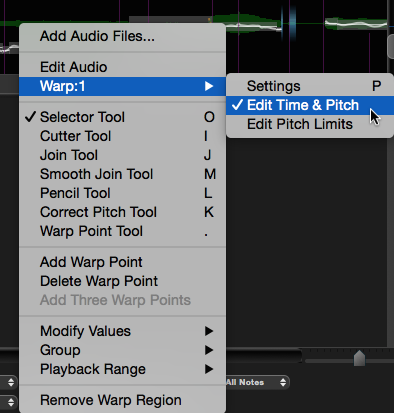
- If there are multiple warp regions - only one can be selected at a time. In the picture below, the second warp region is initially selected for Warp editing. To select the first one, place the cursor over the audio which you want to Warp edit, RIGHT CLICK to see the left part of the menu below. You will see the available Warp functions, which in this example are Warp: Lead Vox.1 and Warp: Lead Vox2. To select the first one, move the mouse over "Warp: Lead Vox.1" and the right pop-out will appear. Select Edit Time & Pitch to display that Warp Region's editable features.
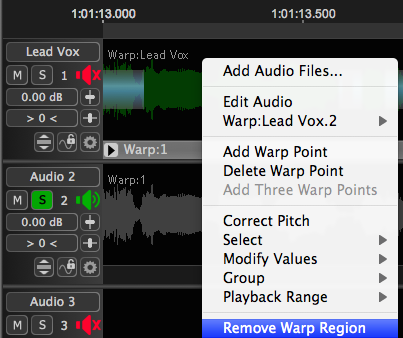 To Remove a Warp Region's processed values, RIGHT CLICK the track in the region which has the Warp Region's values and select Remove Warp Region as seen shown selected near the bottom of the menu shown at right.
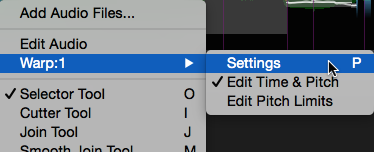
- To see and change the Settings for each Warp Region, select the Warp Region of interest and then either press the P key, or RIGHT CLICK the Warp Region and select Settings from the sub-menu related to the Warp process concerned, as shown below, and the Warp Control Panel shown below should appear.

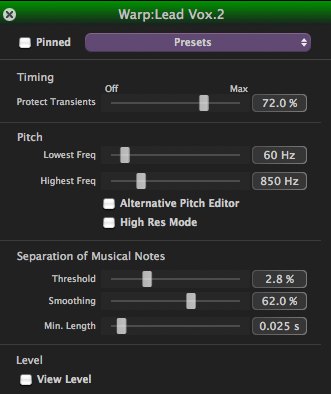 Warp Region Control Panel
Most of the settings in the top area of this control panel (shown right) have been described in the chapter on APT setup and controls.
The Section controlling Separation of Musical Notes contains the following controls, which do not normally require modification.
- Threshold - The change in pitch to restart a new note boundary.
- Smoothing - The factor applied to create smooth pitch contours
- Min. Length - For pitch values to be made into a note, they must be within the pitch threshold for this minimum length of time.
Editing Signal Level
The View Level tick box in Level section of the Control Panel shown above will enable the display of the measured Level values. (From version 3.3 this option is enabled by default but the Pitch and Level displays are not shown at the same time.) Levels will be displayed in groups of measurements (like notes) and shown as Blocks as shown at the top of the track display below. (From version 3.3 a decibel grid is superimposed.)
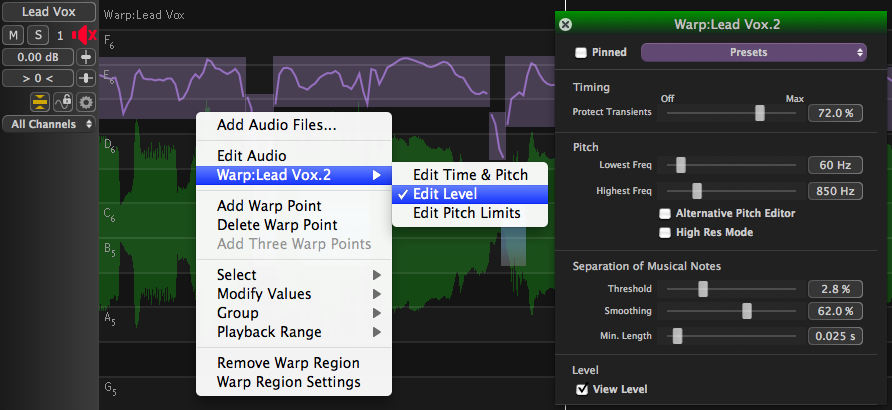
To edit these values, RIGHT CLICK to bring up the context menu shown above and select the name of the process (in this example it is "Warp: Lead Vox.2" and then select Edit Level that appears in the pop-out menu as shown. (From v3.3, pressing S on the computer keyboard will switch quickly between pitch and level editing modes.)
Then, the blocks of Level measurements can be modified using all the same tools as the pitch adjustment system.
Click a topic below to jump to
Back to Index
Warp Process
A Warp Process uses the input from one track, but unlike a Warp Region, it can be any length and it creates an output that is sent to a designated track where the adjustments are made. The input audio is left unchanged.
Warp Processes are setup in the same way as APT and Doubler processes, so their range is determined by the Process Warp Process Control block in the Process Control Track - and can include anything from part of one region to spanning multiple regions.
How To Create a Warp Process
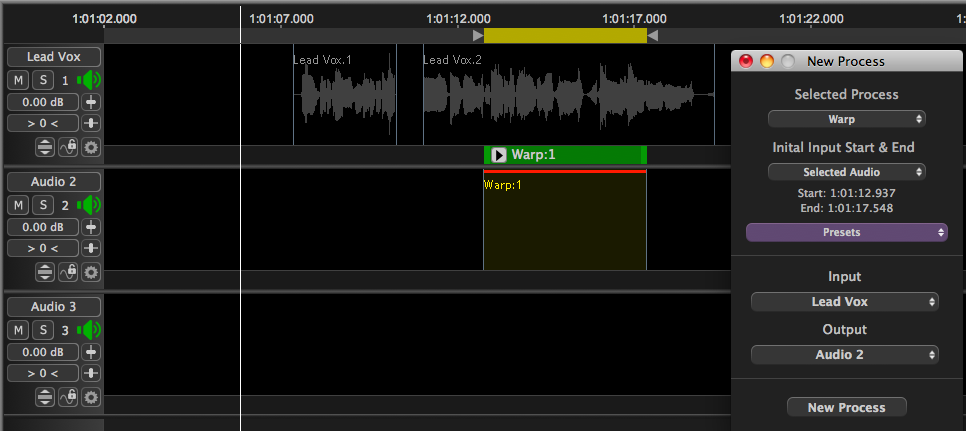
We will first show an example creating a Warp Process using two selected and separated audio regions as shown below. RIGHT CLICK in the Process Control track under audio track 1 will bring up the Process Selection menu shown below. LEFT CLICK and select New Warp as the process.
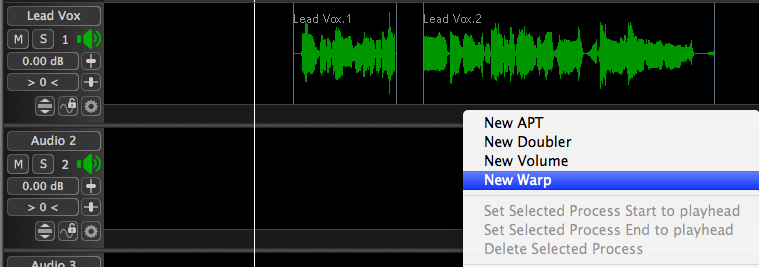
When the click on New Warp is released, the New Process window will appear as shown below with the Warp process selected, ready to create the process using the other settings shown.
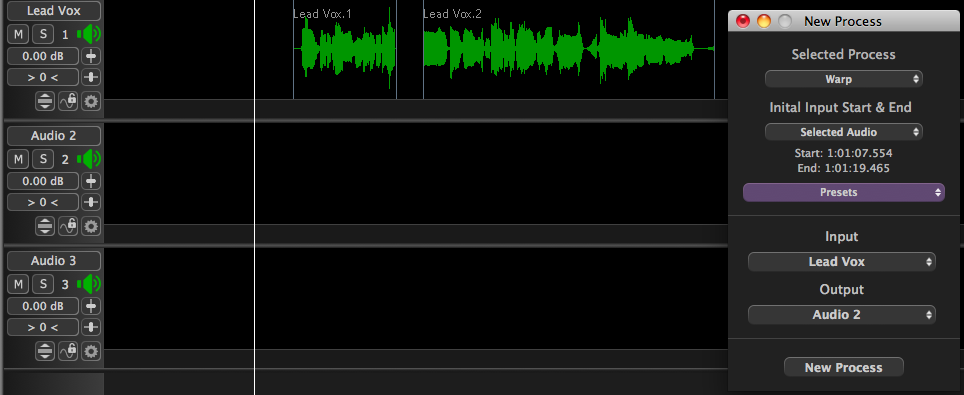
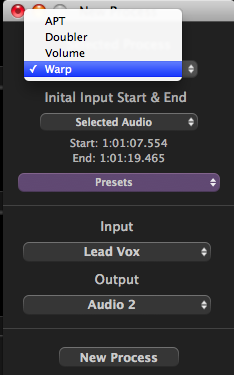 Alternatively, if the user has the audio selected and presses the B key, the New Process window will appear as shown right. LEFT CLICK the Selected Process drop down to select Warp as shown right. Once that is done, the New Process window will look the same as above.
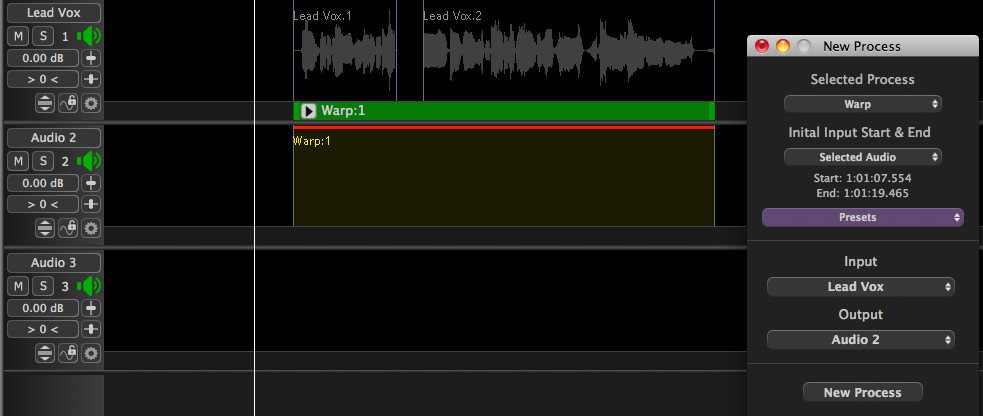
Check that the Initial Input Start & End, the Input and Output drop downs are set correctly. In this examples, we want to see "Selected Audio", "Lead Vox" and "Audio 2" as the settings for those three fields respectively. Click the New Process button (or press the N key on the keyboard) and the Warp:1 process will be created in Process Control Track 1 to match the selected audio range and the red line in track 2 "Audio 2" shows where the Warp Process Output will go.
Optionally, check and/or change the Preset setting for the process.
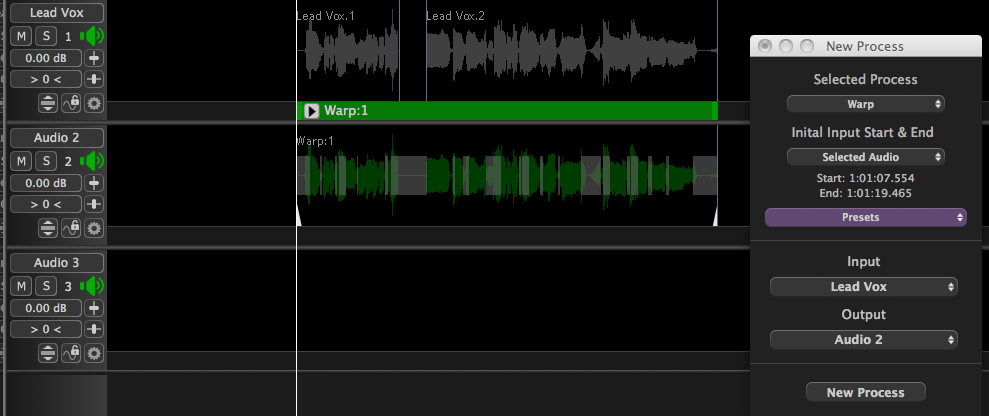
If all the settings are correct, press the Space Bar to run the process (unless background processing has already done this), which will generate the output as shown below (in Track Audio 2) and play the audio.
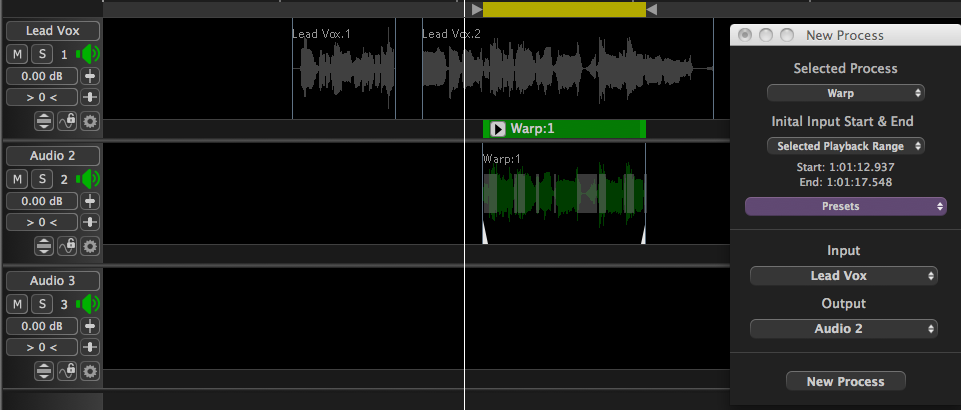
Arbitrary ranges of Warp Processes can be created by using a Playback Range to set the start and stop of the Warp Process (in the same way as with APT and Doubler processes). Below we show a Playback range shorter than the length of the second region in Track 1.
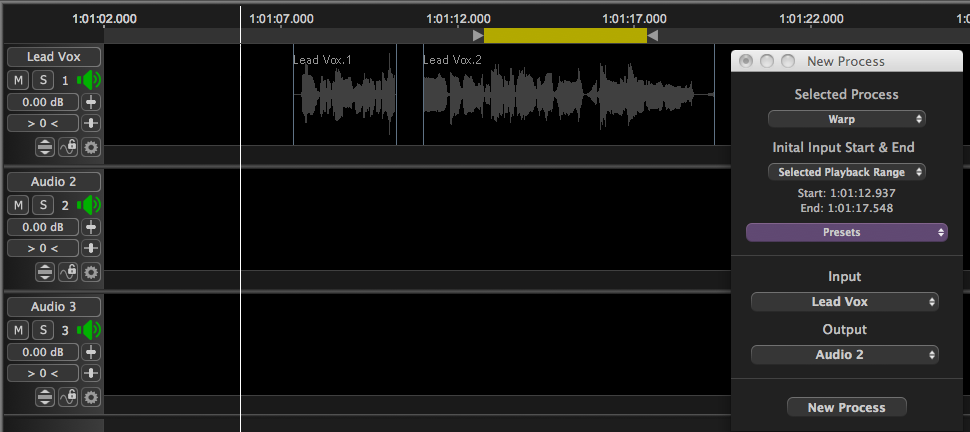
Check that the settings are correct and that the Initial Input Start & End drop down shows "Selected Playback Range" and LEFT CLICK New Process button or press N on the keyboard to generate the Warp:1 Process Control block and the Output range.
As before, check the Preset is OK and then press the Space Bar to generate the Output in Track "Audio 2" and play. The Output track shows the Output region ready for adjustments to be made.
Displaying Settings and Editing Levels
To display settings, menu contents and controls for Level editing, the procedures are almost identical to those described in the sections above for Warp Regions. Press S on the computer keyboard to switch quickly between Pitch and Level editing. See Specific Considerations for Level Editing.
The next section describes how to adjust the Time and Pitch features of the Output track.
Back to Index
How to Adjust Timing and Pitch features
In this section, we will look at the main displays and controls for editing the Timing and Pitch of:
- A Warped Region
- A Warp Process Output
- An APT Process Output
Later, we will include editing the Timing of a Doubler Process' Output and the above processes using added Time Warp points.
In general, the analysis, graphical tools and processing used to make timing and pitch adjustments in the first three of these processes are largely the same and relatively simple to use.
There is, however, a minor difference in the note detection processing and settings of the APT process compared to the Warp processes, which we will briefly describe later.
Full height display of features
The output of the three processes timing and pitch control features can be seen to some extent in the processes' output track in the multi-track display mode, as shown below in track 2 (named "Audio 2"). 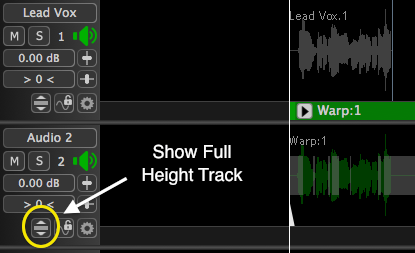
But in most cases, we recommend LEFT CLICKing the Full Height Track toggle switch shown in the picture above to achieve more detailed displays similar to the picture below.
The Output of the three processes will contain the main elements and controls for Timing and Pitch warping that are identified in the Full Height track display shown below.
Main Elements of Time and Pitch Editing Window
In the image below, we show the main graphic elements that appear in a track (shown after clicking the "Full Height" button) which contains a Warped Signal (including a Warp Region, a Warp Process Output or APT Output). Using the Full Height toggle gives better view of the features and finer control of adjustments.
To return to the multi-track display, LEFT CLICK the same "Show/Hide Full Height" button.
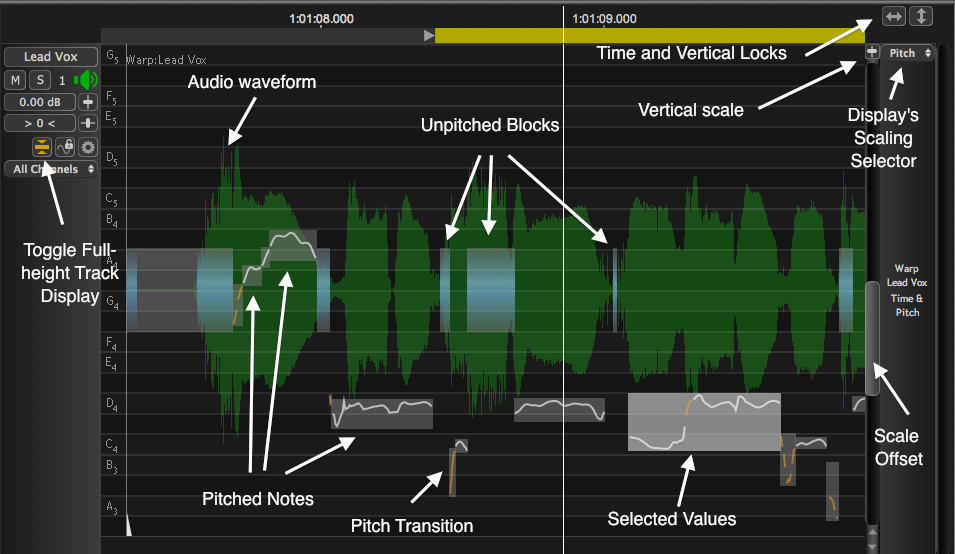
In this example, to keep the discussion simple we are not displaying the Track's "Level" values, which can be switched on and off in the processes' Control Panel (not shown here). (Level display is on by default from v3.3.)
(If the items above are not visible in the APT Output, make sure the Time & Pitch selector in the Display & Edit section of the APT Control Panel has been turned ON, and Level view is OFF.)
In the image above, where the audio signal has a measurable Pitch, the pitch measurement traces are automatically Grouped inside Note Blocks based around an average pitch for a duration determined using the pitch group's trajectory to determine "notes".
One or more Blocks can be selected, as shown by the Block colour change for "Selected Values" group above, and if the mouse cursor is placed within or on the edges of a selected Block, the cursor shape will indicate the available movements, as will be explained in detail below here.
The faint grid in the background is a Pitch Grid, which can be set to display the intervals of various musical scales, as described further in the Musical Scales chapter. The notes displayed on that grid can be selected using the Scales menu in the transport area at the bottom right of the main window, as shown below.

Display of Editing Strength
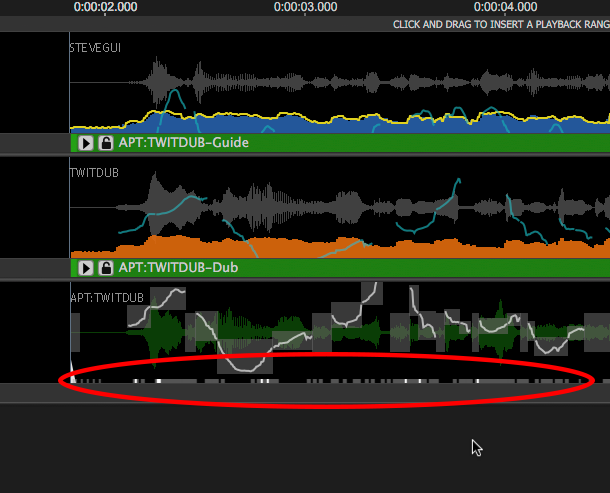
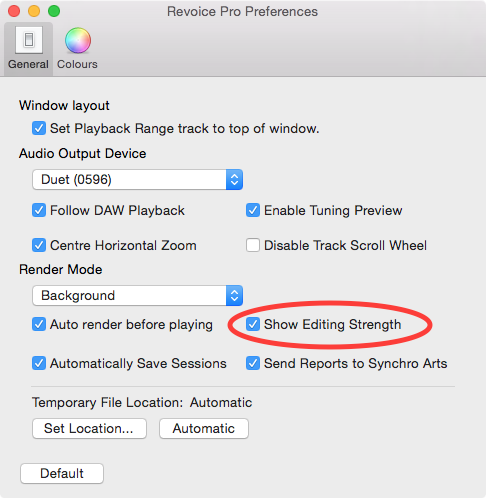
From v3.3 it's possible to see how much processing has been applied to different parts of the audio waveform, in the APT and Warp processes. As shown below, small block markers at the bottom of the display vary in their brightness depending on the amount of editing done to the waveform. Lighter equals more processing. You can turn this display on and off using Show Editing Strength in the Preferences dialog.
Editing tool selector
Once you are displaying a process output with timing and pitch blocks, you can select one of the many editing tools available. RIGHT CLICK anywhere in the relevant display window to show the contextual menu of editing tools, and select the tool to use:
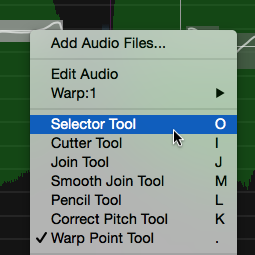
The Selector Tool is the default, and is the mode familiar to users of older versions of Revoice Pro. It can also be selected using O on the computer keyboard. Using this, follow the instructions in the next section to select blocks and move them. Use of the remaining tools is described in the section Editing Tools. The keyboard shortcuts shown (O, I, J, M, L, K, . ) can be used to select any of these tools without needing to access the contextual menu.
How to Select Blocks to Manipulate Timing and Pitch
Once you are displaying a process output with timing and pitch blocks, you can select parts of the audio to adjust in four ways, using the Selector tool:
- To select one note or non-pitched block - LEFT CLICK on the note, transition or non-pitched block to select it.
- To select a range of notes and/or non-pitched blocks - LEFT CLICK anywhere in the track and hold the LEFT mouse button down, then Drag the cursor to an end position (a "lasso" function) to select all elements within the box.
- Or, LEFT CLICK on a note pitch block, press SHIFT and LEFT CLICK a different note block to select all the notes from first LEFT CLICK to second LEFT CLICK.
- To select ALL note and non-pitch blocks in a Warp Region or Warp process , RIGHT CLICK, chose Select and from menu at right that appears click Select All,
The range of notes and non-pitched blocks and silence regions selected will become one block of values (as shown above as "Selected Values" that can be manipulated together at the same time, in ways that depend on the signal content of each type of audio blocks within and the Time and Vertical lock switches shown above. For now, we will assume the Time and Vertical lock switches are OFF.
You can audition audio in a looped fashion while you are manipulating time and pitch, to hear the effect. If background processing is turned on it will attempt to keep up with the changes you make, and with the effects of the various tools described below.
There is a section below containing detailed information on manual time and pitch adjustment.
Changing the display of pitch
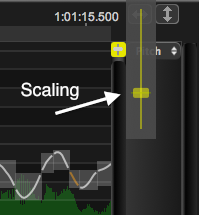 If the drop down Display's Scaling Selector at the top right of the Track window is showing the label "Pitch" (as above), then the display (but not the values) of pitch measurement traces can be "zoomed" (expanded or contracted) in height using the pop-up Vertical Scaling control shown by the arrow at right.
In addition, the gray Scale Offset slider can move the pitch blocks and grid together up or down (without altering the notes) to bring the pitch blocks into the visible part of the display.
The measured groups of unpitched signal content (such as breaths and other noises) are shown as "Unpitched blocks", which are placed along the waveform's zero line. These blocks cannot be altered up or down (in Pitch).
Both Pitched and Unpitched Blocks can usually be stretched or compressed in time and sometimes be moved along the time axis depending on whether unselected adjacent blocks stop the movement.
Restricting movements of Pitched and Unpitched Blocks
![]() As long as the Horizontal (time) and Vertical (pitch) locks in the upper right hand corner are unlocked (as shown right), then
As long as the Horizontal (time) and Vertical (pitch) locks in the upper right hand corner are unlocked (as shown right), then
- Pitch Blocks can have both Vertical movements, i.e. up and down in pitch, and Horizontal movements, i.e. forward or backward in time as well as shortening or lengthening blocks (and the corresponding part of the output waveform) in time.
- Unpitched Blocks can generally only have Horizontal (i.e. right and left in time or modification of duration) movements, since they have no pitch.
![]() Turning one or both Locks ON (red) as shown right, will prohibit the Horizontal (i.e. time) and/or Vertical (i.e. pitch or other measured values) motion editing respectively along the whole track.
Turning one or both Locks ON (red) as shown right, will prohibit the Horizontal (i.e. time) and/or Vertical (i.e. pitch or other measured values) motion editing respectively along the whole track.
These Locks can also be toggled using the Keyboard Quick-keys:
H key for Horizontal (time) and V key for Vertical (measurement values).
Moving pitch blocks on specific musical scales
From Revoice Pro 3.2, it is possible to display pitch grids for specific musical tunings and scales, and to restrict pitch block movements to these grids. If you (OS X: hold down the option or alt key) (Windows: press and hold down the ctrl key after pressing the mouse button), the vertical movement of blocks will be snapped to the pitch grid, plus or minus any offset they originally had. Further information about this feature is given in the Musical Scales chapter.
Back to Index
Specific Considerations for Level Editing
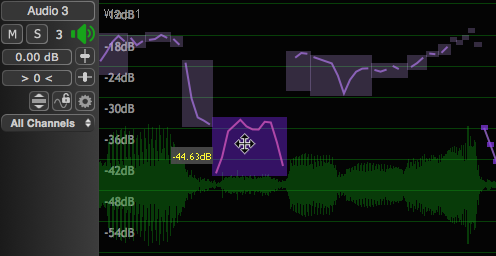 From version 3.3, some additional features make Level editing more straightforward and useful. Pitch and Level are not displayed simultaneously. As shown right, when in Level editing mode (press S on the keyboard to switch quickly from Pitch to Level editing, or back) a dB grid is superimposed to show the level of blocks in dB relative to full scale.
Level blocks correspond to note pitch boundaries and can be grabbed and moved up or down, while the pitch or sibilant is heard. The average level of the block is displayed. If alt is held down while dragging, Level changes are constrained to 3 dB steps.
Editing tools
These editing tools are chosen from the contextual menu and can be used to affect either pitch or level information.
Selector tool
The Selector Tool is the default. It can also be selected using O on the computer keyboard. The cursor shape in this mode varies depending on where it's placed and what you're doing. This is described further in the section on Manual Adjustment below.
Cutter tool
 The Cutter tool is used for breaking pitch blocks into sub-blocks so that the pitch can be tracked and modified more finely with respect to time. It is selected using the contextual menu or by pressing I on the computer keyboard. The cursor appears as a knife that can be applied (LEFT CLICK) at any point within a pitch block to break it. The vertical red line moves with the knife cursor to identify the exact position at which cuts will take place.
 The result is two separate pitch blocks, each with a tracked pitch related only to that section of audio as shown.
Join tool
 The Join tool does the opposite to the Cutter tool. It joins pitch blocks together to make pitch tracking and modification coarser with respect to time. It is selected using the contextual menu or by pressing J on the computer keyboard. The cursor appears as the symbol shown, and can be applied (LEFT CLICK) at any junction between two pitch blocks to join them.
The result is just one pitch block as shown in the first picture in the Cutter tool section above.
The Join tool can also be dragged across multiple pitch blocks to join them, by holding down the mouse button and dragging across multiple blocks.
Smooth Join tool
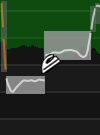 The Smooth Join tool attempts to make pitch transitions between blocks less abrupt. It is selected using the contextual menu or by pressing M on the computer keyboard. The cursor appears as the symbol shown, and can be applied either by hovering over the junction between two blocks (until they are both highlighted) and LEFT CLICKING, or by holding down the mouse button and dragging across multiple blocks. The joins are smoothed only when the mouse button is released.
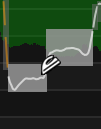 The result is two or more pitch blocks with less abrupt pitch transitions.
Pencil tool
 The Pencil tool allows you to draw pitch contours. It is selected using the contextual menu or by pressing L on the computer keyboard. The cursor appears as the symbol shown, and can be applied by holding down the left mouse button and dragging between notes, at the desired pitch, to draw a new pitch contour. The tool only modifies the pitch values of blocks that exist. It cannot introduce pitch points where none was identified originally.
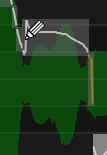 The result is a new pitch contour and pitch blocks that correspond to this contour.
Correct Pitch tool
 The Correct Pitch tool automatically pulls in the pitch of selected notes towards standard pitch centres (notes of the chromatic scale). It is selected using the contextual menu or by pressing K on the computer keyboard. The cursor appears as the symbol shown, and can be applied by holding down the left mouse button and dragging across the note range to be corrected.
 A slider appears allowing control over the amount of automatic pitch correction from 0–100%. Holding down option/ALT and clicking on the slider will set it to 100%. When at 100% all notes in the selection will be completely pulled to the nearest pitch interval, but lesser strengths of correction can be set. Automatic pitch correction is applied on top of any manually applied changes. Revoice Pro remembers the pitch corrections applied to notes, so if they are selected again with this tool the previously set pitch correction value will also be shown and can be modified.
 If the Correct Pitch tool selects notes having different amounts of previously applied pitch correction, the control slider will show the range of correction strength applied to those notes, and the slider will be set midway in this range. Changing the slider, however, will pull all notes selected to the single newly applied value.
If a specific musical scale is selected in the Scales menu at the bottom right of the main window (transport area), then this function will correct the pitch only to notes of the selected scale. See the chapter Musical Scales for further information.
NOTE: Automatic pitch correction is a mathematical operation - based on how the waveform "sits" within a note range. There is no perceptual model used, so the user should always check all automatic pitch correction by ear as some notes from corrected pitch contours will not sound exactly in tune and will need user adjustment.
Warp Point tool
The Warp Point tool allows you to add and delete additional time warping points. It is selected using the contextual menu or by pressing . on the computer keyboard. Additional warp points can be added by shift-clicking at any point on a track, or deleted by shift-clicking on an existing warp points. Further details on time warp points are given below.
Manual time and pitch adjustment
Before editing time and/or pitch, use the Vertical scale (zoom) and Offset sliders to move the pitch trace and blocks into view in the track, and expanded enough to manipulate with the mouse. The result might look similar to those below with pitch contours visible.
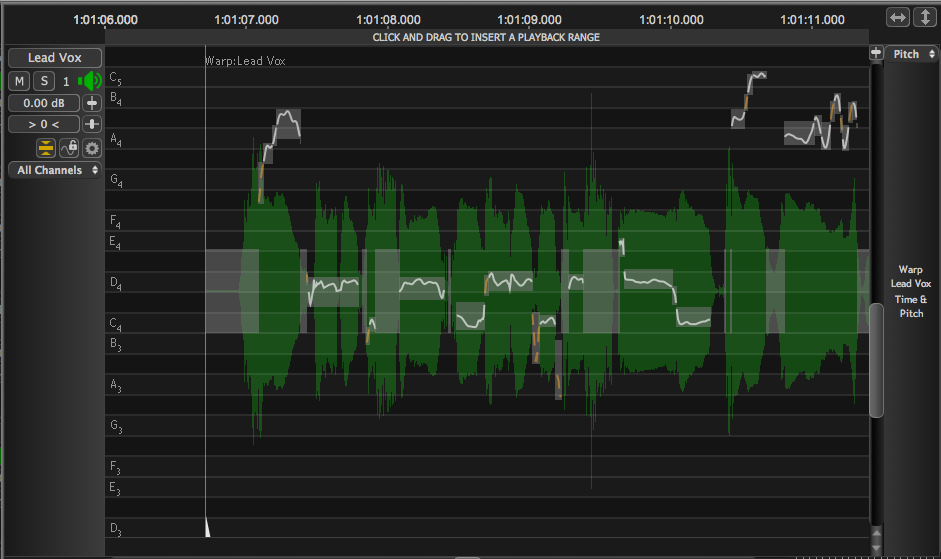
Pitch Blocks and Groups containing Pitch Blocks can be moved up and down (higher and lower in pitch) and left and right (in time), compressed and expanded. If the group also contains Non-pitched Blocks, these will be compressed or expanded in time. Pitch and time blocks can be moved in time if it is not being stopped by a non-selected block.
Non-pitched blocks can only be moved, compressed or stretched right or left along the time line and will stay displayed along the middle of the waveform display for convenience.
Tuning preview
When pitch blocks are moved by dragging an audible tone will be generated corresponding to the fundamental pitch of the audio at the mouse pointer position. This is mixed in with any other audio that may be playing at the time.
This function — "Auto-play when editing" — can be turned off in the Preferences control panel
The replay level of the tuning preview can be adjusted using the selector drop-down in the transport area of the main display, as shown below. The master volume control below this affects whichever parameter is selected in the drop-down (master volume or tuning preview).

Pitch Block Cursor shapes and operations
The selected blocks behave like a position dependent tool selection menu. In other words, as you move the mouse cursor around or in the block, the cursor will change shape to show you what "tool" can be used to modify the signal and in which directions the block can be manipulated.
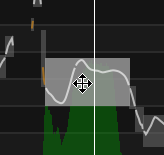
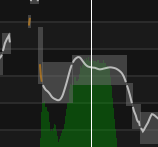 In many cases, neighbouring blocks can stop sideways movement unless they become included in a Group of Blocks. These can be made by LEFT CLICKing a first Block as an anchor point, and then holding down the SHIFT key and LEFT CLICKing on the "last" Block to include in the new Group of Blocks. This operation can be done repeatedly down the timeline. The example right (second image) shows a Group has been made of the two larger Pitch Blocks in the centre of the first image.
The different Cursor Shapes and associated movements are relatively self-explanatory, but will be described for completeness. In images below of blocks with a white dot opposite the cursor, the dot is an anchor point for the movement.
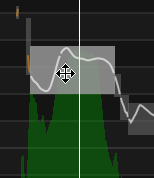
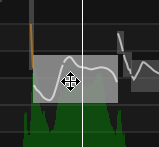
Below, move block up and down in pitch and sideways in time (shown later). Hold down the alt/option key to constrain vertical movements to the notes of the current musical scale.
Below, move Left Edge of Block right or left and time expand or compress the signal.
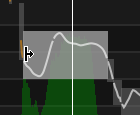
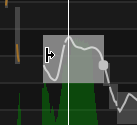
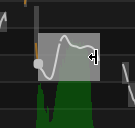
Below, right Edge has been moved left to compress the duration.
Below, bottom Edge has moved upward.
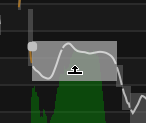
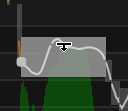
Below, top edge has moved down
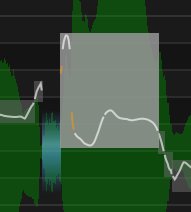
Below, edge joining an Unpitched block (shown blue in left image) has been dragged right (shown right), making right Pitched block narrower and left Unpitched block longer.
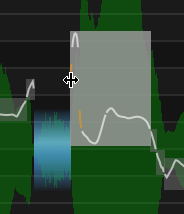
Below, the upper corner can be dragged both up and down and left and right.
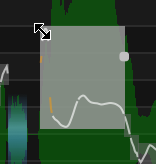
Unpitched block below can be moved right or left (not up or down).

If the Horizontal Lock is on, the pitch block can only be moved up or down as shown by the cursor.

Back to Index
Tilting and Un-tilting Pitch Groups
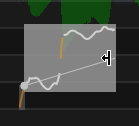
To select the Tilt operation, first make sure the H (horizontal time) lock is not ON. Select the right or left edge of a pitch group (as shown below) and an inward pointing arrow will appear.
For Mac, hold down the ALT key, LEFT CLICK and hold down the mouse button.
For Windows, LEFT CLICK and hold down the mouse button, and then press and hold the CTRL key.
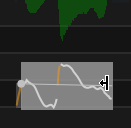
A white line will appear attached to the anchor point (white dot) at the opposite end of the block. This line will show the tilting that takes place as the mouse is dragged up or down.
In the example below, the mouse is dragged down in the second picture, which levels out the rising pitch contour in the block.
Smoothing Unnaturally Fast Pitch Changes
Sometimes a fast pitch change is created between blocks of pitch groups (for example by moving a block up or down). A smoothing function can quickly fix this. From version 3.1 this is most easily implemented using the Smooth Join tool described above. Alternatively, you can employ the older method described below.
In the image below, the selected pitch block is about to be moved downward a few semi tones.
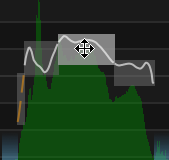
In the next image the centre pitch block has been dragged down two semi tones. This leaves a sharp drop at both the right and left side of the moved block. Although the playback software often will smooth out transitions and the user will not hear any problems, if it doesn't, it can sometimes sound unnatural.
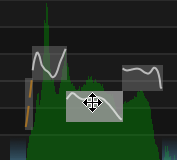
To smooth these edges at the same time, LEFT CLICK the left most pitch block that requires it's right transition to be smoothed, hold the SHIFT key down and LEFT CLICK the right most pitch block requiring smoothing. In this example, all three blocks are selected as shown in the image below.
Then RIGHT CLICK in the track to get the pop-up menu shown, and select Smooth Selected Groups.
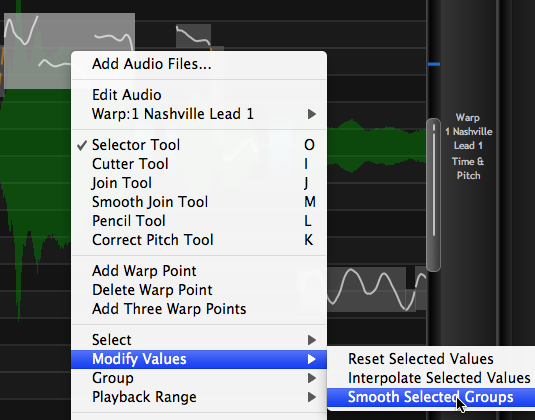
A smoothing function will be applied to the two transitions between the centre and the adjacent blocks, resulting in the two transitions being smoothed as shown below.
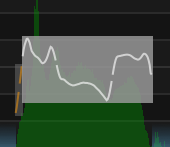
NOTES: if only two blocks had been selected, then only the one transition between the two selected blocks would have be created.
Resetting Edited Blocks and Groups after movement
The last individual Edit can be undone one at a time with the CMD Z (Mac) / Ctrl Z (Windows) keys.
To restore immediately the pitch and time values before editing started, LEFT CLICK a Block or Range you wish to return to its original values to select it. Then, RIGHT CLICK it to bring up the menu shown below and select Modify Values and then Reset Selected Values
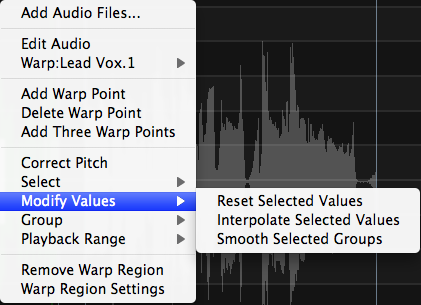
The selected values will snap back to their Original measurements and positions.
TIP: If processing times of large sessions with many tracks and processes seem slow, try making the Process Control blocks shorter (i.e. process sections of audio under, say, a minute in length).
Time Warp Points
The detailed timing of any audio regions that have been output by a Warp Process, Warp Region, APT Process or Doubler Process are adjustable.
Control of this adjustment is achieved via two types of Warp Points, which are inserted into the bottom of the Tracks containing these Output signals.
- Automatically Created Warp Points - automatically inserted into the listed processes Outputs at the Start and End of each processed region (as shown below).
- Added Warp Points - created by the user around the position of the mouse cursor.
Warp Points provide both anchors and flexing points for the waveforms' features at the corresponding time positions.
Adding Warp Points
The menu that contains the commands for creating Warp Points will appear (as shown below) when RIGHT CLICKing in the Output of a Warp Process, a Warp Region, APT Process or Doubler Process.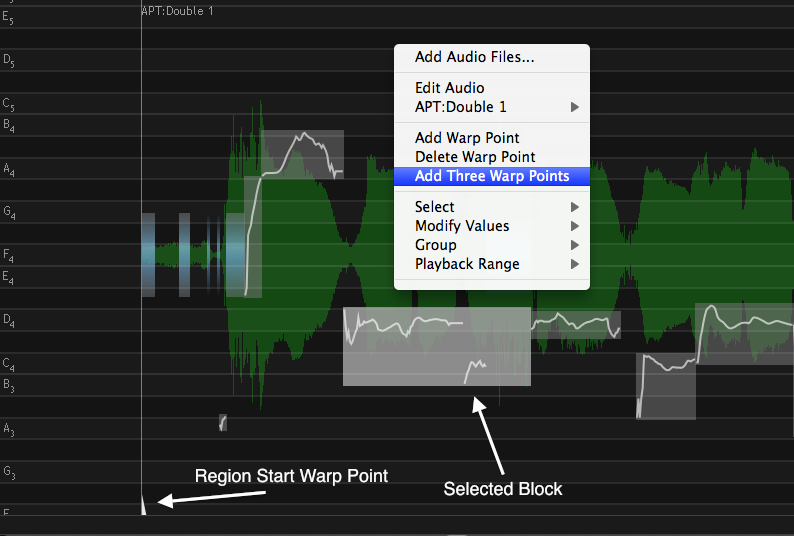
There are three simple Warp Point menu items: Add Warp Point, Delete Warp Point and, if a range of values is selected (such as the "Selected Block" in the picture above) Add Three Warp Points. If no range is selected, this last option is greyed out. Additional Warp Points can also be added or deleted using the Warp Point tool.
Movement Options
Start Warp Point - With no other added warp points in the Region, moving this Start Point left (earlier in time) will use the End Warp Point as an anchor and lengthen (Time-expand) the waveform linearly. Moving the Start point to the right will Time Compress the waveform linearly.
End Warp Point - As above, with no other added warp points, moving the End Warp Point will use the Start as the anchor and time expand or contract the waveform linearly with a right or left movement respectively.
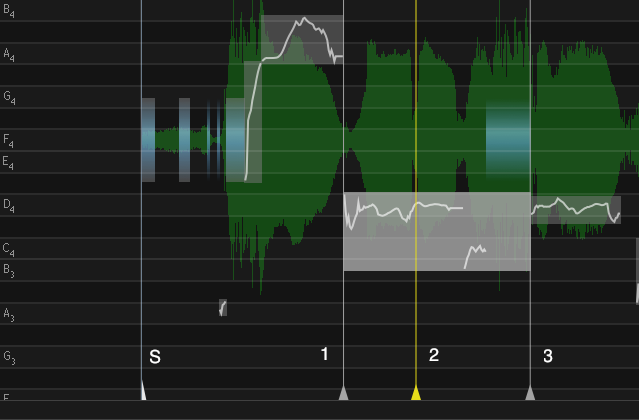 Add Three Warp Points - If there is a Selected Block (providing a time range as shown left) then selecting this option with the mouse cursor in the track within the selected range will add one Warp Point at the start of the selected range, one Warp Point at the end of the range and a middle Warp Point at the mouse cursor position. This is shown at right with the Warp Points number 1, 2 and 3, where 2 was at the mouse cursor position.
The positions of any added Warp Points can be adjusted in time (moved left or right) without affecting or moving the audio if the ALT key is held down while the mouse cursor drags the Warp Point.
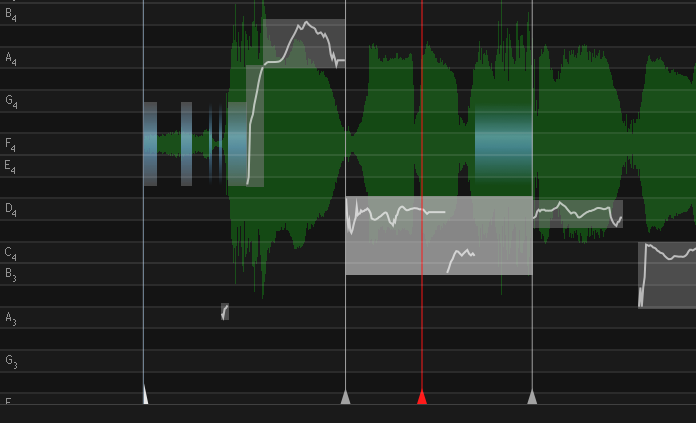 If the mouse cursor is used to drag the middle warp point (2) left - then Warp Points 1 and 3 act as anchors and the audio is compressed between 1 and 2 and stretched between 2 and 3 as shown right.
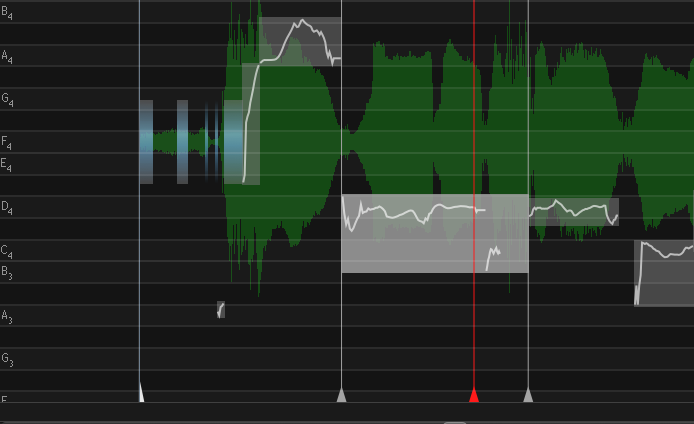 Similarly, if the mouse cursor is used to drag the middle warp point (2) right - Warp Points 1 and 3 act as anchors and the audio is compressed between 2 and 3 and stretched between 1 and 2 as shown right.
If the Mouse Cursor is initially placed outside the Selected Block range, then two of the three Warp Points will appear at the start and stop of the range and the third one at the position of the mouse cursor outside the range.
Add Warp Point
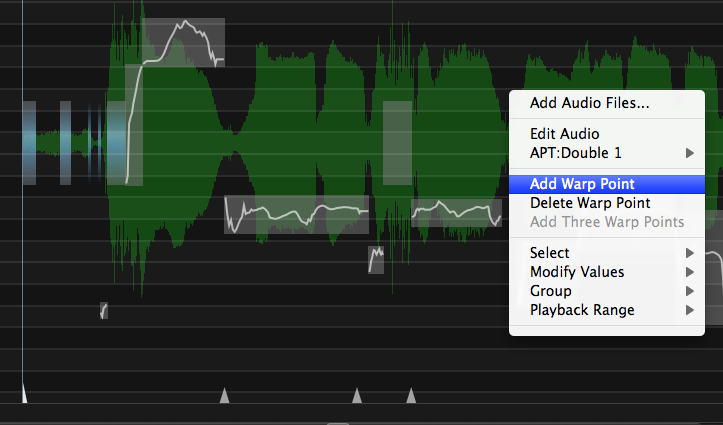
If the Add Warp Point item is selected, a Warp Point will be added at the time where the mouse pointer clicked in the Track to bring up the menu shown right.
Alternatively, use the Warp Point tool and shift click to add a warp point anywhere.
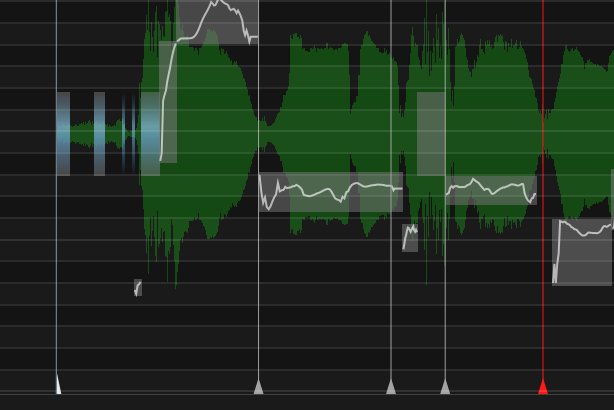 In this case, the mouse cursor was positioned to the right of the three Warp Points added previously, as shown in the image right by the red Warp Point.
Moving that Warp Point to the right would linearly stretch the audio between the Warp Point to its left and linearly compress the audio between the moving Warp Point and the end Warp Point of the region.
Other Menu-based Operations
In this section, we explain further commonly needed editing operation tools found in the context menus that appear when RIGHT CLICKing in the process Output track.
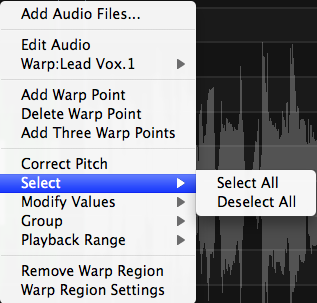 The Select Menu (shown right) has two sub-options.
- Select All - will select all editable blocks in the Output track to be adjusted
- Deselect All - will deselect the currently selected items from being adjusted together.
 The Modify Values Menu (shown right) has three sub-options.
- Reset Selected Values - Will restore all the values to their Original settings (before any editing).
This is very useful if editing is not working and the user wishes to start again or just remove all edits. - Interpolate Selected Values - change values into a straight line between the value at the start of the selection to the value at the end of the selection. Mainly used to achieve a special pitch transition effect.
- Smooth Selected Groups - modify the pitch display at the boundaries of pitch blocks to smooth out any visual discontinuities between blocks of pitch that might appear when blocks are moved up and down. This can sometimes help modified signals sound better.
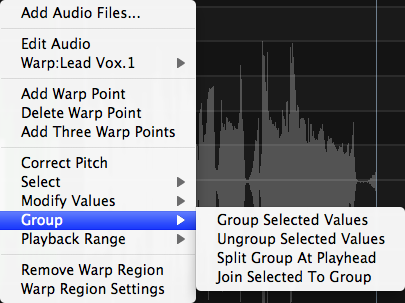 The Group Menu (shown right) has four sub-options for making "permanent" modifications to values.
- Group Selected Values - will merge all individual values and pitch (or other) note block values into a single block of values.
- Ungroup Selected Values - This will separate all selected blocks and value measurements into single point values that can be individually modified.
- Split Group at Playhead - will separate a block or range of selected values into two blocks of values at the position of the Playhead.
This can be useful for dividing one note into separate notes for more detailed adjustment. - Join Selected to Group - will merge all selected blocks into one block for manipulation.
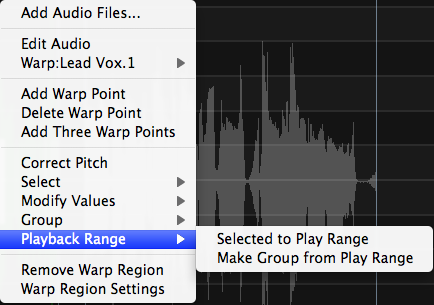 The Playback Range Menu (shown right) has 2 sub-options for using the Playback Range in specifying an action.
- Selected to Play Range - Will create a Playback Range set to the length of the selected items.
This is useful for quickly setting up a looped audition range while adjusting values and listening to changes with each adjustment. - Make Group from Play Range - will create a single group from all blocks in the time range specified by a Playback Range.
Dividing, Ungrouping and Grouping measurements in Blocks
Although most editing will be based on moving the automatically-created grouped blocks of measurements, these blocks can also be combined or split using commands in the menu shown below which appears when RIGHT CLICKing in the output track Pitch display.

If the Playhead is placed at the point of required split, then RIGHT CLICKing the track and selecting Split Group at Playhead from the pop-up menu will divide the pitch block at the Playhead into two blocks.
In addition, the command Ungroup Selected Values can be used to revert to the individual measurements in order to adjust them individually. Or individual ungrouped measurements can be "Regrouped" in one of two ways:
- Select one pitch value with the mouse cursor, holding SHIFT key down, moving the cursor going to last measurement to put in new group, RIGHT CLICK and select Group Selected Values.
- Create a Playback range (yellow bar at the top) that is the length of the signal section where you want to group the pitch measurements together. Then RIGHT CLICK in the output track and select Playback Range and then Make Group from Play Range.
In the rest of this section, we will only discuss modifying Blocks of grouped measurements.
Copying Groups of Pitch Values
An interesting feature of Revoice Pro is that Groups or values of pitch can be copied [using CMD C (Mac) / Ctrl C (Windows)] for example from one Pitch Block to another Pitch Block [using CMD V (Mac) / Ctrl V (Windows)].
The copied values will be distributed linearly in the destination group if there is a difference in duration of the source and destination.
Back to Index
Extending the Pitch Detection Range
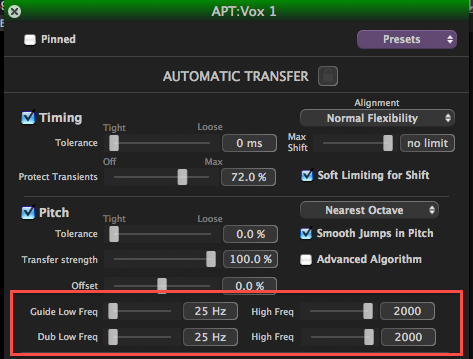 A new feature added in Revoice Pro 2.5 is the ability to raise or lower the pitch detection range of both the lowest and highest pitches being processed in the APT and manual pitch editing functions.
This can make it possible to manually adjust or process the pitch of notes of voices and very low-pitched instruments (such as Bass guitars) or very high-pitched instruments such as flutes with extremely high quality.
As shown inside the red highlight in the image above, for both the Guide and Dub signals, the lowest frequency the pitch detectors can be set to is 25 Hz and the highest frequency is 2000 Hz. Normally, only the low or high limits would be adjusted for a particular signal's range. For the manual pitch adjusting "trick", set both the Guide and Dub to the same limits.
If the user wishes to visually set the low or high frequency limits, a graphical approach is described here.
NOTE: Extending the pitch processing range from the defaults of 60Hz to 850Hz does increase the processing time as well as (in some cases) the chance for pitch measurement errors.
Back to Index
APT Process Considerations
Editing Level Manually in APT
Level measurements and Blocks of Level measurements can also be manually edited in APT processes, although the new Level editing features of v3.3 only apply to the Warp process at present, although the new dB grid will display.
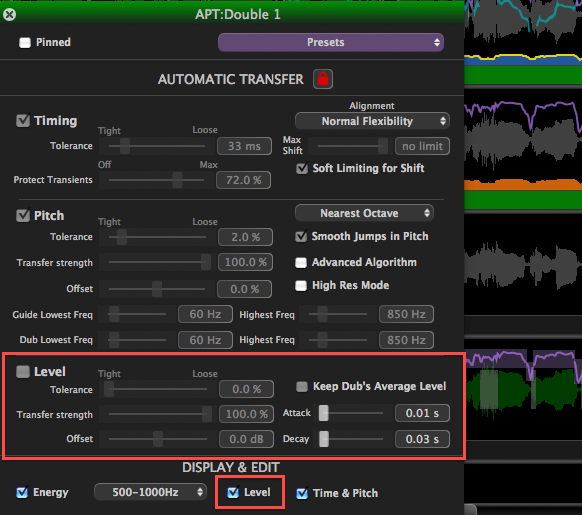 To set this up:
- In the APT Control Panel, in the Display & Edit section at the bottom, Level must be selected ON.
- In the Automatic Transfer section, Level can also be selected if you want level measurements to be transferred from the Guide to the Dub's output automatically. You don't need to do this and it is off in the APT function for this example. But it still can be edited manually.
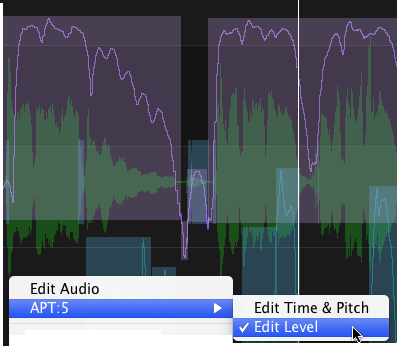
- RIGHT CLICK in the APT Output track to bring up the menu shown below, and use the mouse to LEFT CLICK the option Edit Level.
- Once this is done, the Level Measurements will be initially automatically put in groups in Blocks, and the contours displayed as shown by the upper Level Trace in the image below. These Blocks can be edited in much the same way as Pitch blocks, mainly by manipulating the upper and lower edges of the Blocks.
Also, groups of Level values can be copied and pasted from one block to another.
Adding manual Time and Pitch adjustments after APT processing
An APT is an automatic process that changes time and pitch of the Dub based on the Guide's features and your settings.
Changing the timing and pitch of the APT's process manually is allowed. However,
- A warning will be given when you start manual adjustments.
- The Automatic Transfer function will Lock (as shown by Red padlocks in the APT Control Panel and APT Process Control Bar) - to prevent changes to the Guide or Dub causing an automatic recalculation and all the manual edits to be lost.
If you want to prevent the APT's automatic editing from running automatically and removing any manual changes you make, it is recommended that you leave the APT "AUTOMATIC TRANSFER" lock to ON (red) as shown right.

